For the first time this year, I made a vision board. If you’re not familiar with the concept, let me explain. A vision board captures the things you want and desire for the upcoming year. They can be serious, silly, fun or anything at all so long as they’re important to you. Making them is fun too! You cut pictures and words from magazines and paste them on your chosen background. You then place the completed vision board somewhere that you can see it daily.
Doing this helps you stay focused on your needs and wants and helps propel your forward.
They Really Work
Here’s a quick story from a friend who put a silly item on her vision board. She loves country music, particularly Keith Urban. While she’s had many cool Urban experiences, including a chance to meet him, she didn’t have his signature. So, one year she decided to put something with his signature on her vision board in hopes that somehow she’d get it in the coming year. She found a picture of a black guitar with his signature online and printed it out.
Later that year, she went to see Keith Urban in concert. As she was entering the venue, she sang for a stranger to enter a contest and win his signature. As a shy person, she’d normally not sing in public. Of the 30,000 people in attendance, my friend won! And it turns out, she won the very guitar she’d put on her vision board – and it was signed to her!
Making a Sewing Vision Board
Since it seems vision boards do help manifest goals, even silly ones, I thought it might be fun to make a vision board for sewing goals, wants and needs. Whether it’s a fancy new sewing machine, a certain fabric, completing a particular project or moving your love of sewing from a hobby into a career a vision board may help you get there.
To start, think of all the things you desire with your sewing. Grab your latest sewing related magazines or go buy some and a pair of paper scissors. Find words or pictures that connect with your desires. Even if you’re not sure of the connection, but simply like the way the picture makes you feel, cut that out too. It could be connecting to a subconscious desire.
When you’ve got loads of clippings, have fun dry placing them on your vision board. When you like the layout, glue everything down. Feel free to add to it throughout the year if you come across other items as you peruse new issues of your sewing magazines. Place the completed vision board somewhere you can see it daily. You don’t need to study it in depth, just glance at it and let your subconscious do the rest.
At the end of the year, take a look at your vision board. How many of the items of on it have become reality?
While it is true you often need to acquire specific tools to take your sewing to the next level, there are also items you will find around your house that easily make sewing and quilting a breeze. Each of the following items were truly an “ah-ha!” moment when I discovered them. I hope they help you too.
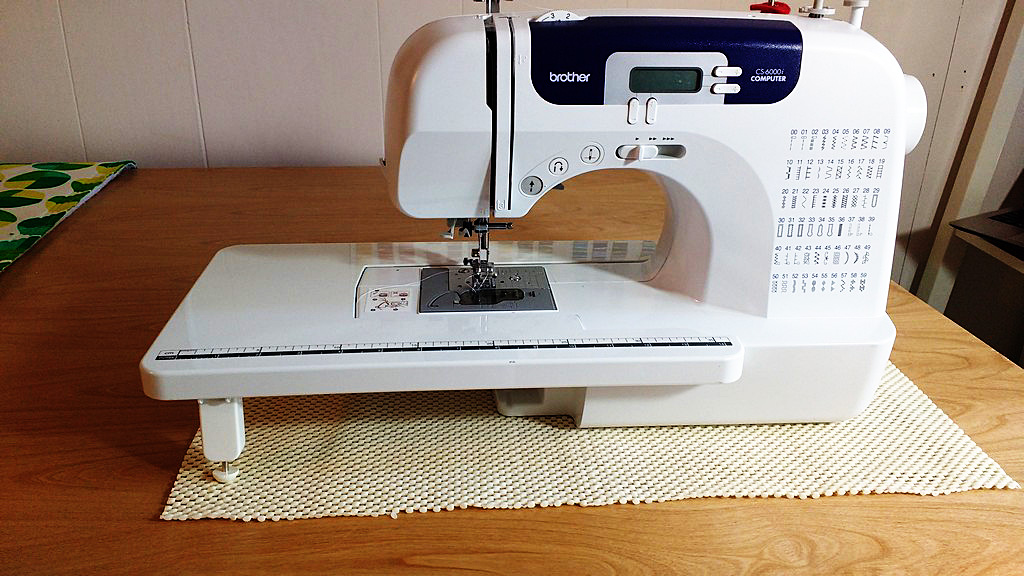
Shelf Lining
I used to have the infuriating problem of my machine slipping as I tried to quilt. Short of cutting a hole in my desktop to fit the machine level with the table, I wasn’t sure what to do to remedy the problem, until I saw shelf lining used under a sewing machine. Genius!!! Now I put a piece underneath where I work and my machine stays put every time.
Now I put a piece underneath where I work and my machine stays put every time.
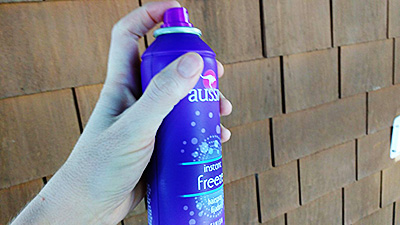
Hairspray
I’m far-sighted, which means threading a needle can be difficult. It gets worse the longer I’ve been sewing, if I’m really tired, or the lighting is poor. Hairspray fixes that. Spray a little bit onto the end of the thread and it will glide through the smallest needle hole like magic.
Spray a little hairspray onto the end of the thread and it will glide through the smallest needle hole like magic.
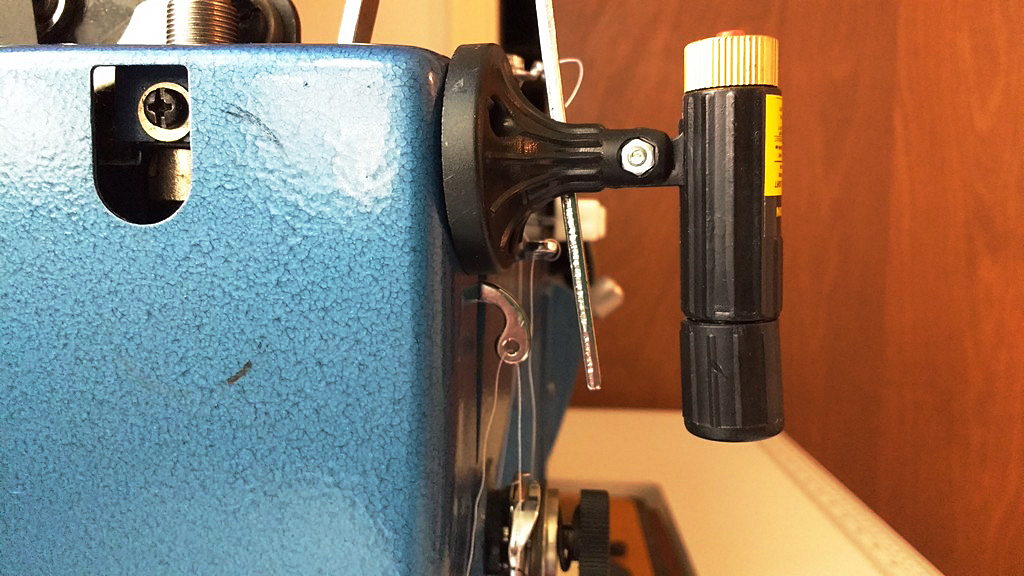
A Laser Marker
This little tool is currently all the rage in quilting circles. I bought mine at Harbor Freight. It has multiple ways it can attach to your machine, including magnets, sticky back, and screws.
The laser marker is currently all the rage in quilting circles.
Just look how far it extends the straight line you need to sew. Plus it makes you feel like a high-tech ninja when you use it.
Just look how far it extends the straight line you need to sew.
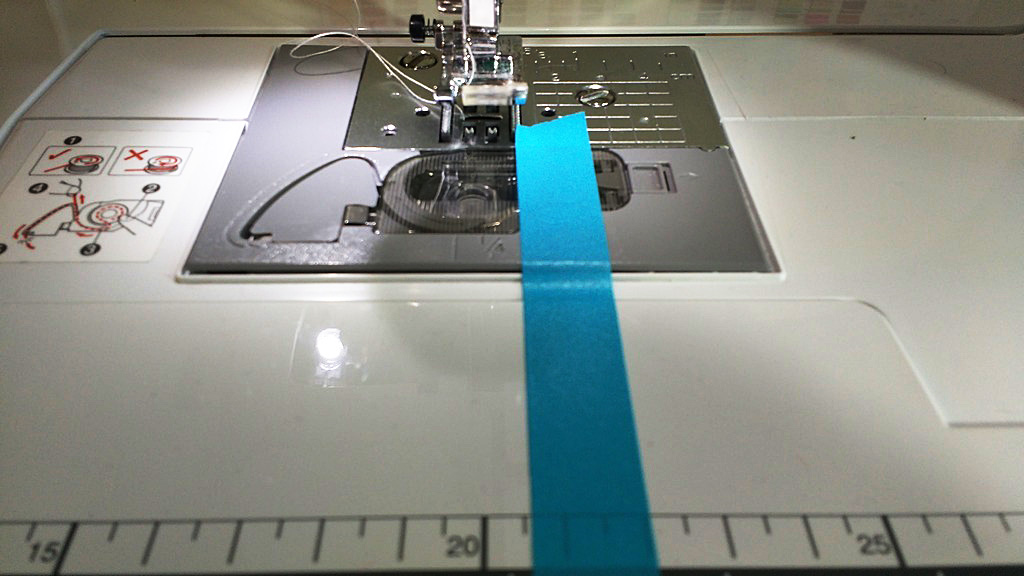
Don’t want to get a laser to extend that line? You can also use washi tape or painter’s tape to do the same.
You can also use washi tape or painter’s tape to do the same.
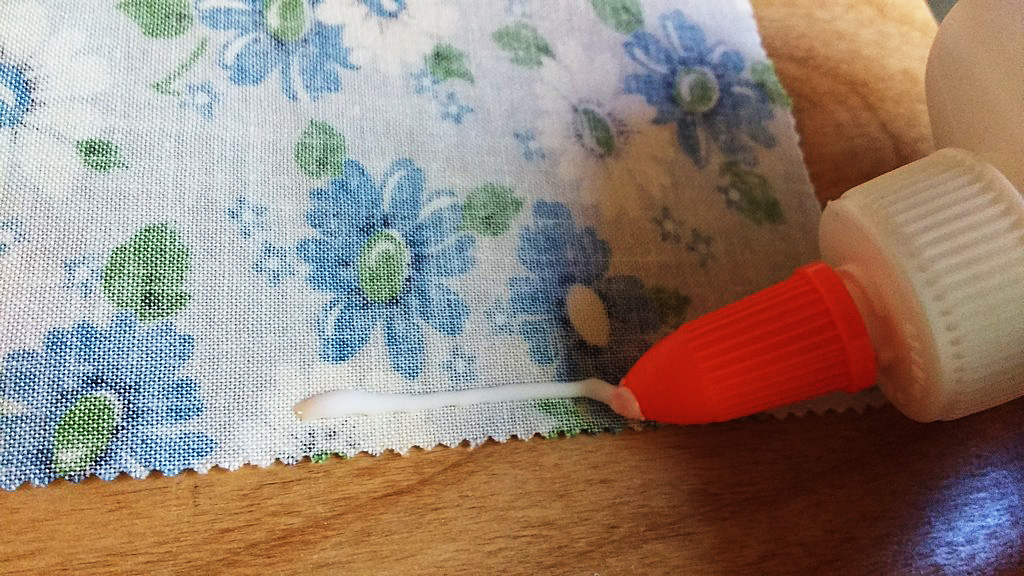
Elmer’s Glue (the washable kind)
It’s time to raid your stash of school supplies and bring the Elmer’s Glue over to the big kids’ table. Like the Laser Marker, quilters are currently gaga for glue. The genius of washable Elmer’s is that you can apply a tiny amount, heat set it with an iron, and it holds beautifully. You can sew through the heat set glue without a problem and when your project is complete, it washes out without leaving any marks or stains. If you ever wonder how people achieve perfect corners, they are probably using Elmer’s Washable Glue.
If you ever wonder how people achieve perfect corners, they are probably using Elmer’s Washable Glue.
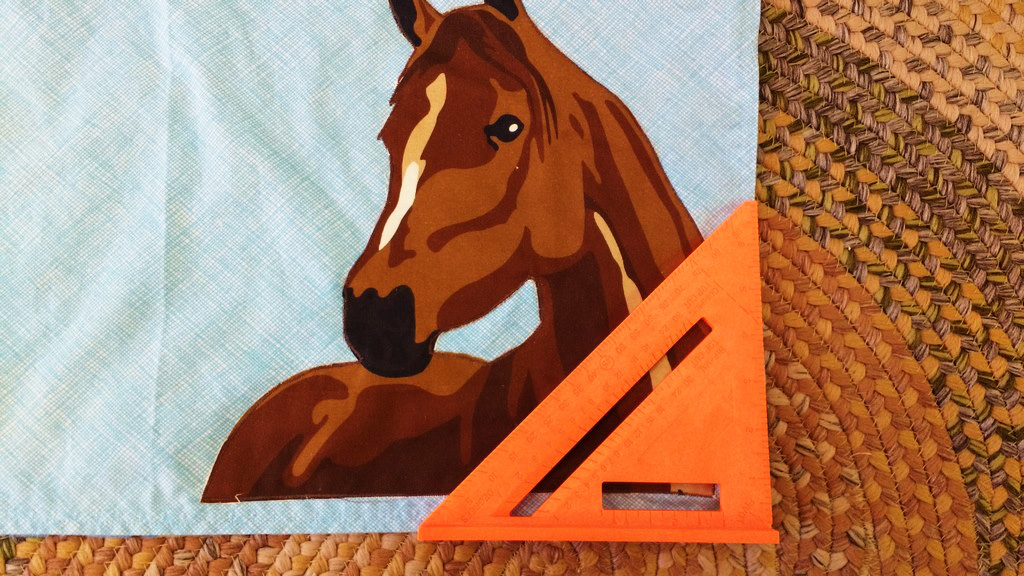
A Square
My whole life I’ve called the carpenter’s tool called a Square, an L, because that is what it looks like. These giant L-shaped tools make squaring your quilts or larger projects very easy. Pictured is a smaller, triangle version, which I use for corners that need to be evenly squared.
A smaller, triangle version, which I use for corners that need to be evenly squared.
What other common household items do you use as part of your sewing and quilting took kit? I’d love to hear in the comments!
—————————–
Charlotte Kaufman is a writer and sewist in Mammoth Lakes, California. She specializes in digital patterns, marine and home interiors, and continues to fall more and more in love with quilting. You can follow her at charlottekaufman.com.
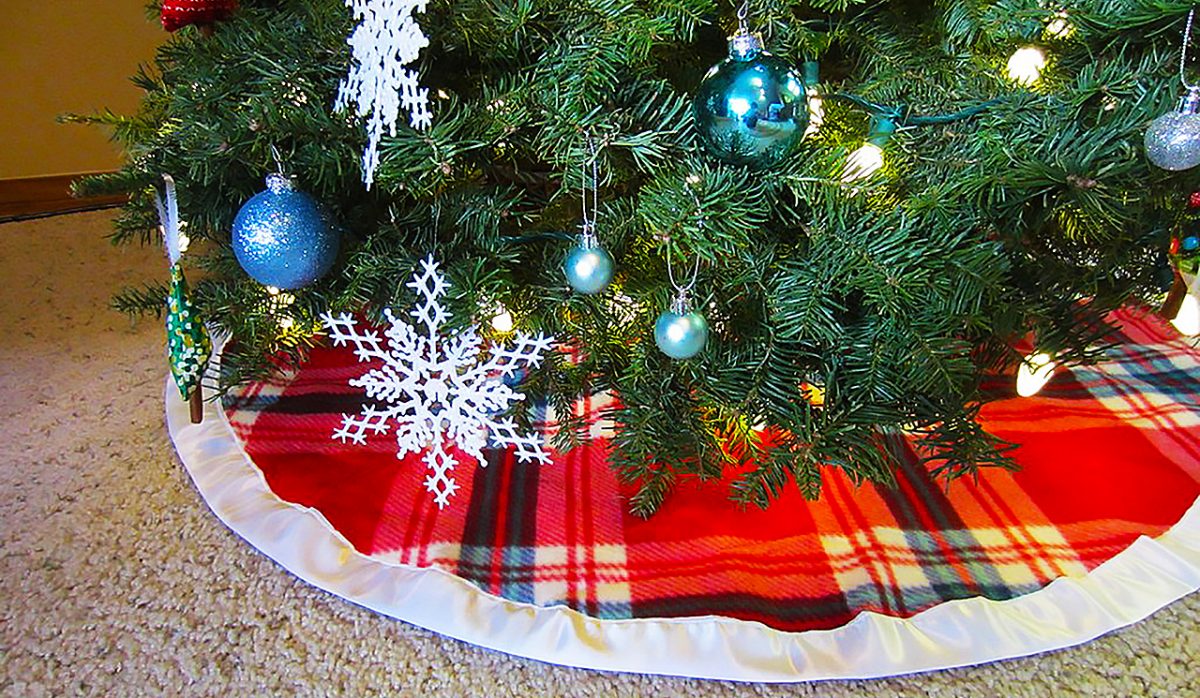
I’ve always adored the classic look of plaids during the holidays. And plaid combined with satin is just lovely. We recently moved to a new house and I’ve been doing Christmas on a budget this year. I knew I wanted a plaid Christmas tree skirt but also knew I needed to be frugal. Here’s how I accomplished both.
Fabric first!
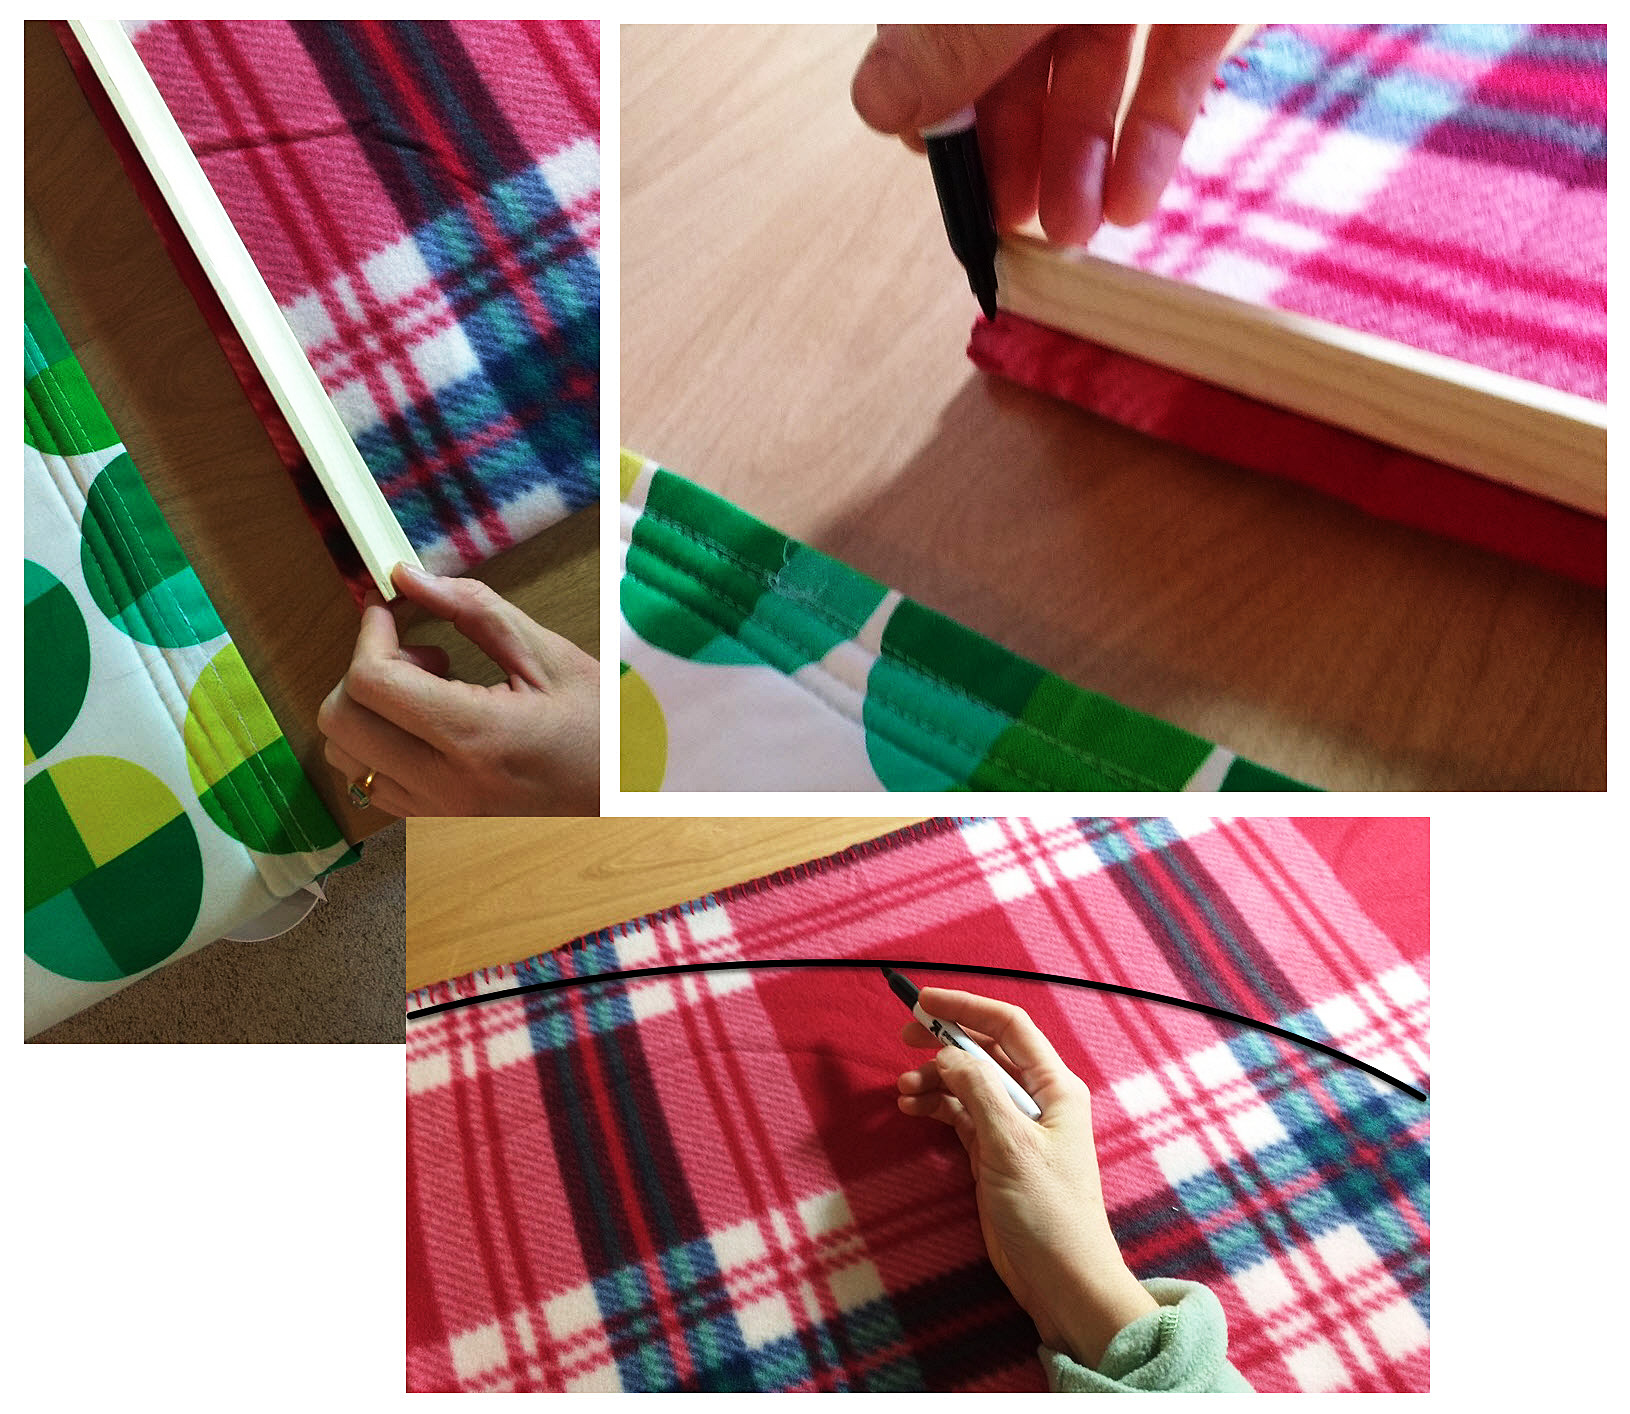
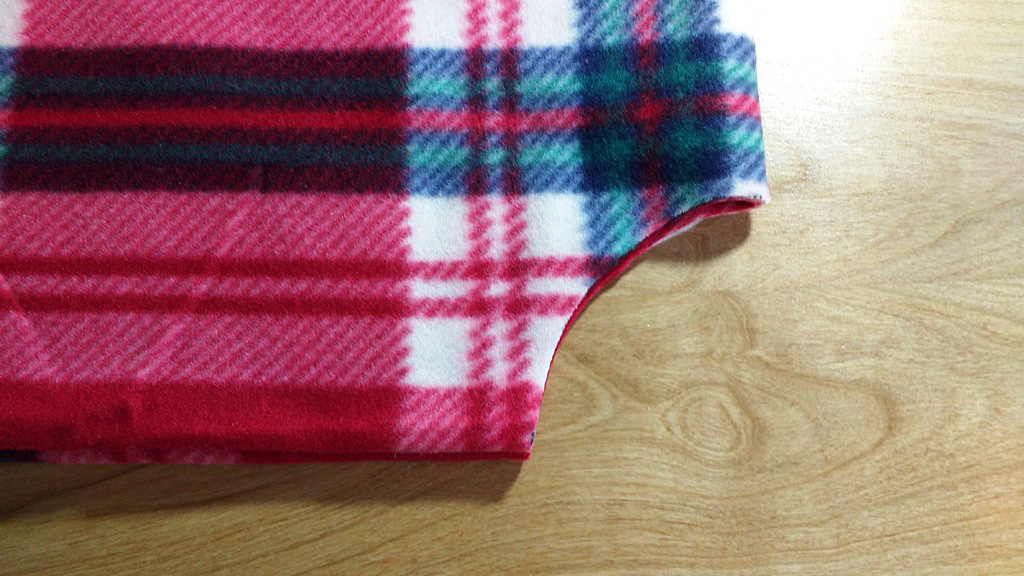
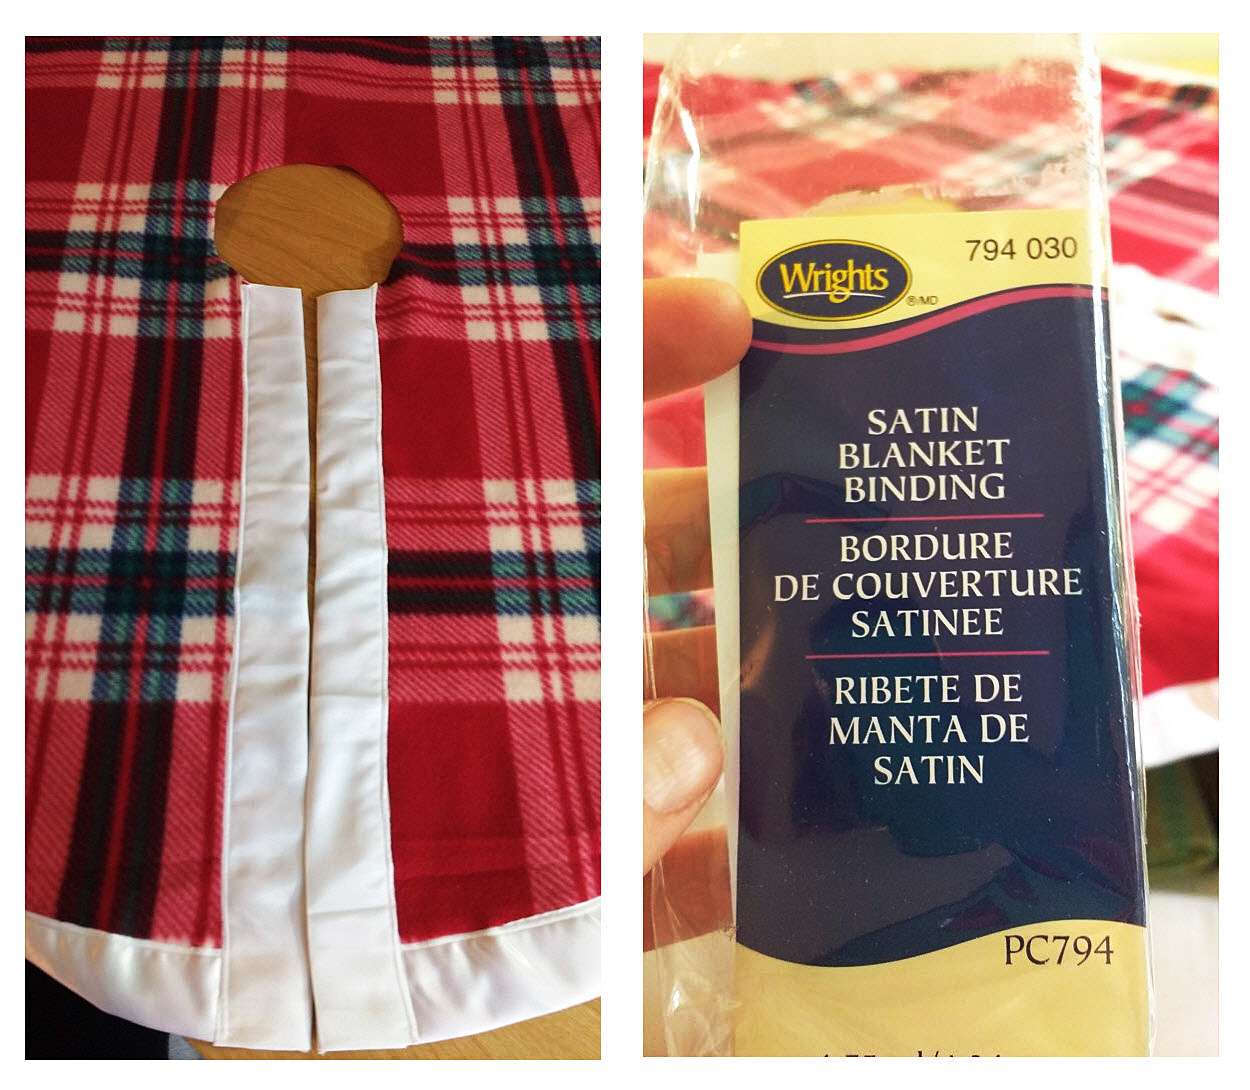
I picked up this plaid fleece throw blanket at K-Mart for $1.99. To create a perfect circle, I folded the blanket into quarters and then measured the shorter height of the rectangle it formed. On this blanket, that was 28″. I, randomly, had a stick that measured exactly 28″. You could do this with a long ruler, or just measure out the length you need on any stick or piece of wood and do the same.
Once you’ve marked the length on both sides of the rectangle, hold the stick at the corner of the folded blanket, and then draw an arc from point to point, moving only the top of the stick.
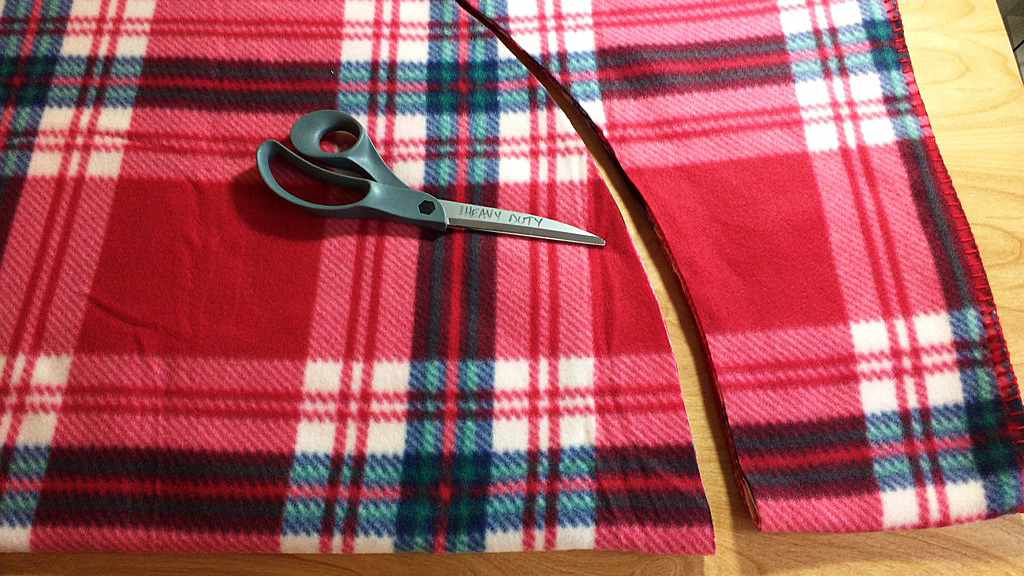
Making the cut
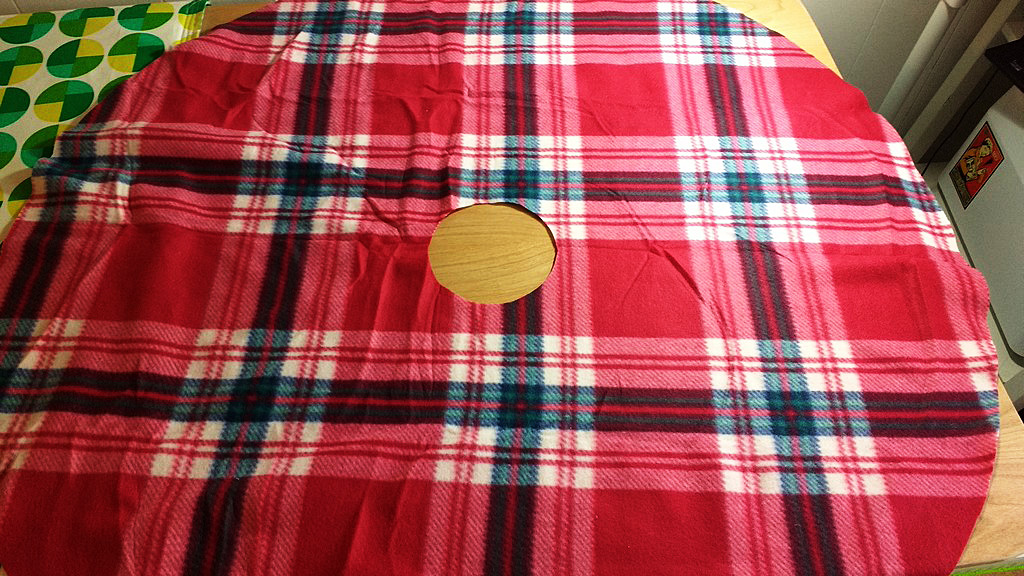
Now cut out that lovely quarter circle. Before you unfold the blanket, cut out the interior circle (the part that will wrap around the trunk of the tree.) To do this, determine your desired circumference, which will allow you to find the diameter, and thus the radius. If you need the formulas, they are: d = C/π and r = D/2
Once you know your radius, do the same thing you did to mark out the larger arc but this time at the corner where the blanket is folded into quarters.
Wash away those wrinkles
At this point I unfolded everything but the fleece was far too wrinkly. One of the great things about fleece is that it doesn’t fray, so I took the opportunity to wash a few of my daughters’ blankets and threw them, and this tree skirt, into the wash on the cold, delicate cycle. I added white vinegar as fabric softener, and then dried on low. It significantly reduced the wrinkles of the fleece.
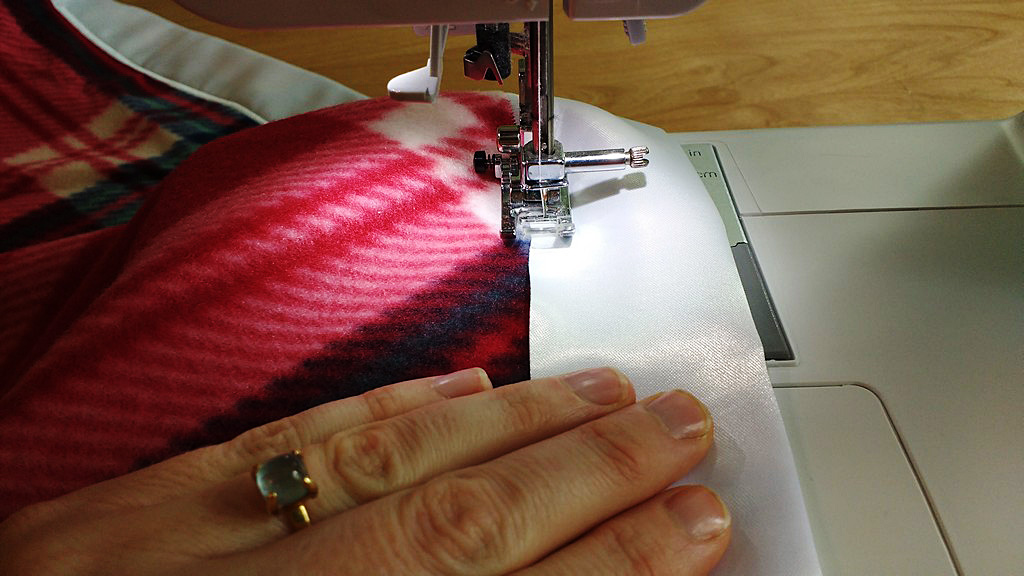
Binding it all together
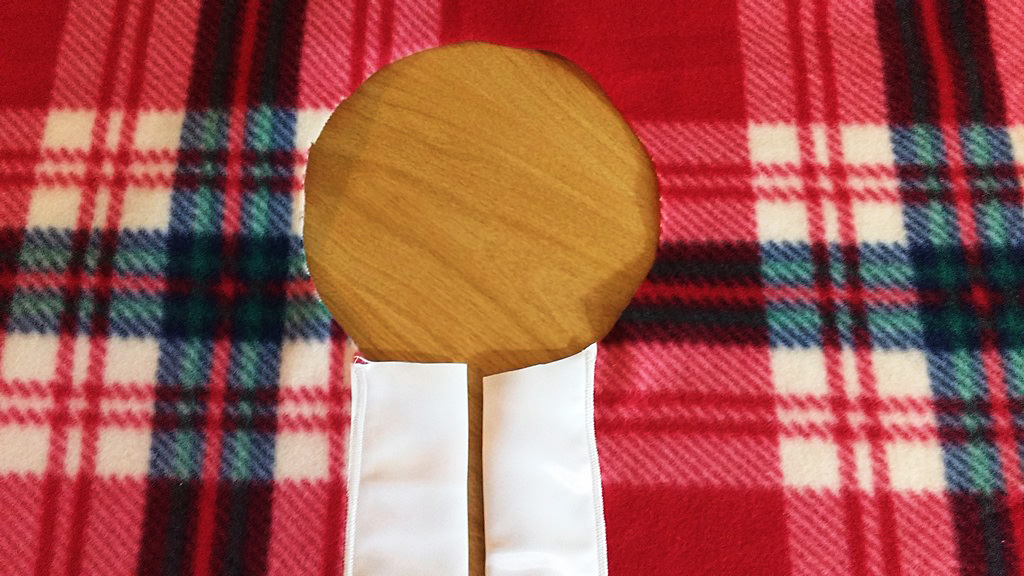
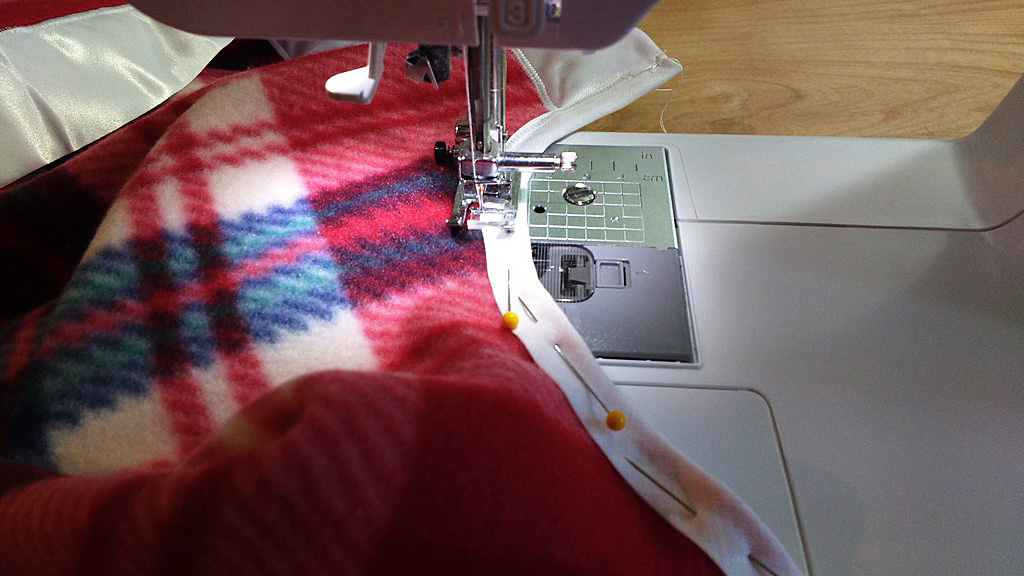
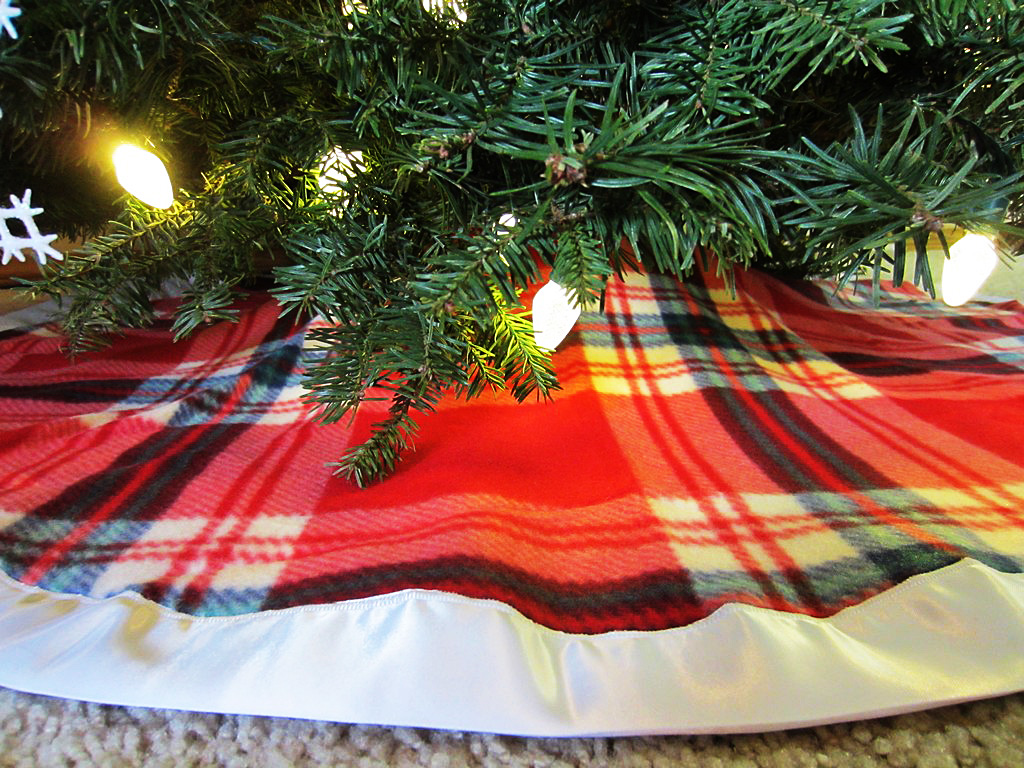
For a tree skirt that is 56″ wide like mine, you will need two packages of satin binding. I used a satin applique stitch and worked my way around the skirt. Pre-packaged satin blanket binding is NOT cut on the bias, so you will need to pay careful attention as you go around the curve of the skirt.
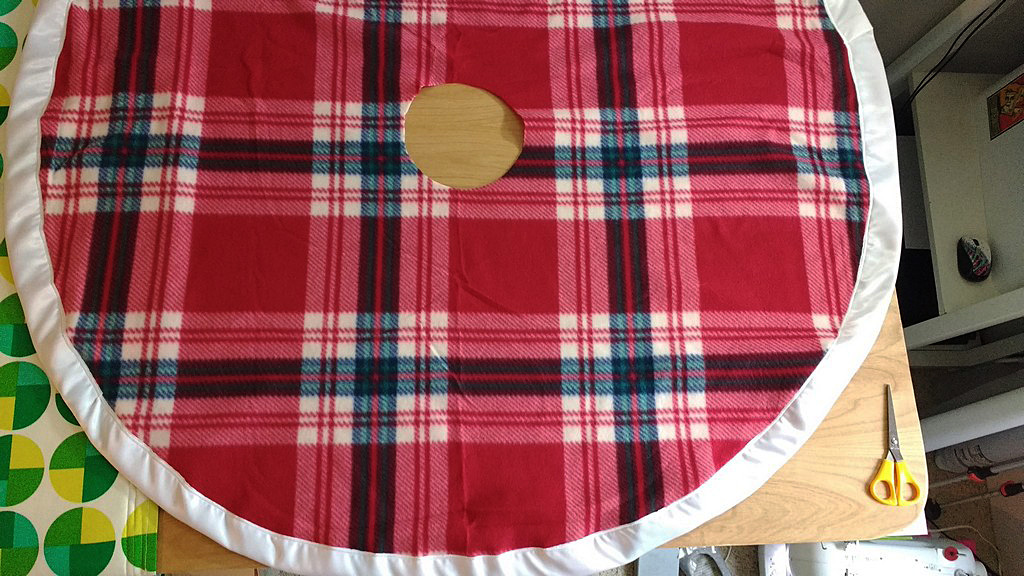
Some skirt tutorials will tell you to cut a line up to the interior circle before you add binding; I like to cut my line afterwards.
Looking at the fabric, I followed the lines of the plaid to cut a straight line from the outside of the skirt to the inside and then used more of the satin binding to trim each edge.
Welcome to the inner circle
When it comes time to bind the interior circle, do yourself a huge favor and switch to binding that is cut on the bias. When fabric is cut on the bias it is much easier to curve it, which makes binding circles, especially interior circles tremendously easier.
Here I switched to prepackaged white bias binding and though pinning is not my favorite, thing, for this project I pinned everything carefully in place.
Pro tip: think ahead before you pin and place your pins in the direction that you sew. This will it easier to pull them out as you go around the circle.
Tie it off
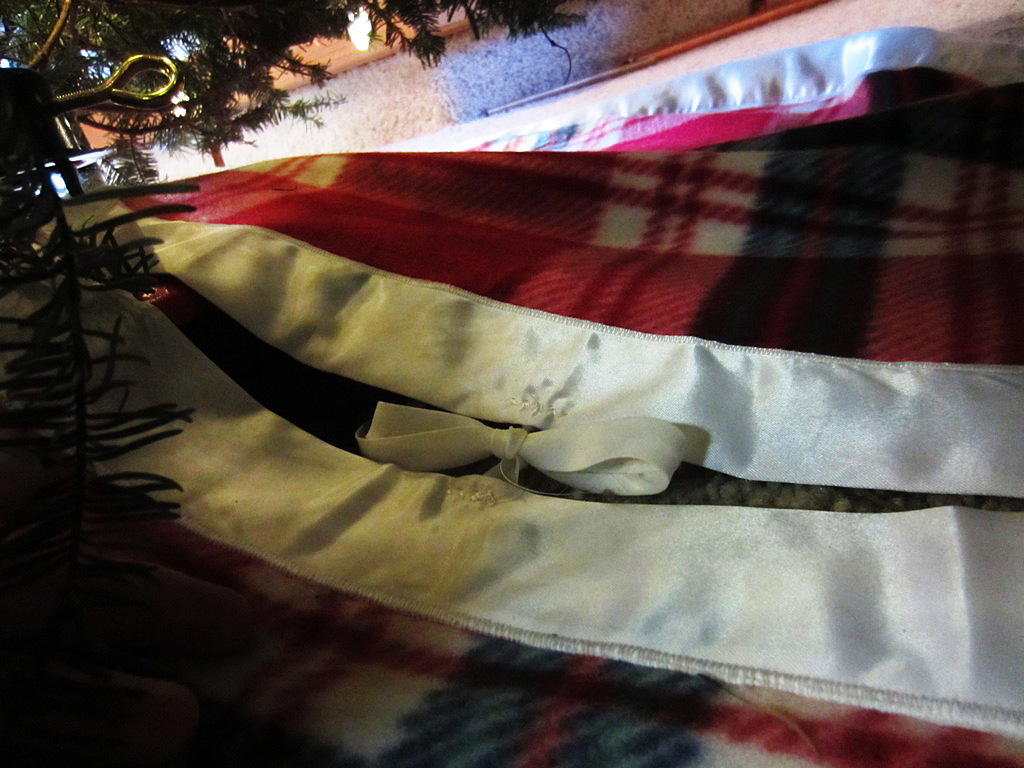
Lastly, don’t forget the ties! I used four pieces of the binding tape that I used on the interior circle to create ties, two at the top of the circle, and two 12 inches down the cut edges.
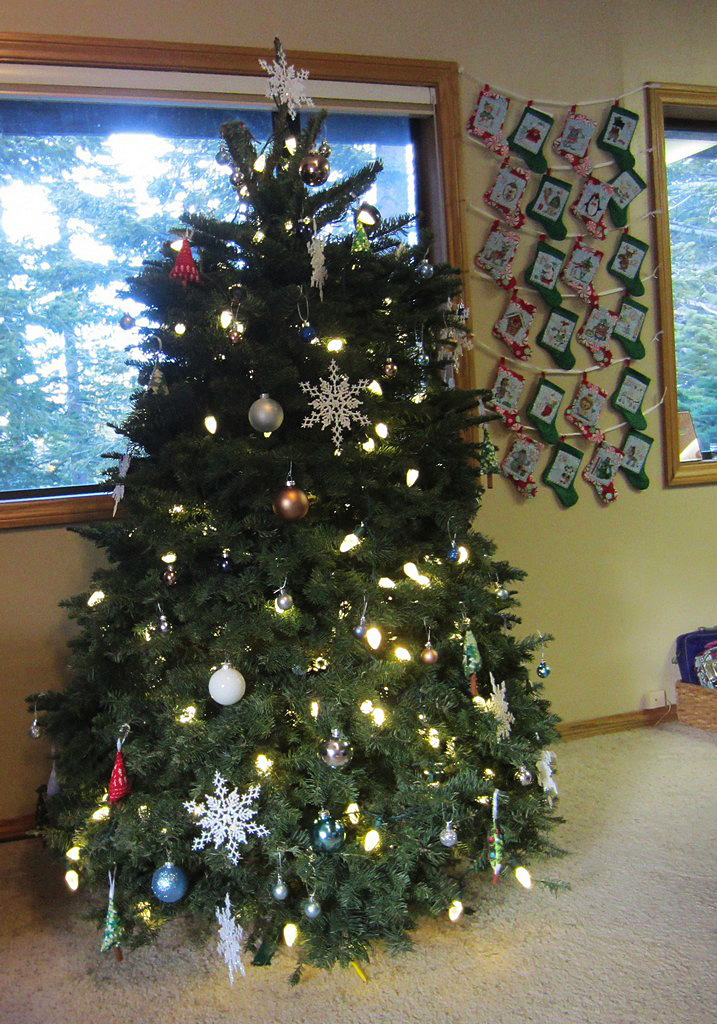
Here is my tree before the plaid tree skirt.
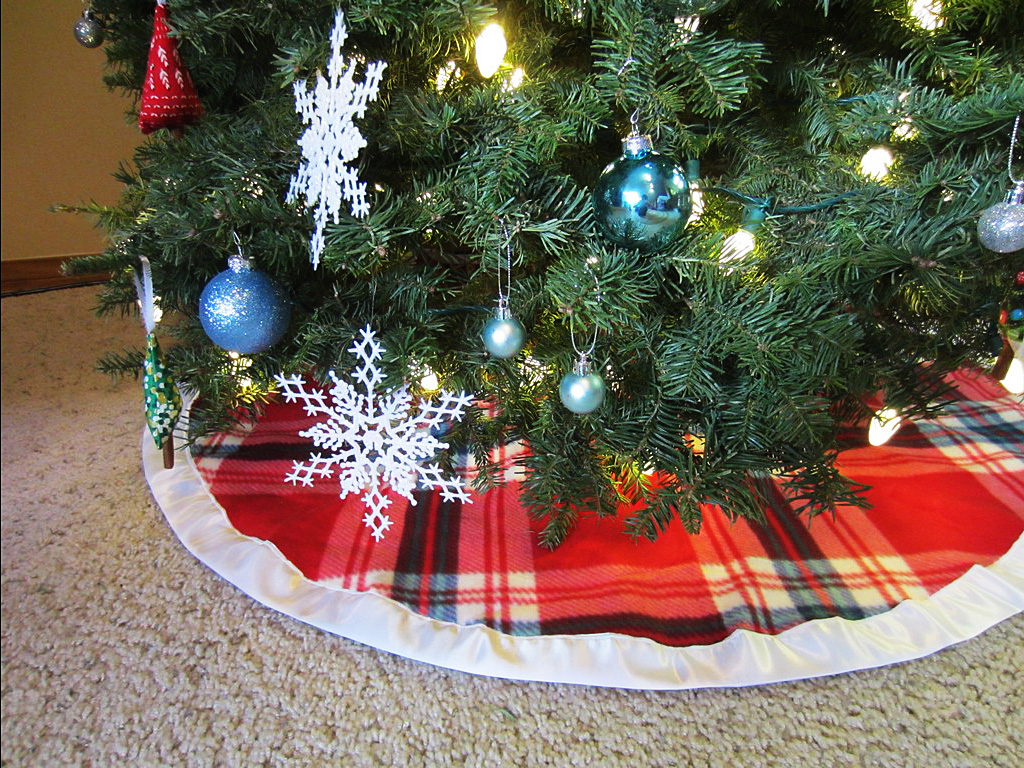
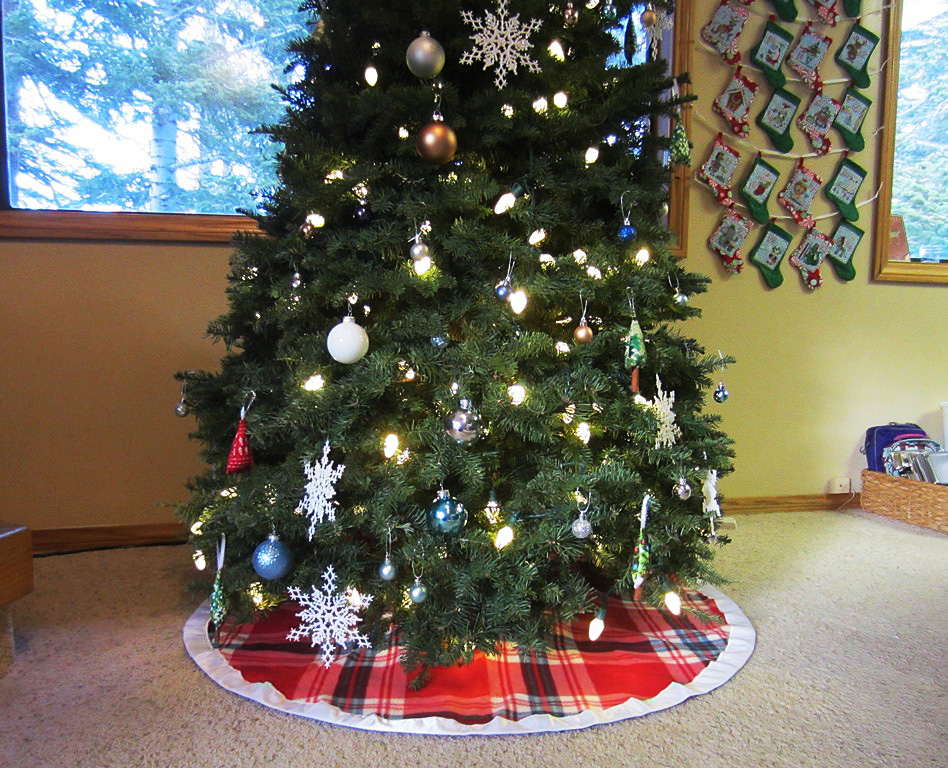
And voilà, the finished product!
The combo of fleece, plaid, and satin just warms my heart.
What are you DIYing this holiday season? Let us know and happy sewing!
—————————– Charlotte Kaufman is a writer and sewist in Mammoth Lakes, California. She specializes in marine and home interiors and continues to fall more and more in love with quilting. You can follow her at charlottekaufman.com.
One of the best pieces of advice my mom ever gave me in regard to baking was to buy a box of white cake mix and blend in whatever flavor of cake I wanted to make. It’s proven effective for banana cake and coconut cake, and I’m interested in trying an orange cake later on down the road. The problem with the strategy though is that I never really learned the more elaborate way to make those cakes, if you consider it a problem. I mean, the cakes taste fine, so what does it matter if Pillsbury was involved?
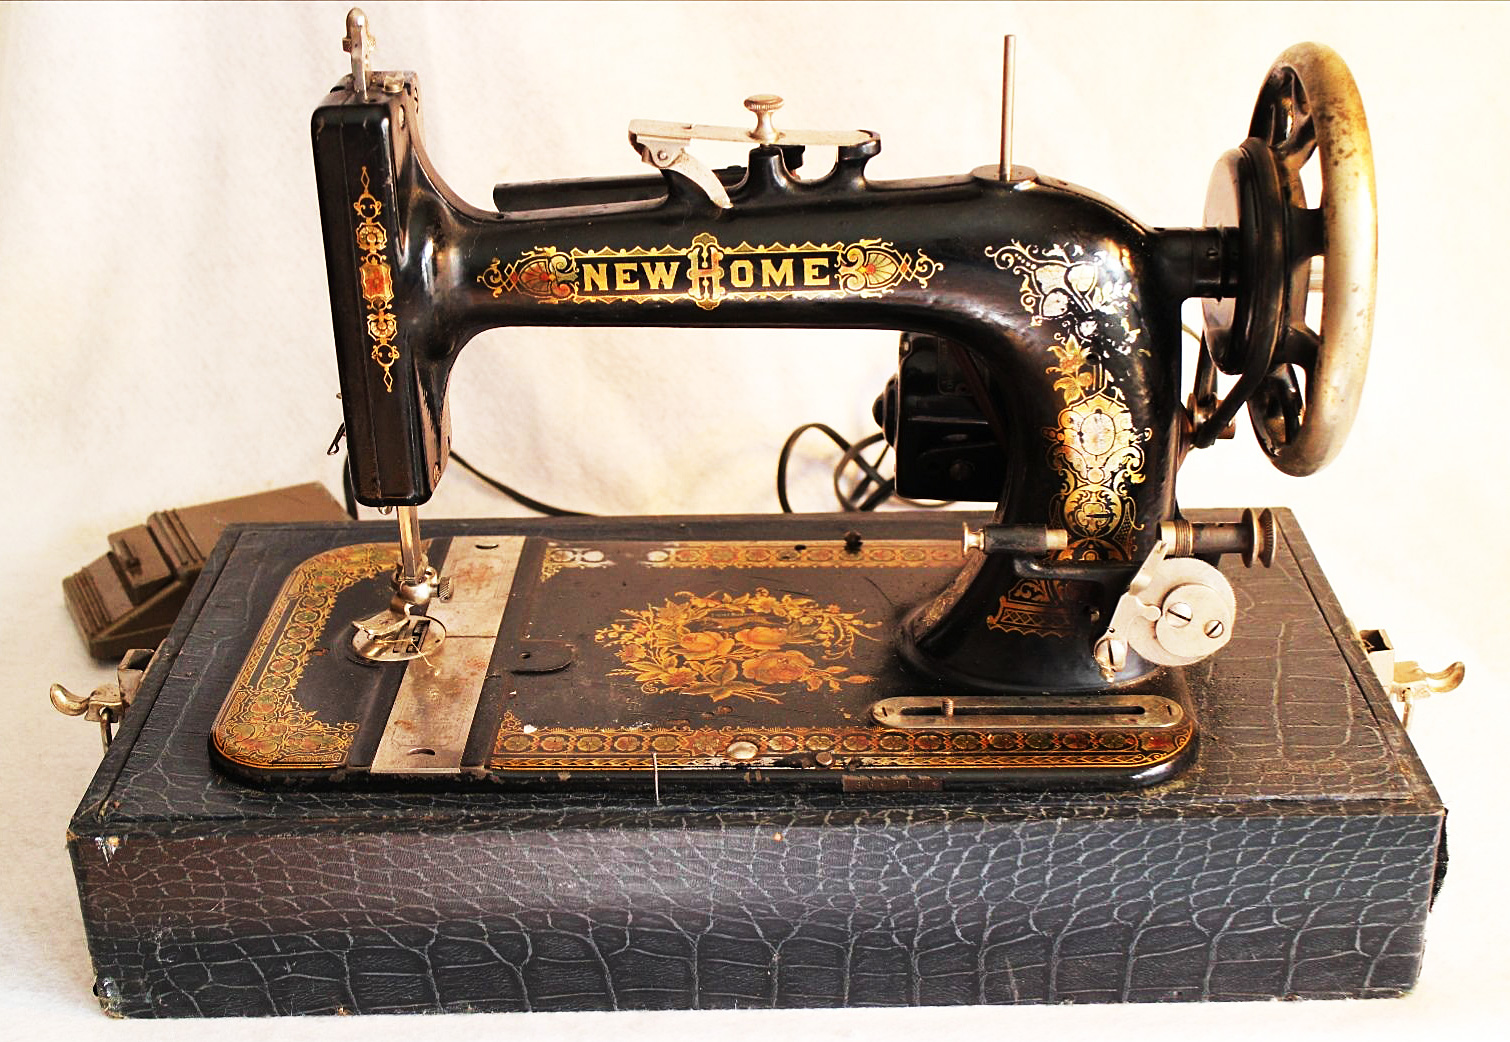
I find myself having a similar conundrum now that it’s potentially approaching the right time for me to buy a new sewing machine. Which, by the way, isn’t the easiest step for me. I’m a creature of habit and comfort, guys — to the point where making myself watch a new movie might be a challenge. So buying a new sewing machine? Not necessarily an experience I excitedly dive into!
It also doesn’t help matters that I can be a cheap frugal person, so my #1 criterion in the past might have been, “Which one is cheapest???” Well, now that I have different goals in mind for the sewing machine other than just a hobby, I’m thinking I might want to expand my ideas a bit to make a more complex decision. That decision though has led me into the Pillsbury version of a sewing problem — should I learn more from scratch, or rely on modern conveniences?+
Let me explain that reasoning!
The truth of the matter is that I’m nowhere near a sewing expert, and there are details about the process and machinery that still leave me metaphorically scratching my head. I’ve come some distance in the things that I did learn and have practiced with, but there’s still so much left to find out and excel at. One of those things — something that I haven’t quite gotten the hang of yet — is tension, which can be SUCH A BIG DEAL with sewing by machine. As one source said, “[n]o matter what stitch you are sewing, it will look terrible if the tension if off” (Lawson, 2011, “Tension” section).
That’s a hefty amount of pressure to put on any one specific aspect of a sewing machine. Basically, I could do everything else perfectly and still have a horrible final product because I missed the mark on the tension detail. I kid you not when I say that my experience and understanding of tension might be laughable to a number of more advanced sewing enthusiasts, so logically, finding a machine that can make that detail easier would be a good idea for me, like one that automatically adjusts the tension.
Or would it?
That question moves into the Pillsbury section of territory for the sewing concept. Should I get a machine that will automatically adjust it for me, like Pillsbury assists me with cakes? Is that the best strategy in the long-run?
The lazy part of my brain screams, “YES!” and can back up that idea with coconut and banana memories of simple, scrumptious treats. But the other part of my mind — the one that realizes technology has definitely eased up sewing (and baking) to the point that my grandmother would probably be disappointed — says, “Uh, no.”
Can you picture someone casually sewing on one of these now?
Honestly, when I think about the history of sewing and how few tools used to be available for the process, it’s potentially hard not to be a tad bit ashamed if I lean too much on technology to do the work for me. Even after sewing machines became a thing, there were still real differences to what we now have.
The struggle is real
It’s just like the notion that my Pillsbury-based cakes lack a certain impressive quality in comparison to a tasty baked-from-scratch cake. Sure, they’re good, but they aren’t that level of remarkable.
It’s a struggle between wanting an easy route and wanting a more challenging route, and at this point, I’m not 100% sure which way the decision will go. I could buy a machine that does the tension for me, and I could end up with wonderful projects without ever fully getting a handle on how to do tension for different crafts. Or I could make things harder on me for the moment, then come away from the experience as a more advanced quilter/sewing enthusiast.
Should I Pillsbury-cheat, or go the distance? Decisions, decisions, guys!
What do you think? It is worth it to learn how to do these things by hand and my own skills, with limited technology, so I can have a better grasp on the issue? Or do you think it doesn’t matter so long as the end products are good?
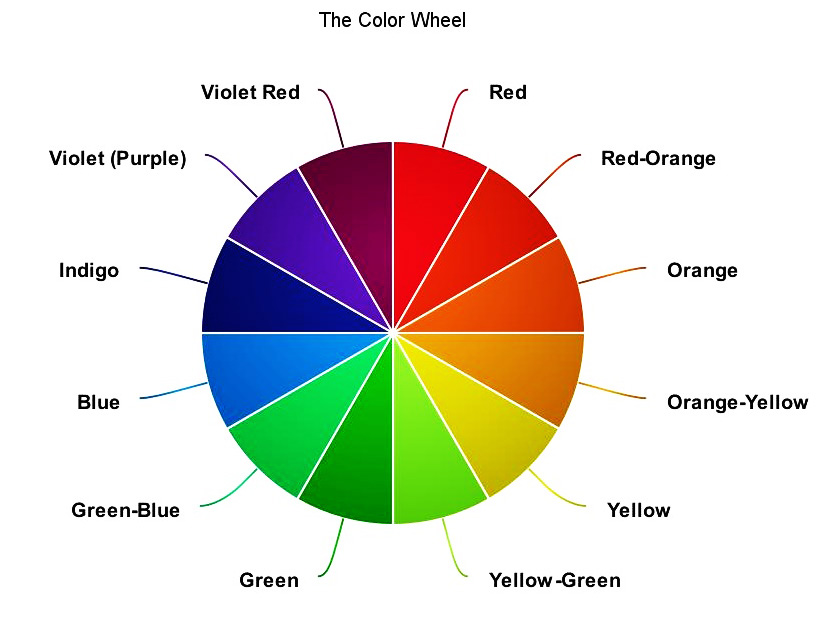
Color theory and scheme play an essential part in any design, and color choices are most important in planning any quilt. Choosing a color scheme that works for your quilt prevents muddy color or boring results from your hours of work. You want quilts that both stand out and fit in, and the key to this is using color theory to your advantage. Using colors that work together as a quilting team in your design can enable you to do any or all of the following:
Achieve harmonious results using a wide array of many fabrics
Make some colors pop and others recede, to emphasize or unify block patterns
Design quilts to complement interiors without any clash, and without being boring
Have backgrounds that work well, rather than as competition to spoil design effects
Balance any design and make all your quilts sing
Add extra Oomph and Wow Factor, for perfect success
Different color choices…
Enable different results.
You can do all this with ease when you understand color theory and recognize the logical choices available. We don’t have to reinvent the wheel, and so we can choose from a preselected menu of color scheme styles, or teams, that we know will always work wonderfully together.
Color theory and schemes
What are some of these tried-and-true color teams? Let’s look at them all:
Monochromatic
A monochromatic color scheme uses only one color, choosing from all shades and tones of that color. How many greens are in the garden, and all of nature? It feels like shades of blue are unlimited when you think of the many colors for sky and sea. The brown palette includes all colors of dirt and soil layers, skin tones, fur shades, tree barks, and more. You could use hundreds of different fabrics in one quilt and stick to one color. Or limit yourself to less, if you like, but know that a monochromatic quilt is a viable option in any color. You can also use a monochromatic palette as an element of your quilt, rather than the whole thing. This trick will enable you to paint with your fabric and achieve dramatic landscapes or picturesque quilts.
Analogous
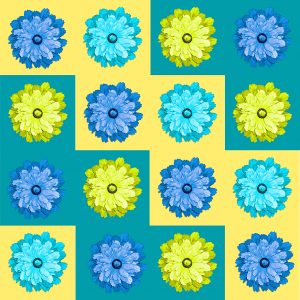
Analogous colors are next to each other in the color wheel. You can choose a narrow or a wide analogous scheme. You could choose to use all shades of just red, orange, and what is between them, or include all the way to yellow for more contrast. Choose from the other side of the wheel using blues and indigos, or including violets. Or go with yellow, green, and blue, including everything in between them, or blue, purple, and red with shades in between these. There are a lot of options for analogous quilts. I made one using blues and indigo, I showed how to make it on this blog a while ago.
Complementary
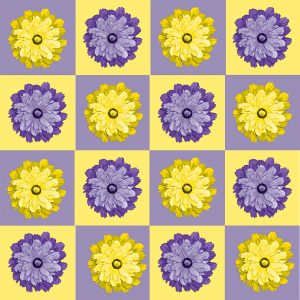
Complementary colors really set each other off.
Complementary colors are opposites on the color wheel. They go well together as natural pairs and seem to reflect their differences pleasingly. Complementary pairs are: red and green, blue and orange, yellow and purple, and more. Indigo is between blue and purple, so its opposite shade is between yellow and orange. You could also choose two analogous colors and also use both color’s complementary colors. For example, I have never used indigo and violet with yellow and orange yellow as a color scheme, but I know that it would work well.
Triadic – primary, secondary and tertiary
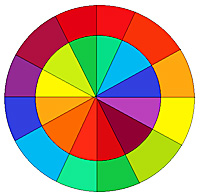
The familiar primary color scheme of red, yellow, and blue is triadic. Triadic colors are evenly balanced and play well together without competition. The secondary triadic trio includes green, purple, and orange. Tertiary triads include indigo, red-orange, and yellow-green together, or yellow-orange, blue-green, and violet red. Remember that you can choose from different shades of each color. For example, the familiar pastel trio of pink, pale yellow, and light blue used so often for babies, is a just a lightened up version of the primary color triad.
I used a Rainbow color scheme for the cover of this baby color book.
Rainbow
The rainbow color scheme includes, you guessed it, every color of the rainbow. Don’t leave any out; a rainbow palette must include red, orange, yellow, green, blue, indigo, and purple. You can decide for yourself whether to include the tertiary colors that fall between these or not. A rainbow scheme will work with or without these colors. A rainbow scheme always results in a vibrant quilt.
Warm and cool
Warm and Cool.
Warm colors range from red to yellow, like the colors of the sun. Browns and sands are included in this group, too. Cool colors go from blue-green to purple, like the seas and the skies, including at night. Warm colors advance; cool colors retreat. Cool colors separate and warm colors unify. Stars pieced from warm colors really pop against a cool background. Pairing warm and cool colors differently can make dramatic differences in blocks, and changing this up may provide a lot of interest in repeating motifs.
Light and dark
This is the ultimate contrast, like black and white. Shapes are emphasized and the look is simple and uncluttered. Use your choice of colors for the light and dark pairing. You could choose light and dark shades of the same color or a complementary pair to contrast between light and dark, for example. While black and white can be starkly dramatic, this can also be downplayed in a light/dark combo by choosing a mix of lights and darks and gradating the tone.
Neutral
Natural colors: the seashore and shells; barks and stems; wood; dried grasses; crinkly leaves; skin-tones; rocks and soil. Grays like the sky sometimes and clouds, or concrete, and silvery steel. Creams, ivories, bone, and every shade of brown are all neutral colors. Neutrals can be light or dark. They are non-competitive, and help other colors. This is why they work so well as backgrounds. Neutrals are peaceful and offer support, so in general they are always welcome.
Traditional
A traditional quilt color scheme depends less on color than value. It is traditional to choose three colors for quilting: one that is dominant, one that is subordinate, and one as an accent. The dominant and subordinate colors play off each other, and the accent provides a pop. The red squares traditionally used as the centers of Log Cabin blocks both provide pop and serve to unify and define this classic design. You can use your dominant color to emphasize a repeating motif and the subordinate color as the background, sprinkling the accent color about to add sparkle and interest.
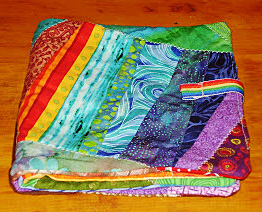
Scrap bag
It is a valid choice to use no color scheme at all and choose indiscriminately from among a plethora of colorful scraps. Scrap quilts, with their confetti of riotous colors, are endlessly pleasing, both to make and to look at. You can piece together a pleasing string or strip patchwork quilt by choosing blindly from an abundant scrap pile.
Choose a variety of fabrics
You can use a favorite fabric as a starting point to choose your scheme around, or you can begin choosing fabrics according to a predetermined scheme. The unlimited choices available to quilters are a big part of what makes quilt-making fun. You can increase your enjoyment in making any quilt by widening your variety of fabric choices. If you choose a triadic color scheme, for example, but then choose only one fabric of each color to complete your quilt, you may be bored by the lack of variety. Choose several fabrics in each color to increase interest instead.
Don’t be daunted by color choices. Choose any one of these color schemes and your quilt is sure to be a success. I hope that you understand color theory now and that this has helped you.
I think jeans are one of the most comfortable items in my wardrobe. They’re also a little boring. Sometimes I want to express myself while still enjoying the comfort of my favorite pair of jeans. With this awesome DIY jeans project, I can – and so can you.
Patches
I’m not great at embroidery, but with the abundance of patches available in craft stores and online, I don’t have to be – and neither do you. Pick up patches in a variety of sizes. Any that you think are fun and express your personality. You may not use them all on one project. That’s okay.
Lay out the pair of jeans you’re going to spruce up and place patches to see what they’ll look like. Do one side at a time and sew them down with hand stitches. Don’t forget the waistline, pockets and cuffs. Well placed patches give jeans personality and character. Best of all, if that pair of jeans gets worn out or no longer fits, you can easily move them to another pair.
Contrasting Fabric
This is a great way to use up some of your fabric stash while making a great item for your wardrobe. Choose some contrasting fabric you really love. You should have about a yard or so of the fabric depending on how wide you plan to go with the next step.
Slit the jeans on the outside from the bottom of the cuff up the seam to about half way to the knee. Using a triangular piece of contrasting fabric as an insert, resew the seam edges on the fabric creating a flared bottom. The more fabric you use, the wider the flare will be. Do both legs if you want the jeans to be symmetrical or do just one leg to create a unique look.
Combine It
You can do either of these DIY jeans projects alone and wind up with a fabulous pair of jeans or you can combine them to create a pair of jeans like none other. I love both of these DIY projects because no special machinery or equipment is needed. Patches are inexpensive and I can use up some of my fabric stash.
If you give either of these DIY jeans projects a try, share the pictures of your results. I’d love to see them!
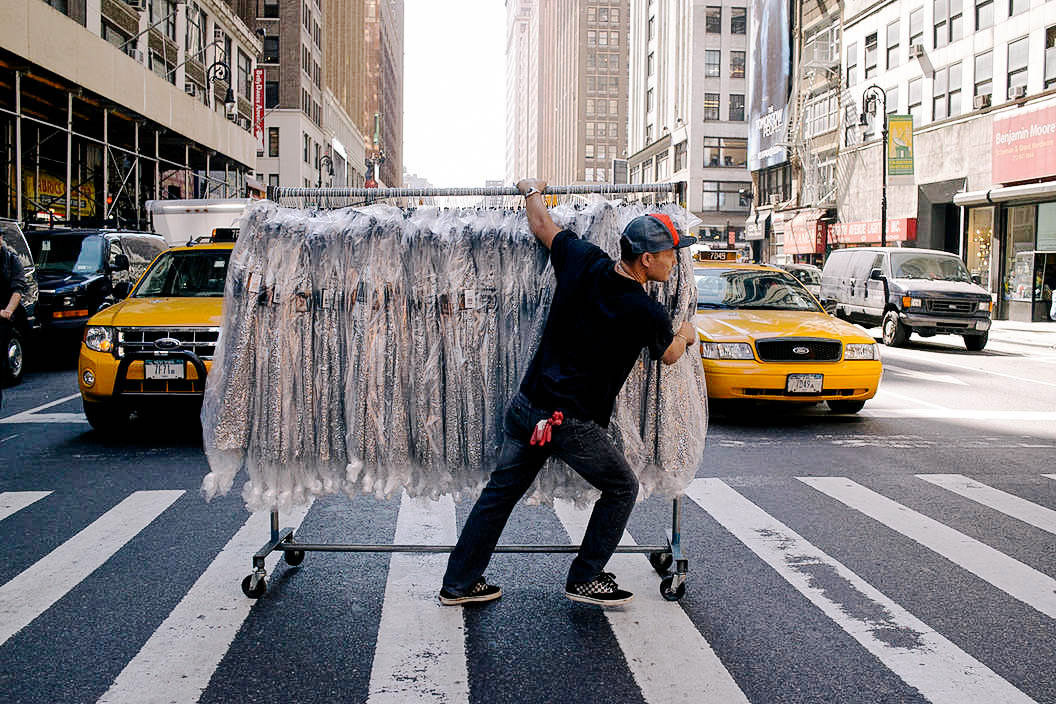
When I first moved to NYC a lifetime ago, I worked for very little money as an assistant to a crazy hat designer in the heart of the garment district. The only upside to the job was that I spent a good part of every day out on the streets gathering fabric swatches and button and trim samples. There was another assistant who had been there for almost a year already and she took me around with her and introduced me to all the people and stores. The two of us had a great time digging through bins of buttons, wandering deep into the back corner of NY Elegant Fabrics, and convincing the nice people at Mood to let us into their “secret” warehouse (it really does exist).
I only stayed at that job for about a month, though it felt like a year, and the other assistant (who has since moved back to Korea to head up a fashion company there) and I still keep in touch. I don’t go to the garment district as often as I once did but I do have a list of must visit favorite places.
Mood – 225 West 37th Street
I’ll get this one out of the way first since most people at this point have heard of Mood which lucked into some amazing advertising when it became the fabric store featured on Project Runway. One of the coolest things about Mood is the building its in and the old elevator, still manned by an actual man, that you have to take up to the 3rd floor. Once up there, the rows and rows of fabric reach from floor to ceiling. Things are pretty well organized, the selection is large, and most bolts have swatches already cut and attached to the ends that you can take.
One little note about swatching in most all the stores in New York City: If someone asks if you are a student, say no. They’re asking because most stores have specific hours for student swatching and won’t allow you to do so if its not during those hours.
Also of note: Mood has a public restroom in the back right corner. 😉
NY Elegant – 222 West 40th Street
I love NY Elegant for its selection of light weight cottons, organdies, and batistes. NY Elegant is a family run store and is the last standing fabric store on 40th St. They also get a lot novelty fabrics – fake furs and things with glitter and sparkly threads.
Paron Fabrics – 257 West 39th Street
This is one of my absolute favorite family run fabric stores in the city. Sadly, they closed their doors for good just last month. I’m only including it to remind everyone to try and support their local fabric stores and if, you have the chance, come to NYC and shop in the garment district. You really can find almost any kind of fabric there by visiting the larger stores and just wandering down 39th street and stopping in to the small stores that still remain.
B & J Fabrics – 525 7th Ave #2
B & J is your best bet for high end linens, lace, and silks. The store is extremely well organized and always seems extraordinarily well lit in comparison to other garment stores. They are a little pricier than some of the other stores but the quality of the fabrics they stock is superb.
Lou Lou Buttons – 69 West 38th St
Lou Lou Buttons sells only buttons. They have bins and drawers and barrels full of buttons. They have wood buttons, shell buttons, mother of pearl buttons, and every funky, unique kind of button you could imagine. The people who work there are helpful and friendly and don’t seem to mind if you spend hours looking.
M & J Trimming – 1008 6th Ave
There are a lot of small trim stores in the garment district with beautiful things but M & J has by far the largest selection of trims in the city. And, unlike a lot of the garment district stores, they’re open on Sunday (you know, for those weekend trim emergencies.)
Tinsel Trading – 828 Lexington Ave
Tinsel Trading recently moved out of the garment district to this new location on Lexington. They stock the most amazing unique vintage and new trims you’ll find (unless you’re shopping in India or Southeast Asia). Their stuff is expensive but much of it really is one of a kind. If you like metallic thread, fabrics, and fringes, this is the place to go.
If you’ve never had the chance to shop for fabric in New York City, I encourage you to plan a trip if possible – you won’t regret it. And, if you come during the month of December, you can also go visit the holiday windows at the retail stores along 5th Avenue – Bergdorf’s (always my favorite), Saks, etc.
I wanted to take an opportunity to tell you about something I learned very early in my sewing experience. Hopefully, it will help when you have to square off fabric for blocks or other things.
When I resumed by sewing hobby after being away for several years, I found many things have changed. Well, me for one, because I started out thinking I would make a few things, have a sewing machine available for mending, and leave it at that. I wanted to make a shirt or two.
But, never, in my wildest dreams, I thought I would have an interest in quilting. Being able to buy many different fabrics, mix them up, find harmony between them, and create an awesome piece of art was exciting!
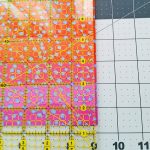
So my first fabric obsession started with “fat quarters”. You know, they are bundles of one designer’s collection, or curated by someone else mostly sold in online fabric stores offering 10, 15, 20 or more pieces that have the same colors or coordinating fabrics! Oh… shopping online!! A whole other obsession!! Sorry. I got distracted!
But, I knew right off, I couldn’t cut them with fabric shears or pinking shears. It would take years off my life.
So, today I want to share how I learned to share how to cut “ fat quarters” for multiple precise pieces all at once.
Three tools necessary for straight and square pieces:
RULE #1 – Never Cut Toward Yourself or Sideways with a Rotary Cutter – Always Away from Your Body
RULE #2 – Measure Twice and Cut Once
This piece is 4 ply +9” high by 22” wide
Use the ruler edge and line it up with the mat edge at the top and bottom as well for exact measured cuts.
The measure above is not important. It’s the matching cutting line. The above example is for illustration only.
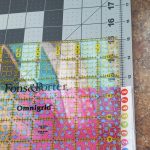
Open 21 x 18 inch piece. Press with iron flattening fold creases. It makes a difference, you will see!
Cut away selvage edge. You will have the longest part on the mat. Do not double the fabric and trim as close to the edge of the selvage as possible.
Refold the length piece in half by taking the left side and match the edges on the right side where the selvage was.
Square right hand edge with ruler and mat. Take off just a little sliver. Then trim the opposite side for threads. Not much to do there if it is square.
Now, the left has a fold, the top is folded two times giving you 4 layers of fabric. The top folded pieces have to be shaved too and the left side so you will still have exactly 9 inches on those two sides if you are careful.
Are you still here? Almost done!
Line up the longer piece with the ruler, and trim off the small 2 inch piece to have 4 perfectly squared 9 x 9 pieces. The best part is you only lose about 1 ½” of the fabric by cutting it this way.
However, if you are feeling bold… and you put:
Beautiful 8 x 8 inch napkins ready for your next meal or party.
Right sides together, sew up the sides at ¼ inch leaving an inch or two (somewhere close to the end but not the corner) to turn them to their right sides, press seams, pin opening closed and top-stitch around all sides.
Then you have:
Beautiful 8 x 8 inch napkins ready for your next meal or party.
I would love to hear your comments or questions. Stop by and see me again soon!
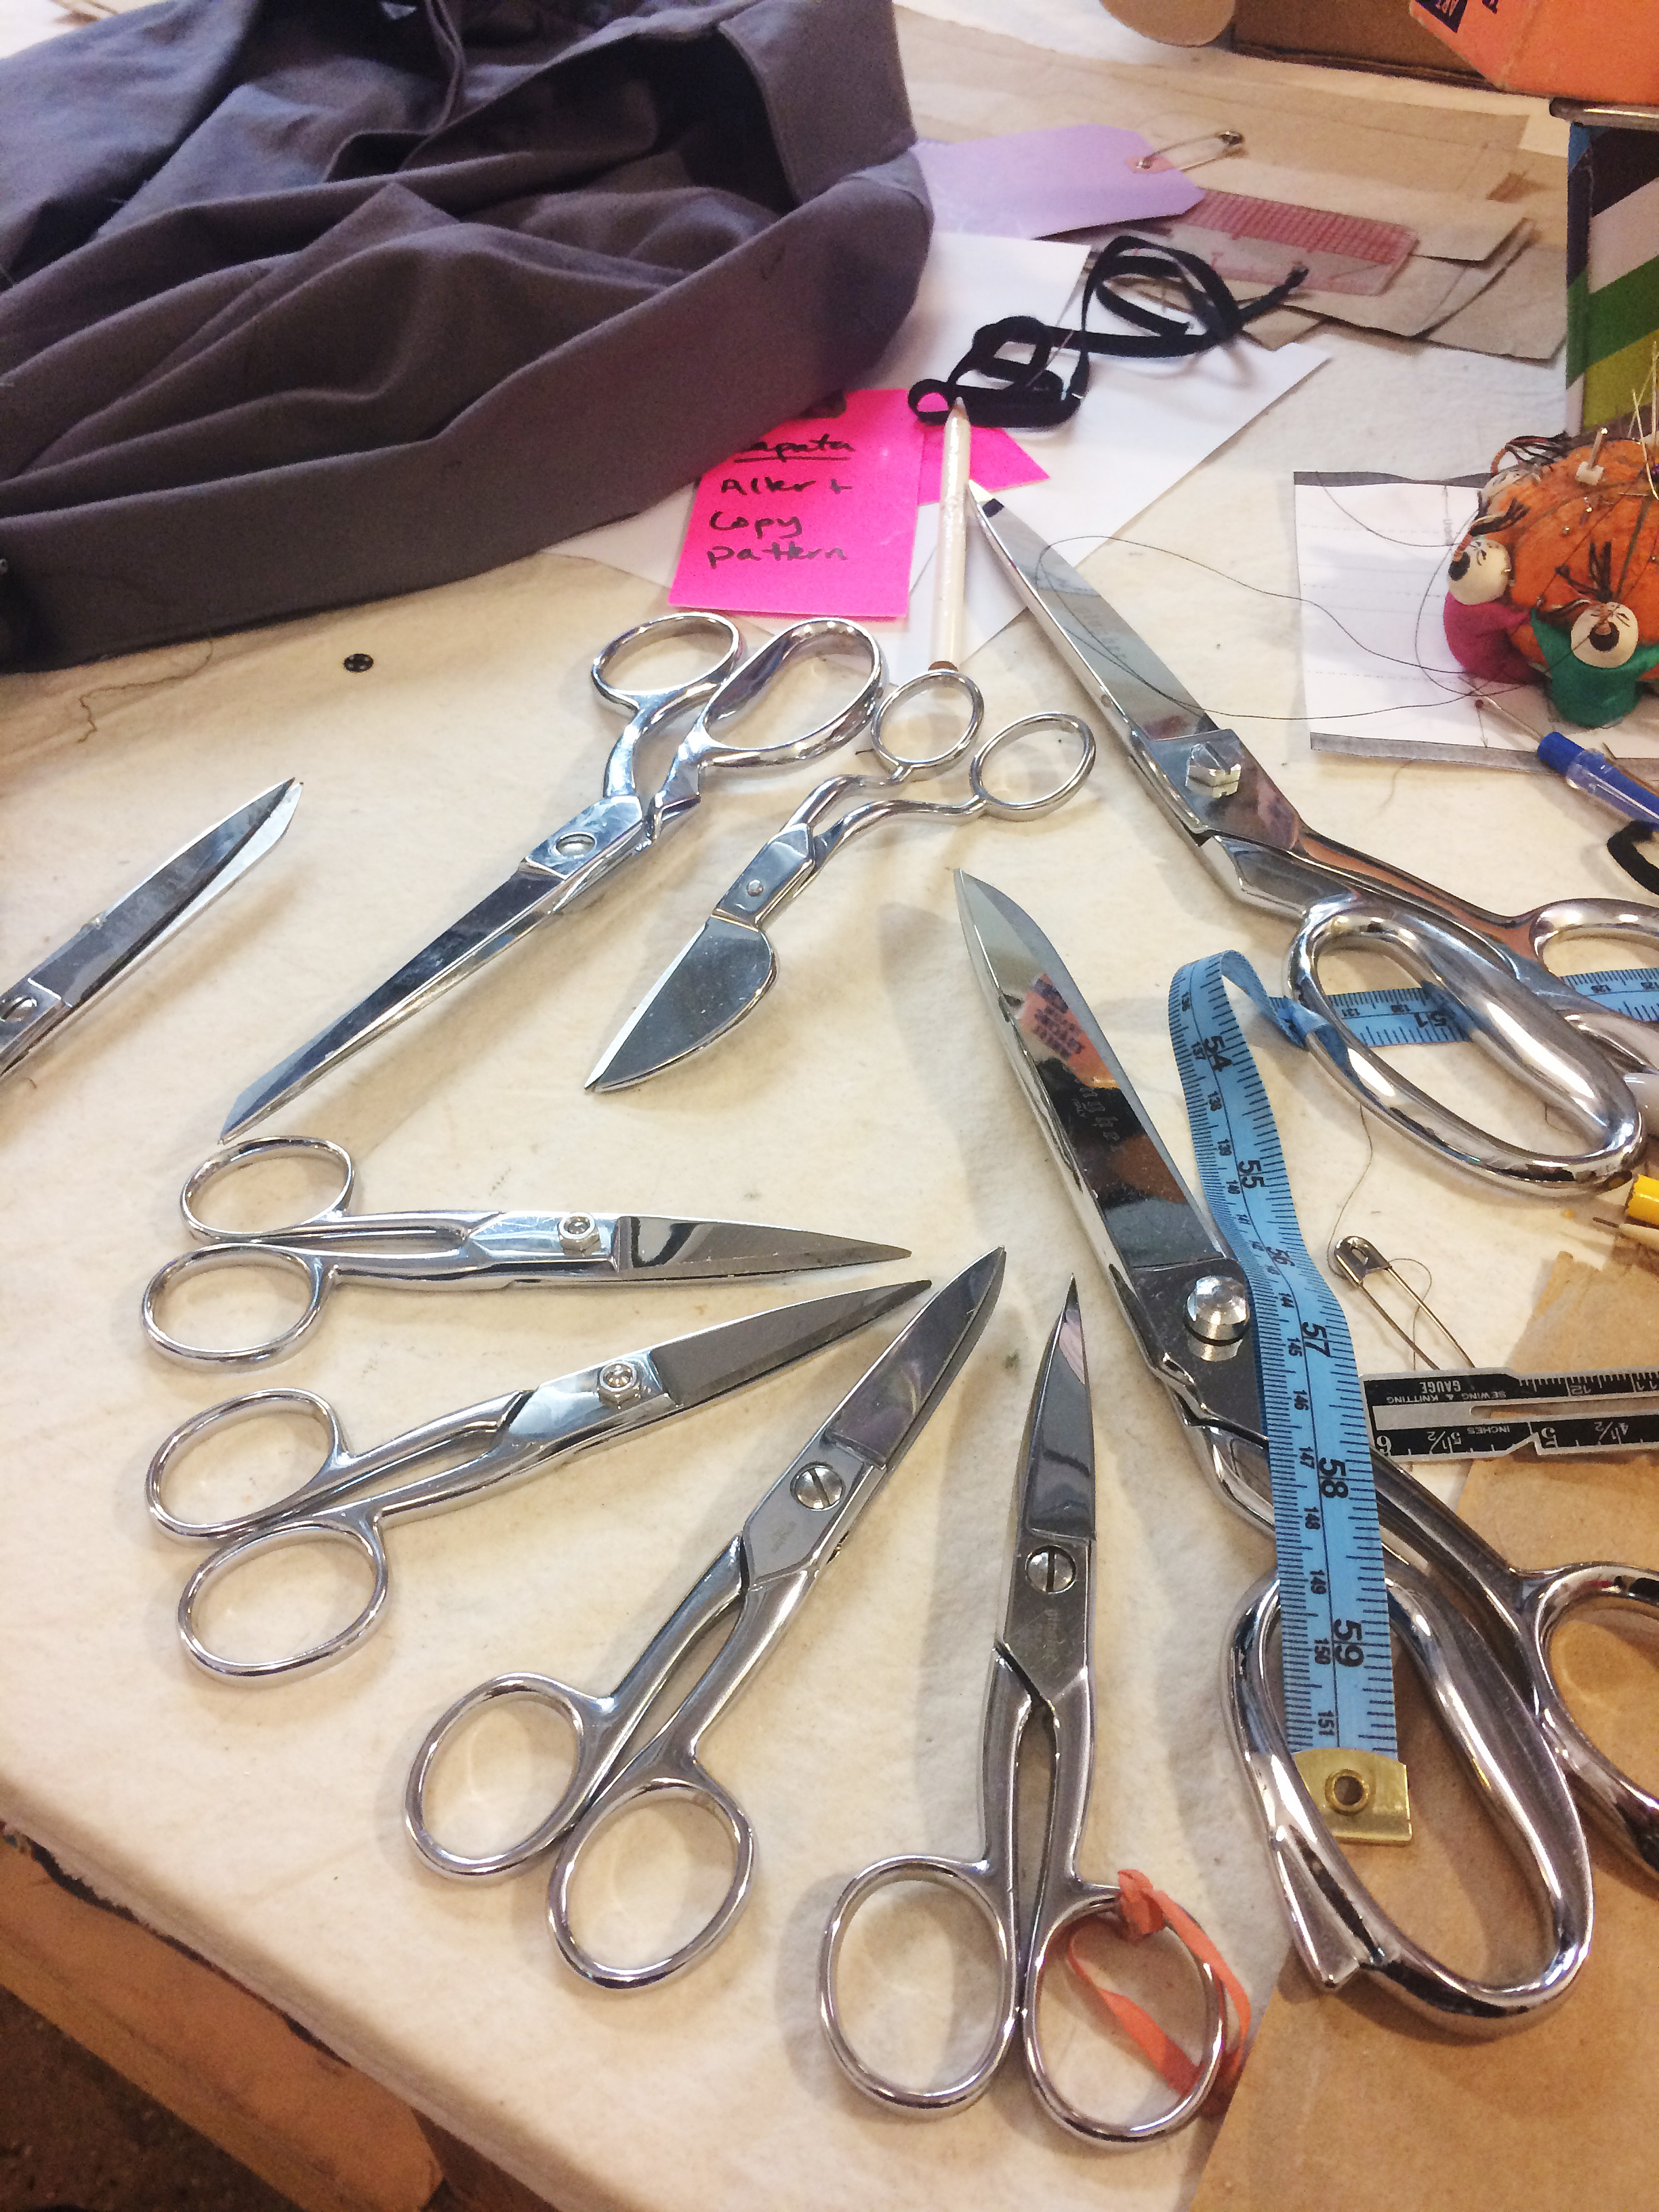
I have a bit of a scissor problem, as in, I have a lot of them. I’m not always good about getting them sharpened, or sharpening them myself and often will just order a new pair – which isn’t necessarily very economical but, often, much more fun. This photo is of the scissors that are currently in my shop at Blindspot. It doesn’t include the scissors I have at home or the scissors that are in my sewing kit on the wardrobe truck or the scissors I probably forgot about that are at the bottom of a bag somewhere in a closet.
In New York City, you can have someone come to your shop and sharpen all your scissors with an electric grinder. There’s also a scissor and knife sharpening truck that still trolls the streets of Brooklyn (like the Mr. Softee ice cream truck). I never have any scissors on me when I see the truck though I always want to flag it down. You can, of course, sharpen your own scissors using a sharpening stone but I never seem to get around to doing that.
Most tailors have a favorite pair or a preferred model that they own more than one of.
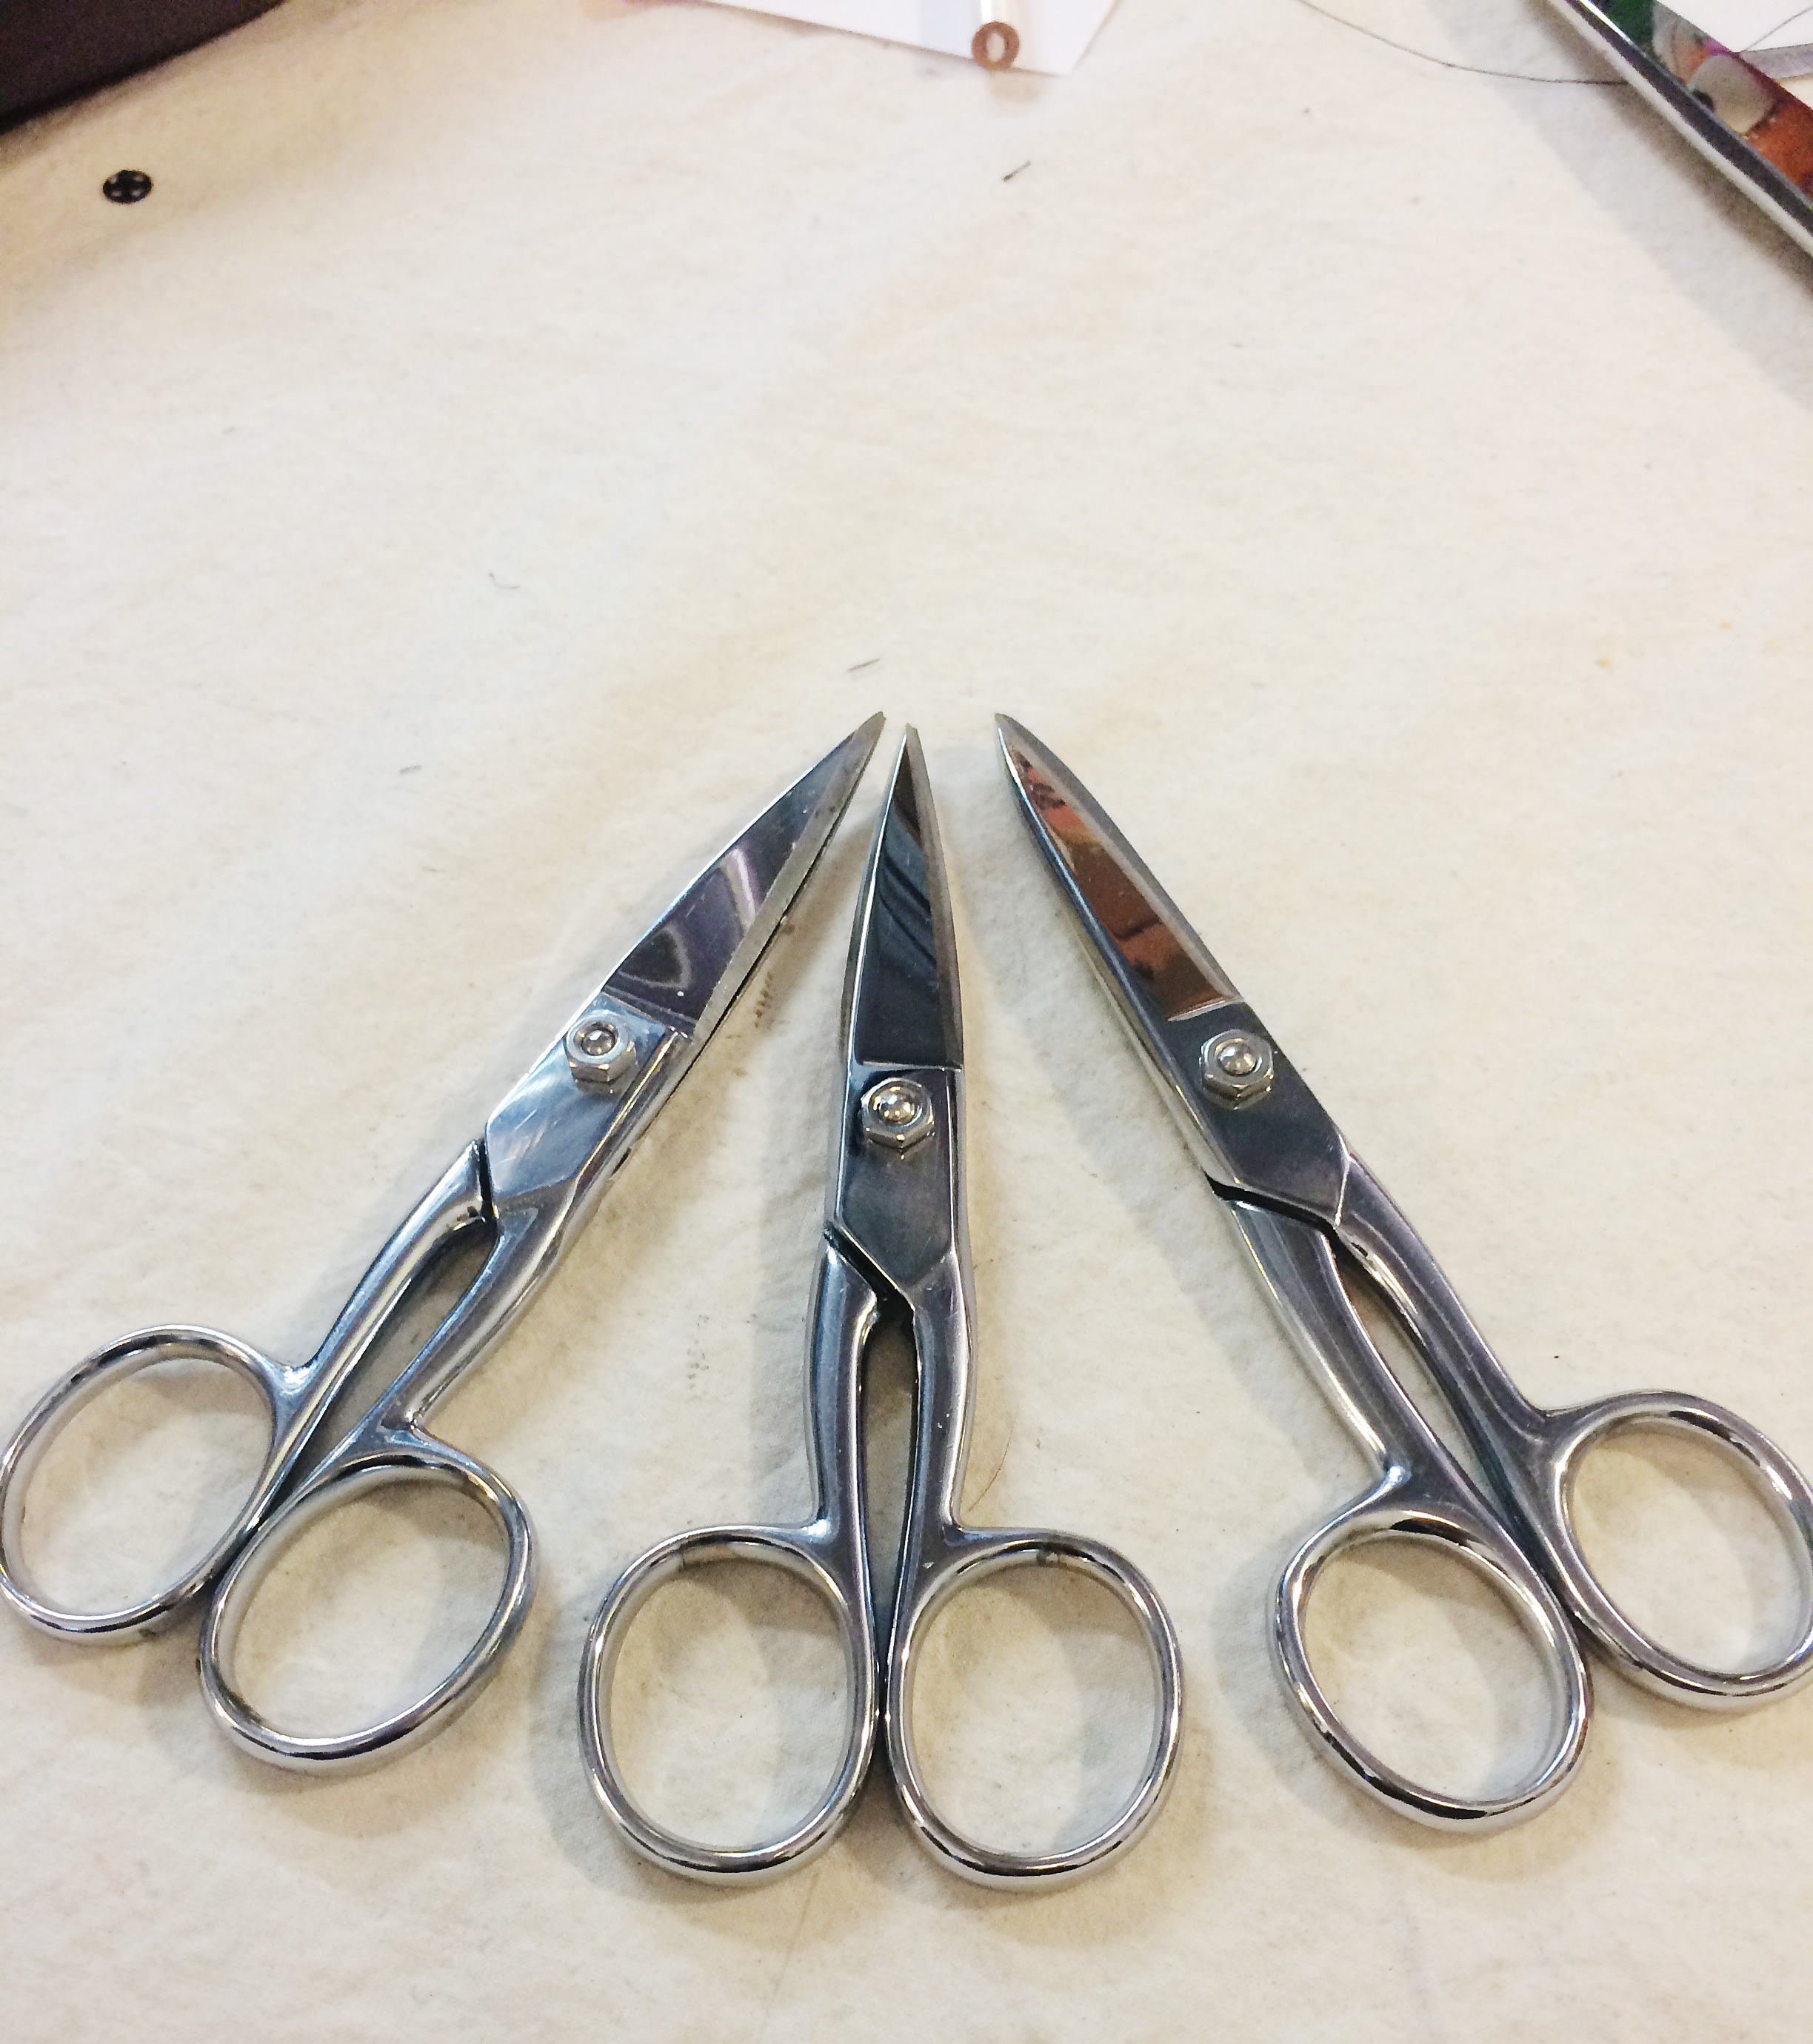
My absolute best loved are Gingher’s original 5” tailor points, the ones that are actually pointy on the end. For some reason, when Fiskar acquired the Gingher brand, they altered the 5” tailor points. Now they have more rounded blades and a blunter end and are often called ‘craft’ scissors. The pair on the left in the following photo is the oldest pair. See how much narrower and pointier the blades are?
Evolution of Gingher’s 5” tailor points.
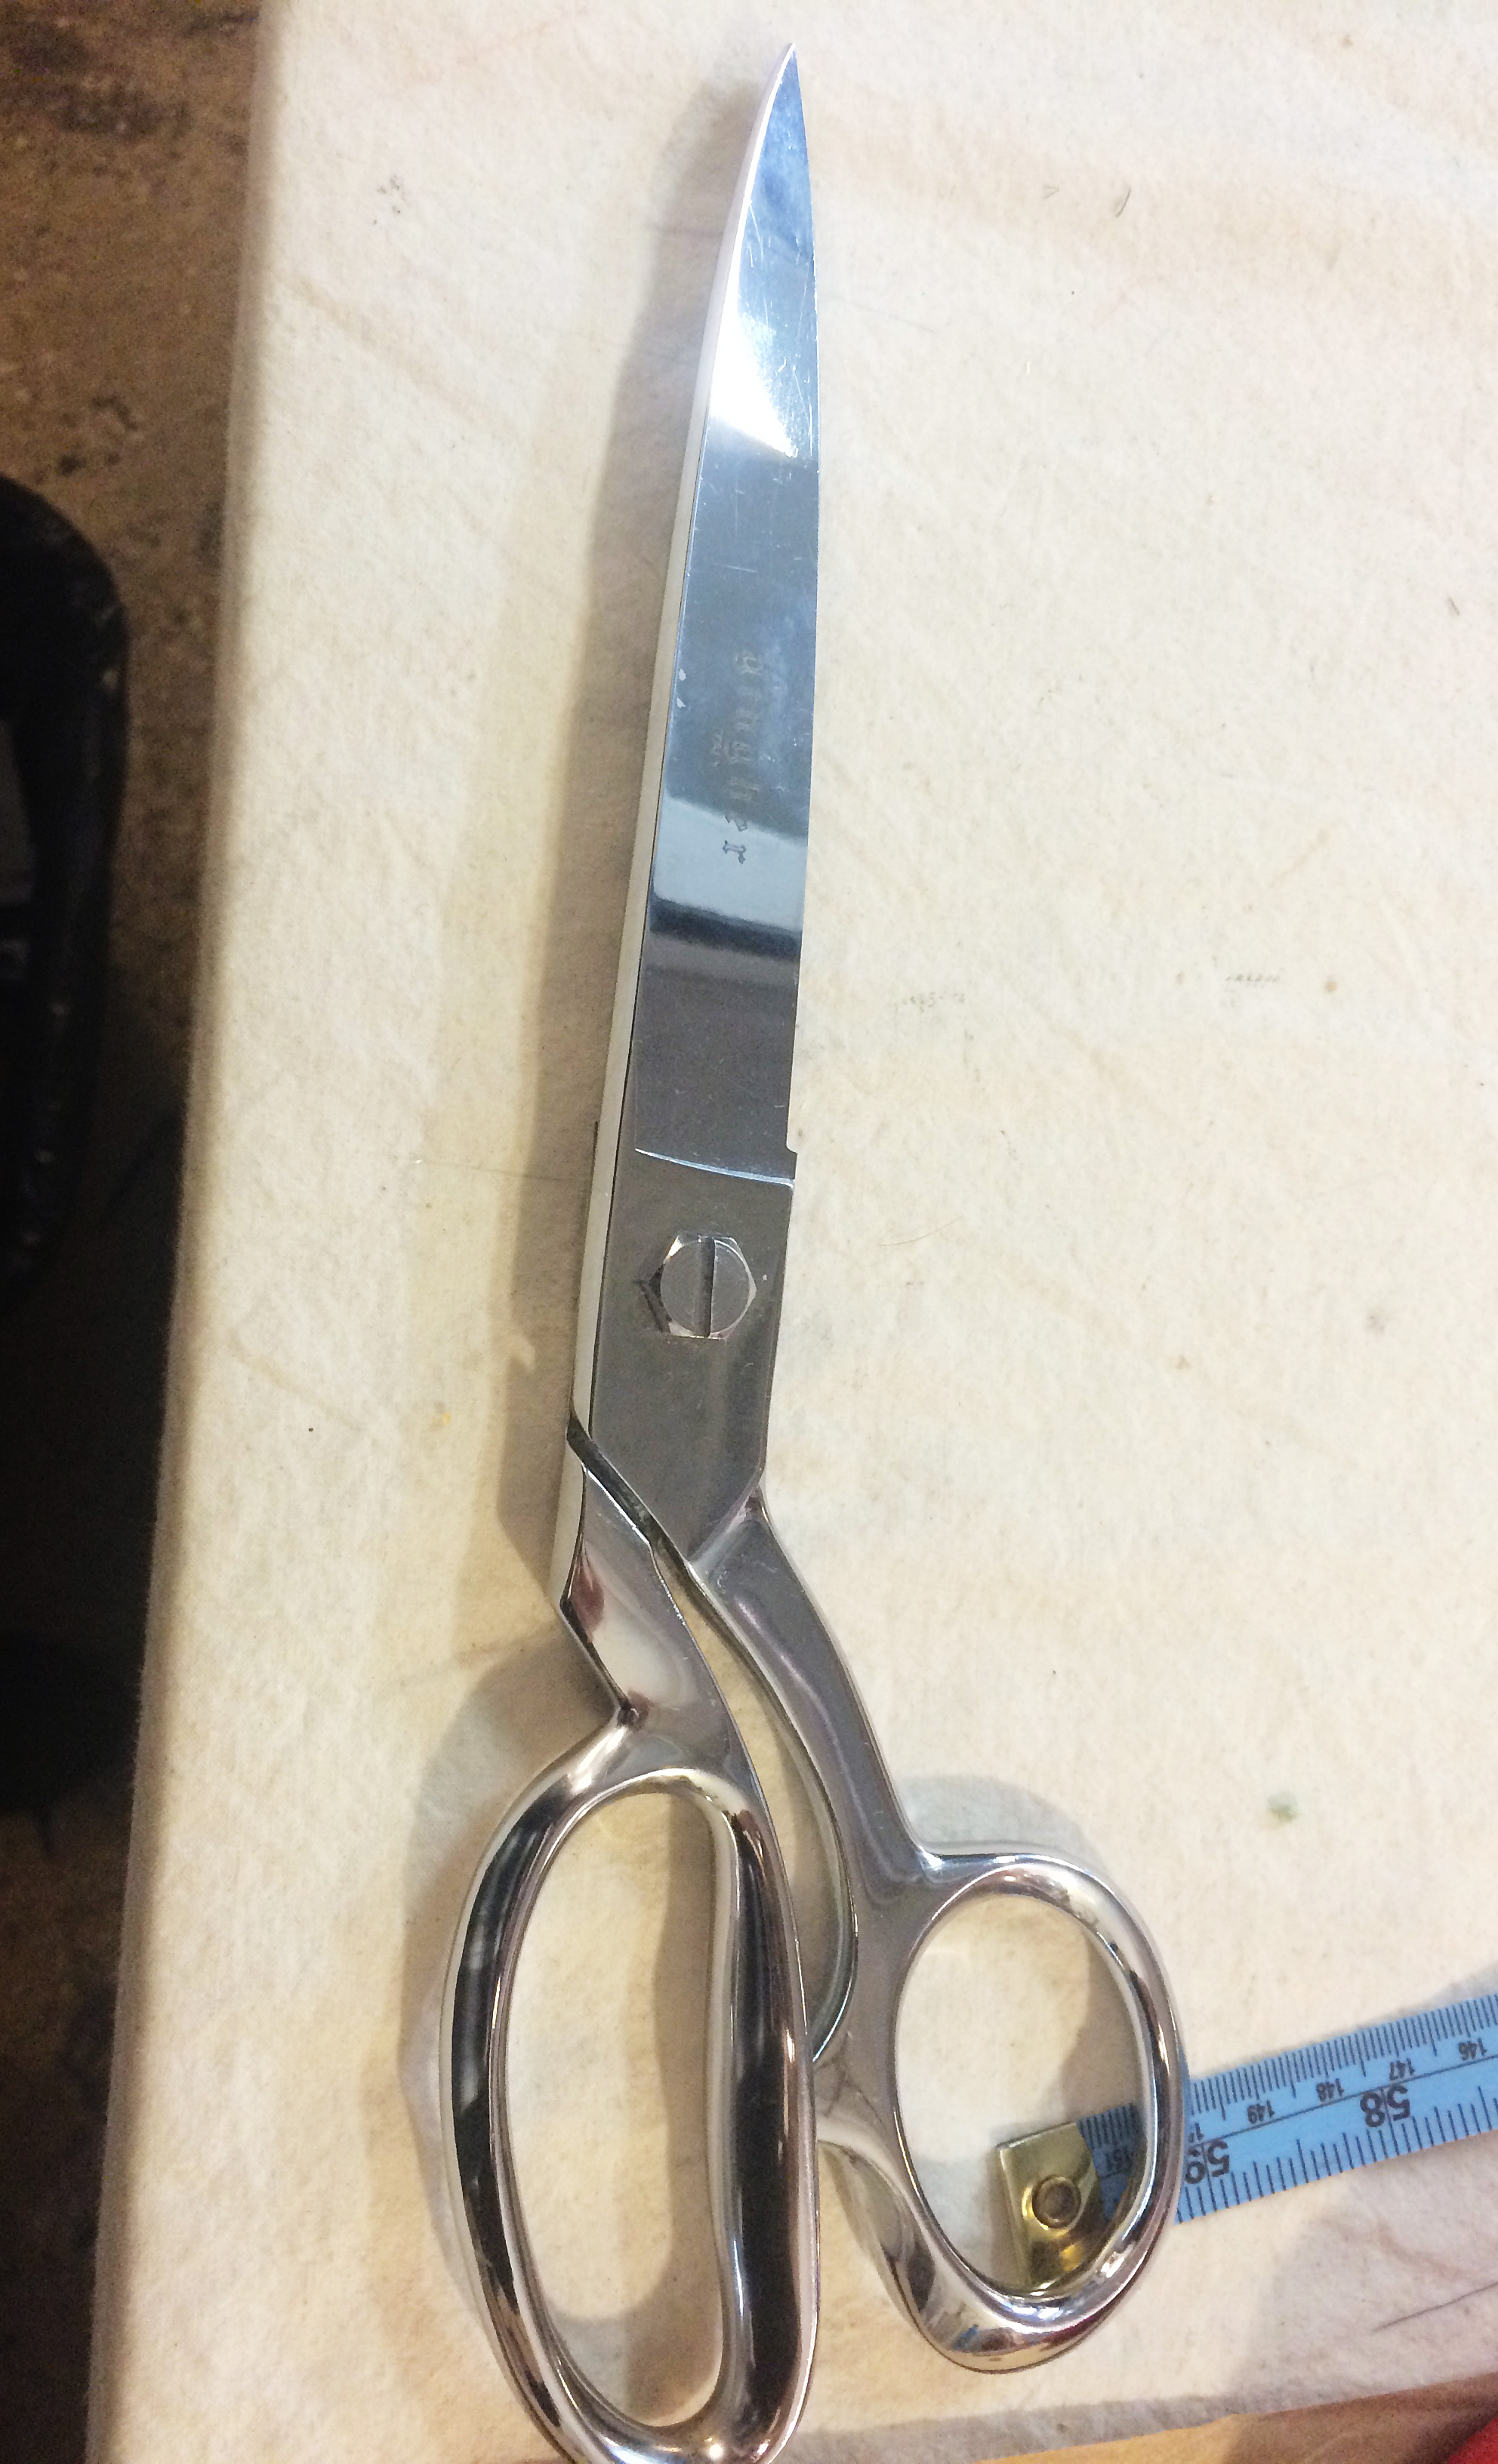
I do quite a bit of cutting. I never really took to the mat and rotary blade camp though I can understand how it can be an efficient and accurate way to cut. Probably because I started my whole tailoring/pattern making career before cutting mats and rotary blades were prevalent. Or maybe I’m just old. At any rate, my favorite scissors to cut with are Gingher 11” knife edge shears.
Cutting shears.
Other scissors that I use on a daily basis are:
Gingher 8” straight blade shears
– For trimming seam allowances, though you can cut with them. I just like a longer blade.
Gingher 7 ½” pinking shears
– I usually pink the hems in men’s suit pants as opposed to serging, mainly because a serged hem will leave a ridge if someone (drycleaner or otherwise) gets over zealous with the hem pressing.
Gingher 6” applique scissors
– I use these when I need to trim something very close the edge, or when I’m cutting around an applique (obvi.)
Gingher 7” straight blade scissors
– I use a pair of these as my paper scissors when patterning.
One of the sacred sewing laws is to never use someone’s fabric scissors to cut anything but fabric. Ever.
Excuse me… What are you cutting?!
Speaking of paper scissors. One of the sacred sewing laws is to never use someone’s fabric scissors to cut anything but fabric. Ever. The standard response from someone who sews to the question, “Can I borrow your scissors?” is “What are you cutting?”
The reason why is fairly simple: try cutting fabric with a pair of craft or paper scissors and you’ll find your edge looks as if it were chewed off by some sort of extremely hungry wild animal.
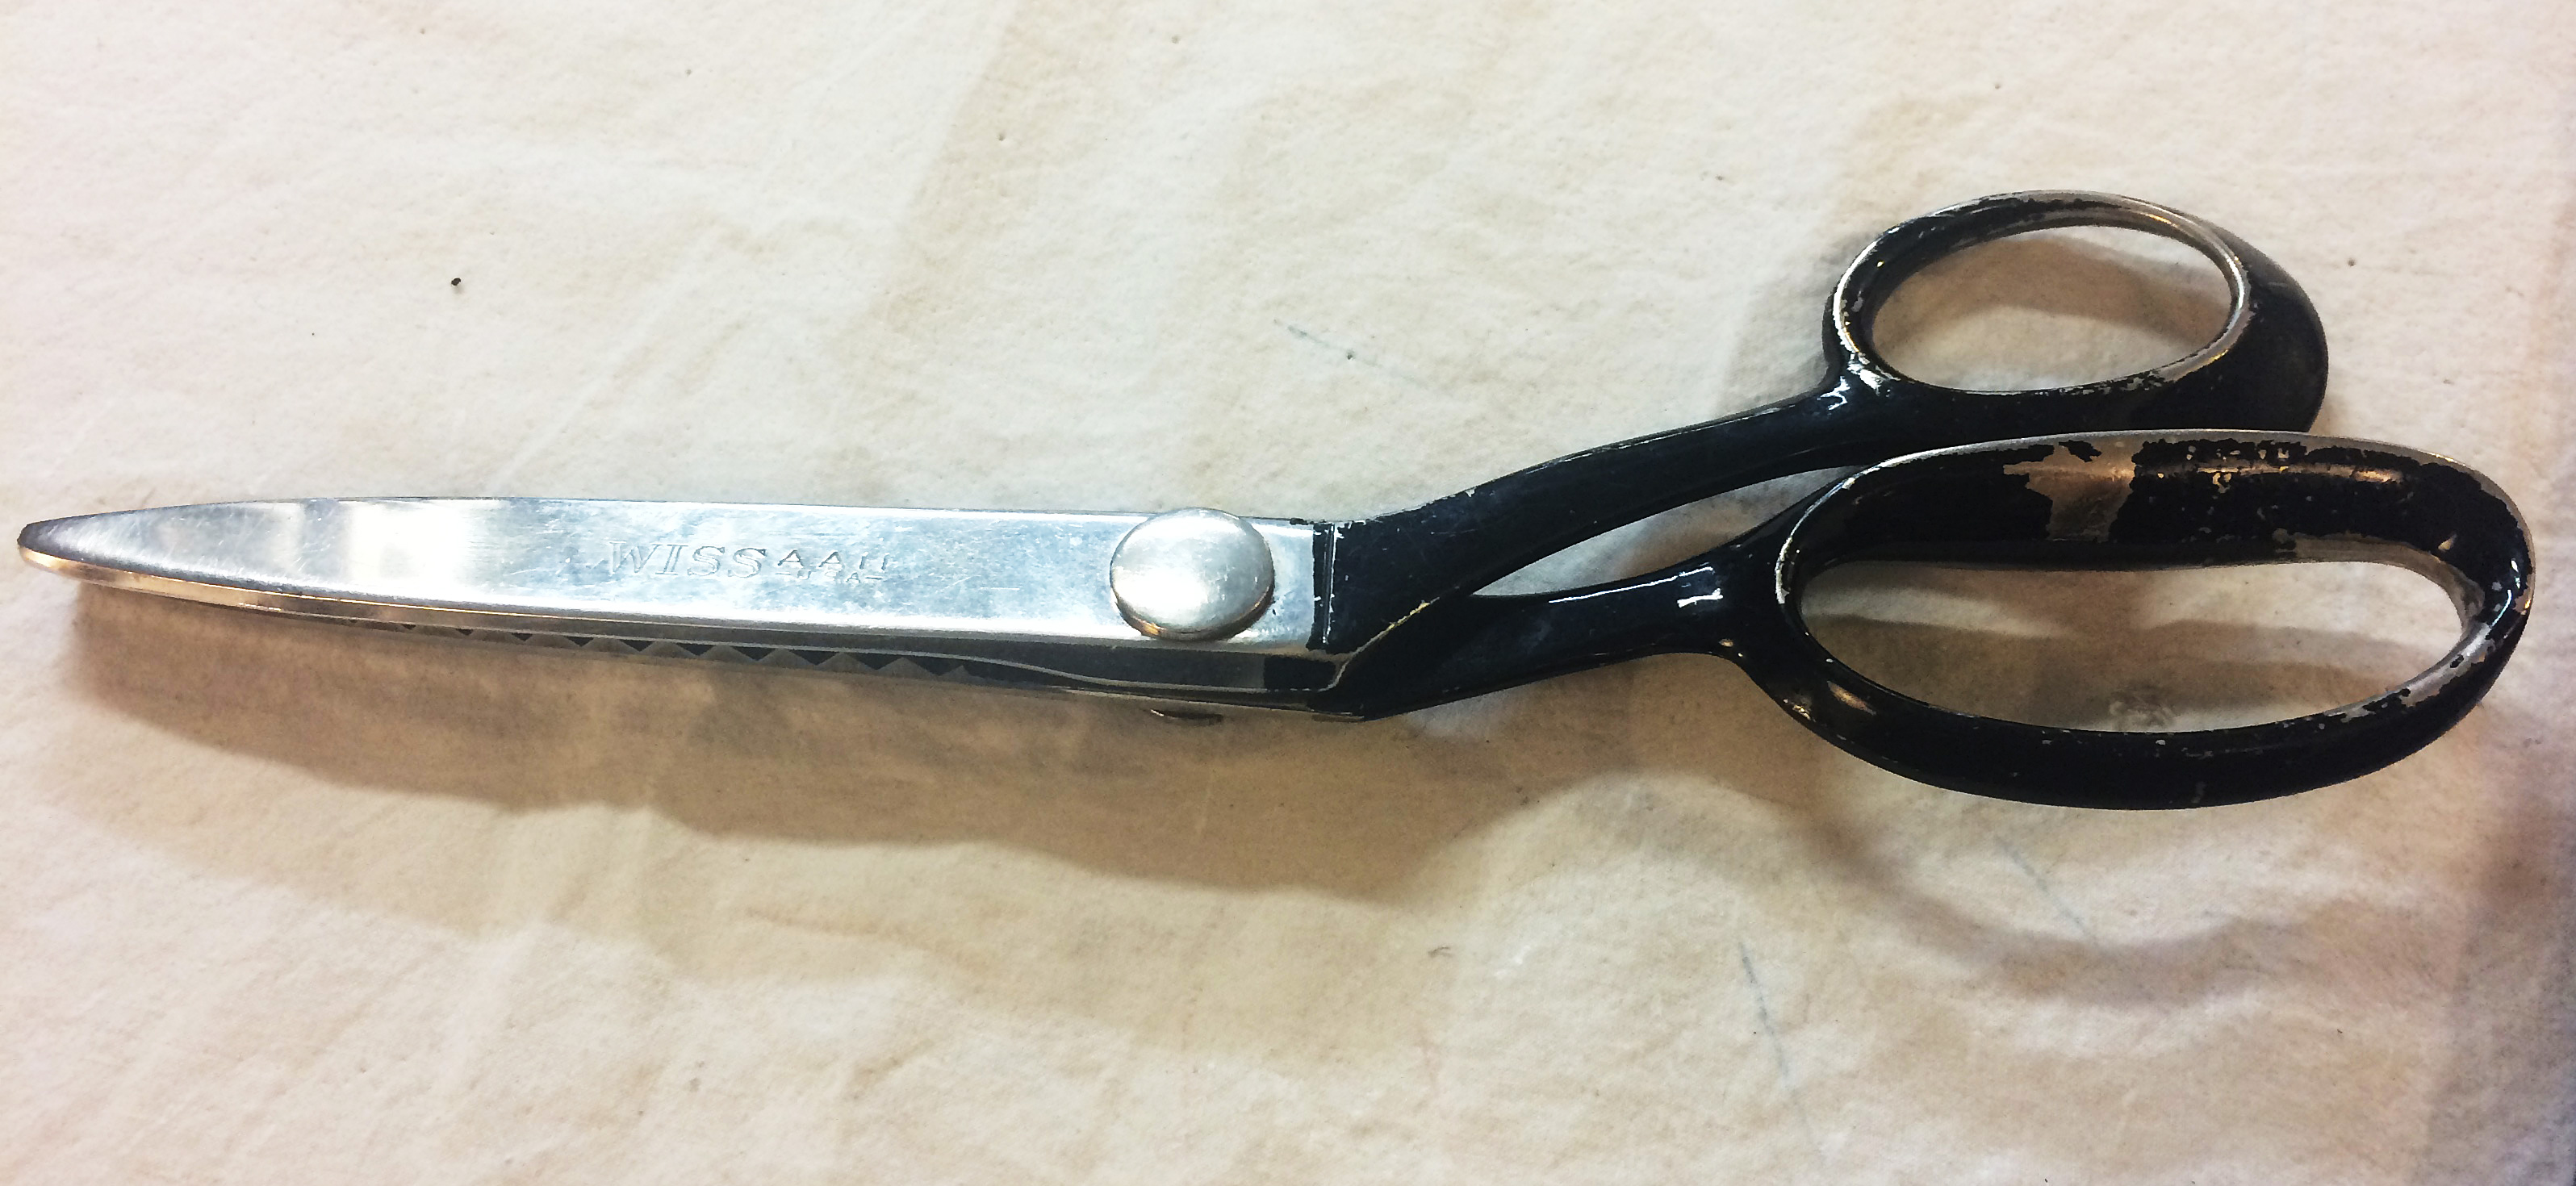
Wiss pinking shears.
A few years ago, I acquired some old scissors for a mens’ tailor in the city who was retiring. I love this pair of old Wiss pinking shears. Despite the knicks and scratches on the exterior, they still cut very well.
Do you make most of your holiday gifts? Have you wanted to start this tradition? If you haven’t, this is a great year to sew gifts for everyone on your list.
I have been sewing and/or making most every gift I give for many years now. So I know from experience that it is easy to get stuck for ideas, especially for certain recipients. But I have learned that with time and thought, it is possible to sew gifts for everyone on your list.
The most important tip I have learned in making holiday gifts over the years is to get started early. With an early start you can complete your gifts in plenty of time to enjoy your holidays. Starting in December can make for a stressful season! Learn from my mistakes and get started now, or you could wind up as I have- sewing late into the night on Christmas Eve.
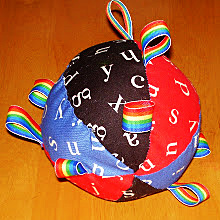
For babies, try a stuffed ball with ribbon tags for grabbing.
You can sew gifts that everyone will love. Here are some ideas to consider for everyone on your list:
Soft Toys – dolls, stuffed animals, robots, monsters. For babies, try a stuffed ball with ribbon tags for grabbing.
This rainbow book of colors is one of my favorite gifts ever.
These are a lot of fun, both to make and to play with.
Soft Books – These are a lot of fun, both to make and to play with. This rainbow book of colors is one of my favorite gifts ever.
Bags – make a tote bag with divided pockets for crayons and include a coloring book. Or whip up a precious little purse to match a sweet girl’s personality. I’ve even made a Star Wars backpack from an outgrown favorite T-shirt.
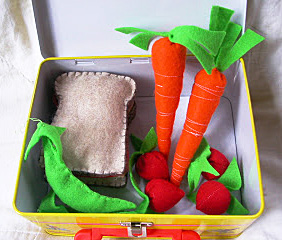
Felt Food – these are both easy and lots of fun to make. You could sew a sack lunch, complete with felt brown paper bag; pretty cupcakes and donuts; even a whole roast turkey! There are a ton of free patterns and tutorials for felt foods available online, but these are easy to make up off the top of your head, too.
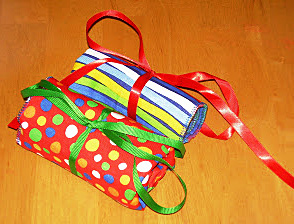
Crayon, Marker or Colored Pencil Rolls – make a great gift for kids on-the-go.
Doll Clothes and Accessories – Sew something new for her favorite dolly. Make a dress or two, a carrying bag with a front pocket designed as the doll’s bed, or a doll quilt.
For Anyone
Zip Bags – These are useful for everyone. Ladies can use them for cosmetics, men will appreciate them for holding shaving and toiletry supplies for travel. Children can use them as crayon or pencil bags, or for containing sets such as legos to-go. They also make great first aid kits for the car or travel.
Lap Quilts – Be inspired by your recipient’s favorite colors or personality and sew them something special for snuggling.
Pillowcases – You can sew a pillowcase from any yard of cotton fabric. Choose a beautiful print or fun novelty fabrics.
For Ladies
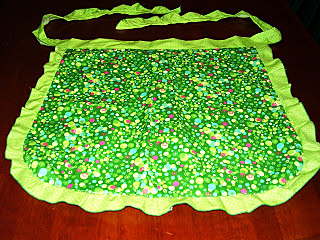
Half Aprons – These are always appreciated and a great way to use fat quarters from your stash. Embellish with ruffles, pockets and/or appliqué.
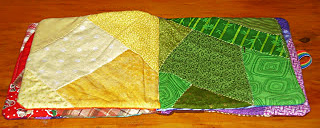
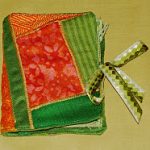
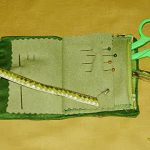
Needlebook front.
Needlebook inside.
Needlebooks – These are a fun little project for playing with patchwork and make useful and treasured gifts.
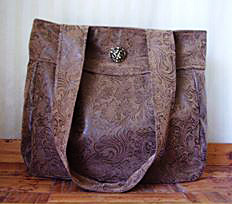
Folklore Bag
Purses – What lady wouldn’t like a pretty new handbag? My favorite purse pattern is the Folklore Bag from the book One-Yard Wonders. I like to add special details like an attached clip for easily finding keys.
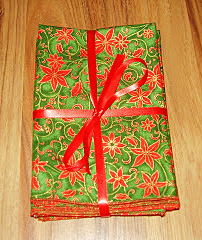
Cloth Napkins – Holiday themed sets from novelty fabrics make a lovely gift. This is my go-to for teacher gifts.
Cloth napkins.
For Men
Barbeque Apron – Here’s another fun place to use novelty fabric. He’s sure to appreciate one emblazoned with his favorite ball team’s logo, or choose a funky fabric with vintage cars, guitars, or hot dogs.
Handkerchiefs – I use the embroidery feature on my machine along the edges. My machine has an alphabet, so I like to sew “Bless You” on these too.
Throw Pillows – with football fabrics or something else he’ll appreciate. Be sure they match the couch or décor in his man-cave!
Over-the-Visor CD Pockets for the Car – include a mix cd for extra fun.
For Furry Friends
Dog or Cat Bed – You can make these as a simple stuffed rectangle or square, or go fancier with patchwork or other design details.
Stuffed Toys – catnip stuffed mouse or felt or fleece “bones.”
Matching Collar and Leash – I buy ugly collars from the dollar store for the hardware, then I make nicer, new collars with nylon webbing covered with embroidered ribbon. These make a super nice gift for pet parents.
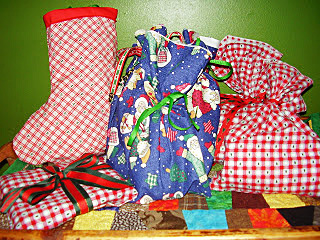
Make this the year that you sew gifts for everyone on your list and they will thank you for it! And don’t forget the gift wrap; use holiday fabric and whip up gift bags to fit any size gift. These re-usable wrappers are zero-waste and your recipients will be happy to use them again next year.