DIY Fabric Gift Bags instead of Wrapping Paper

DIY Fabric Gift Bags instead of Wrapping Paper

DIY Fabric Gift Bags instead of Wrapping Paper

Ready for a DIY project that will last for years and is good for the environment (and your pocket book?) This year, instead of wrapping your gifts in holiday paper that will be thrown away after the presents are opened, consider making fabric gift bags instead. I made five different sized bags in under 20 minutes. Here is how.

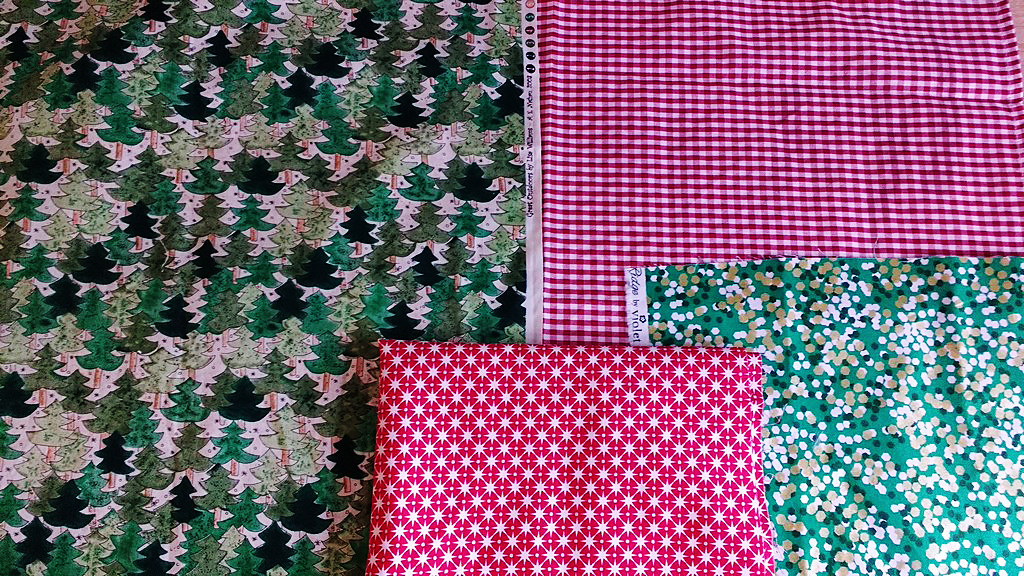
Assemble your fabric.

Get all of the holiday-themed fabric scraps you’ve been hoarding. The sky is the limit on the sizes you can make as presents come in all manner of shapes, sizes and weights/heights.

DIY Fabric Gift Bags instead of Wrapping Paper

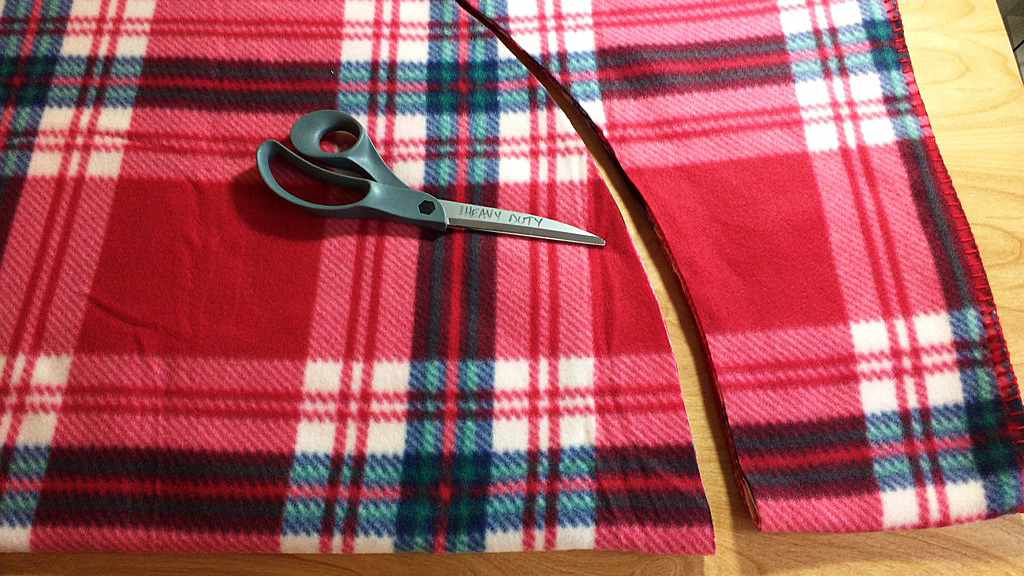
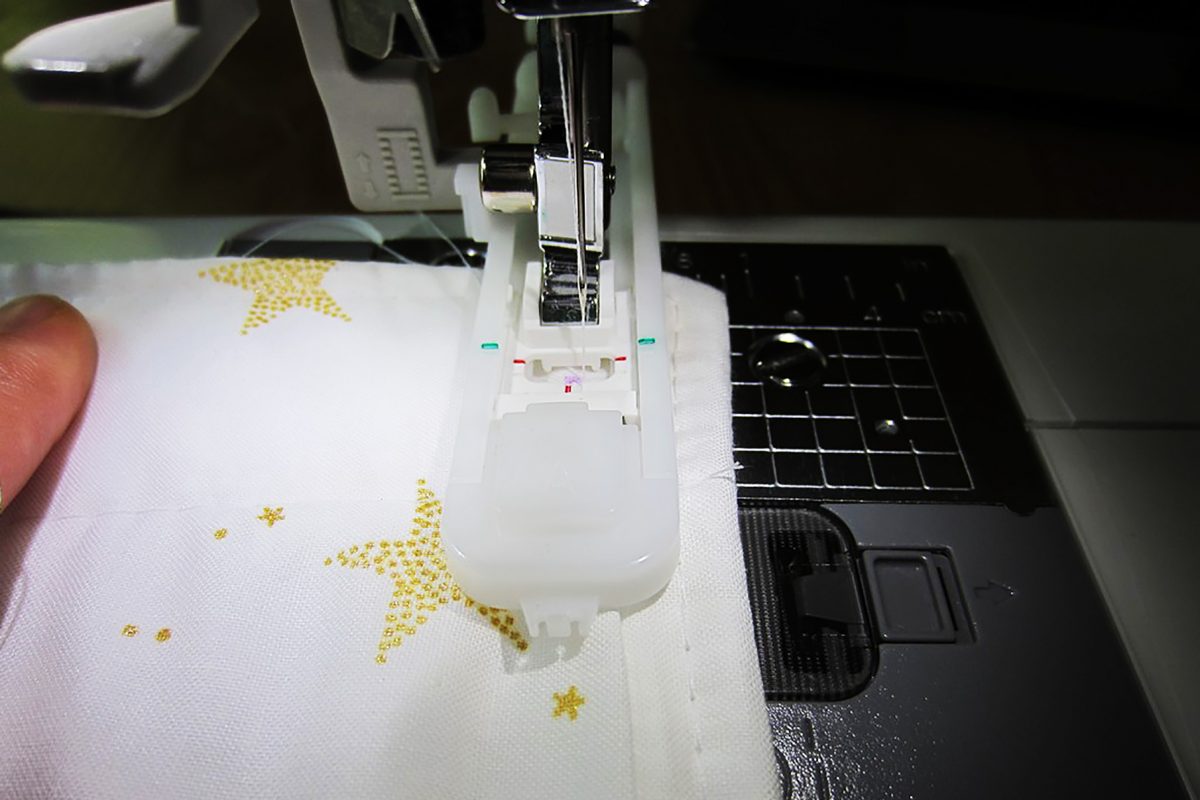
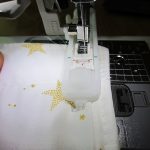
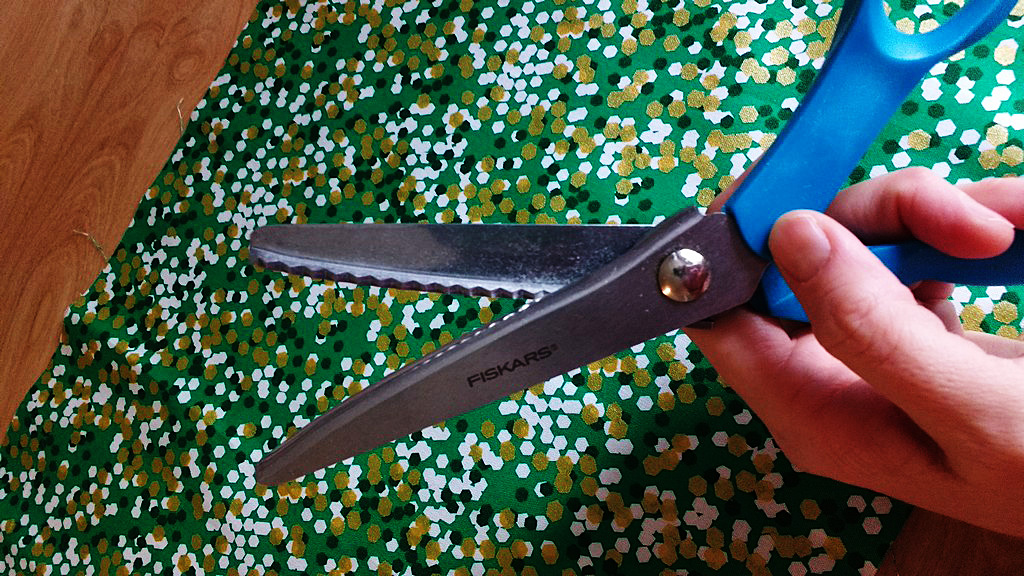
To keep this project FAST, you aren’t going to finish any of the seams, which means you need to use pinking shears, a serger or a zig zag stitch to finish your raw edges.

DIY Fabric Gift Bags instead of Wrapping Paper

Great deals on sergers here

If you’ve been thinking about getting a serger, SewingMachinesPlus.com has them on sale right now, right in time for the holidays. This Juki Garnet Serger is the one I’ve been looking at. I love that it comes with bonus feet and additional thread cones.

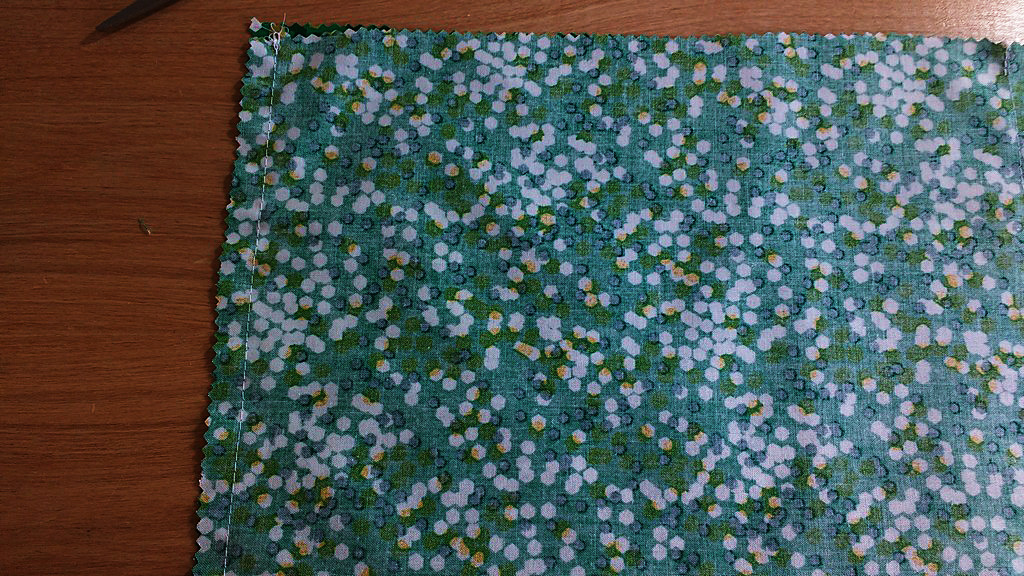
Square up your fabric, fold over, pin, and then sew a straight stitch around all three sides. Leaving the tops of the fabric gift bags exposed (but pinked) will give them a whimsical, handmade feel.

DIY Fabric Gift Bags instead of Wrapping Paper

Nice little folds

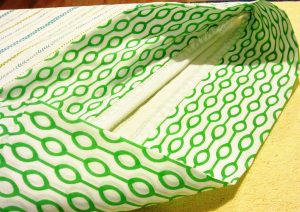
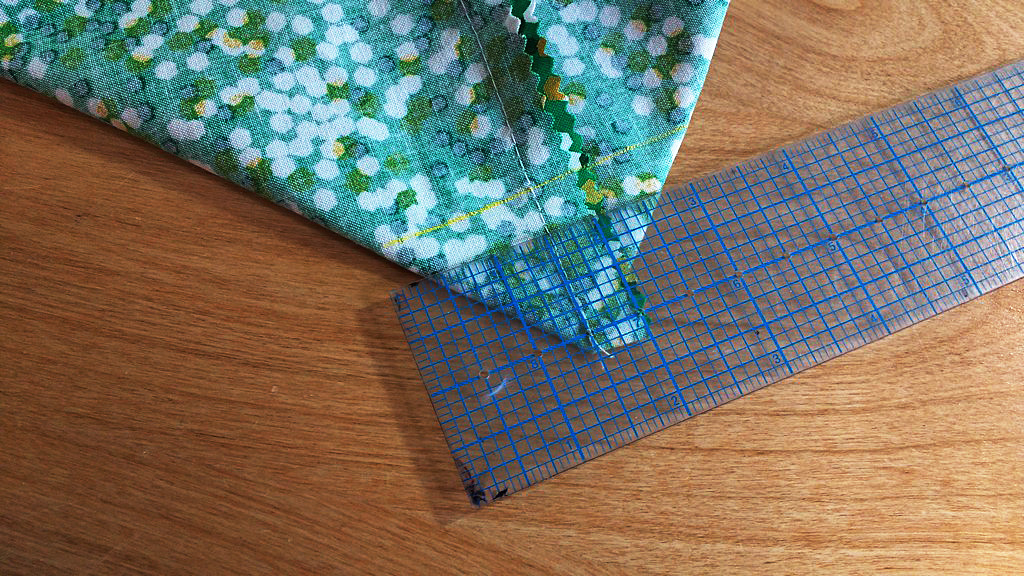
For this fabric, I decided to create box corners (think like a brown paper lunch bag).

DIY Fabric Gift Bags instead of Wrapping Paper

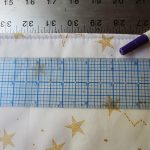
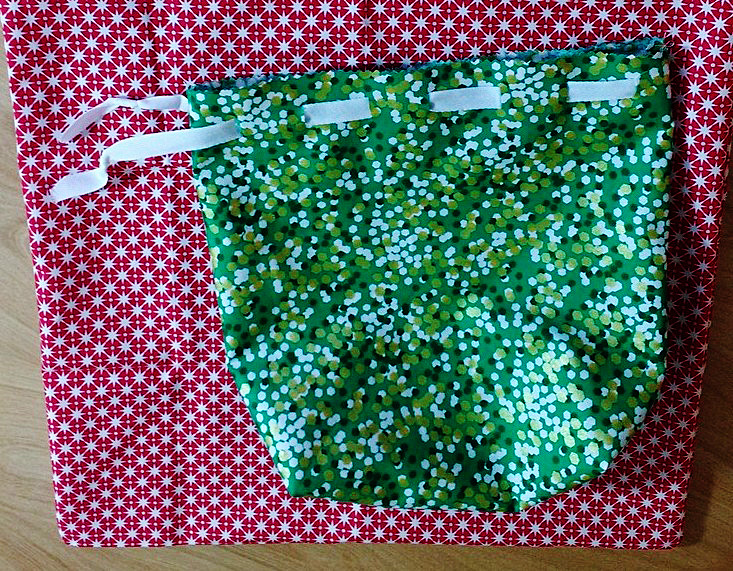
I also wanted to add a casual drawstring. To do this without creating a casing, I marked every 1.5″ and then snipped the openings. I love these Clover Chalk-Liner pens. They are an essential part of my sewing tool kit. They mark precisely and I can just sweep off the chalk when I’m done.

Ribbon feeding trick

I used a safety pin attached to the end of some twill tape to feed the twill through the holes I’d clipped to create the drawstring for this bag.

DIY Fabric Gift Bags instead of Wrapping Paper

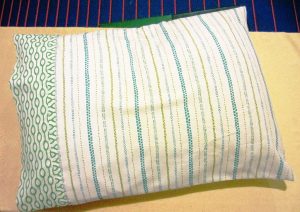
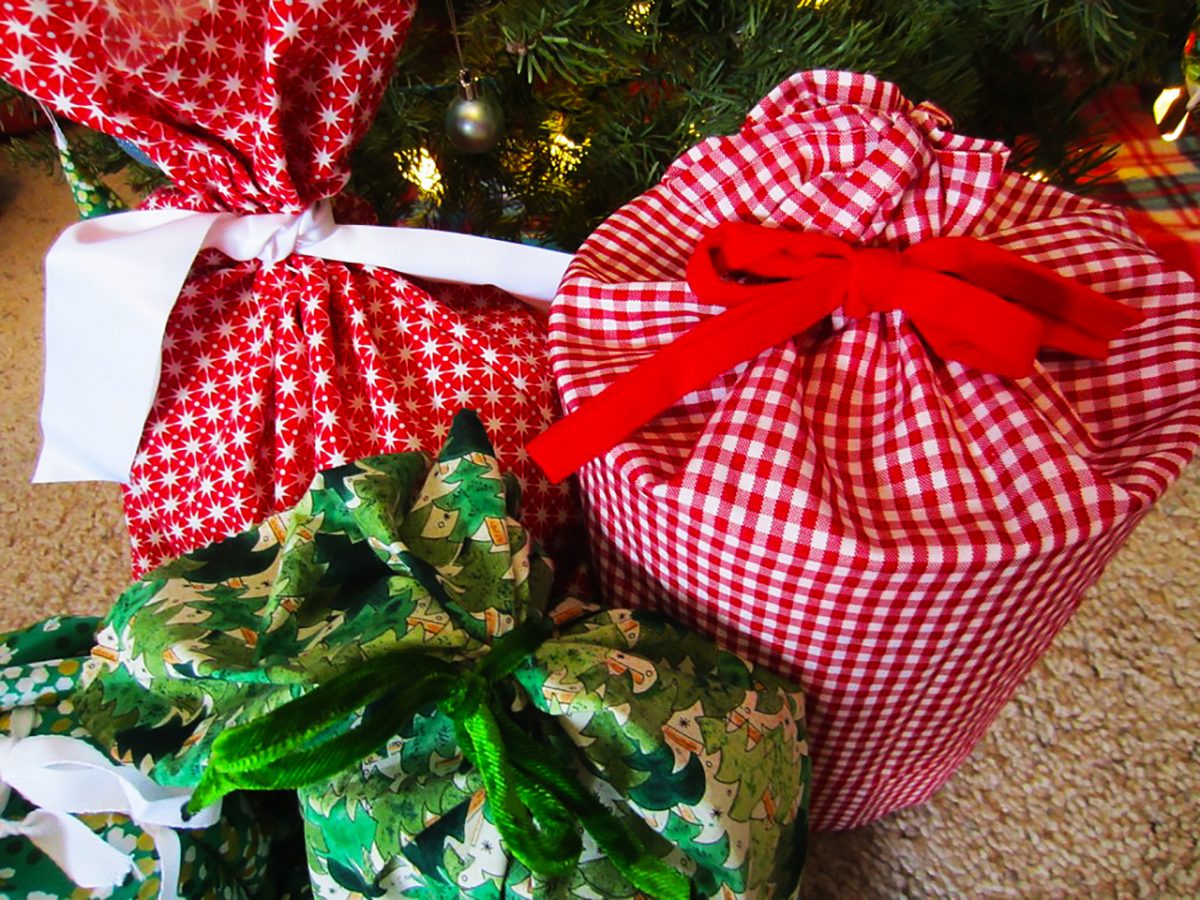
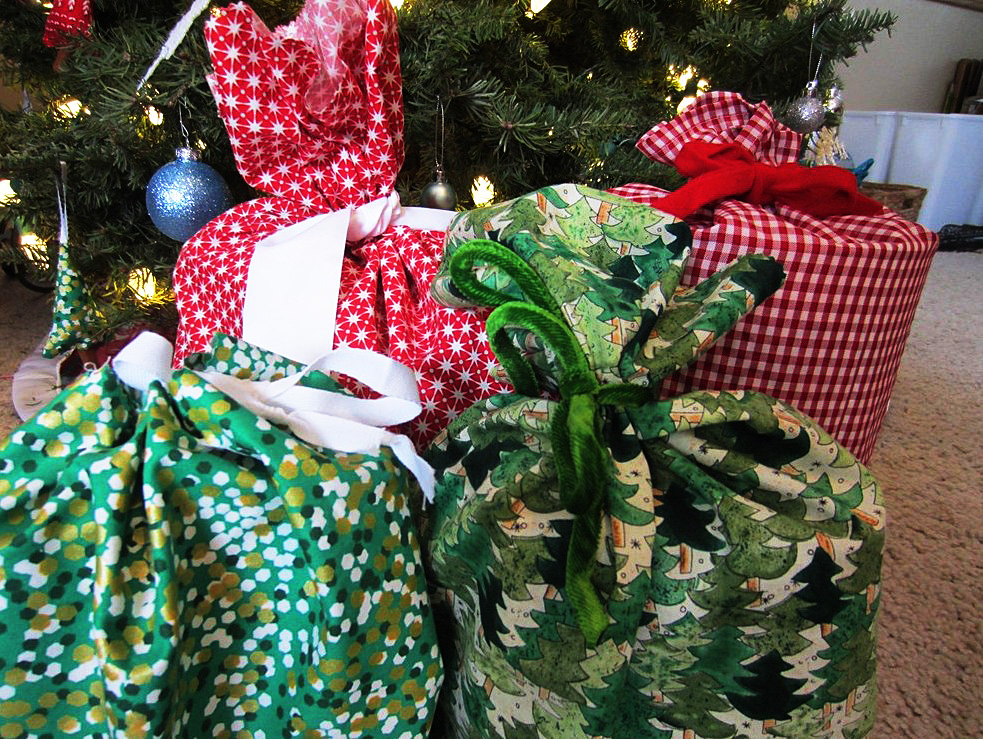
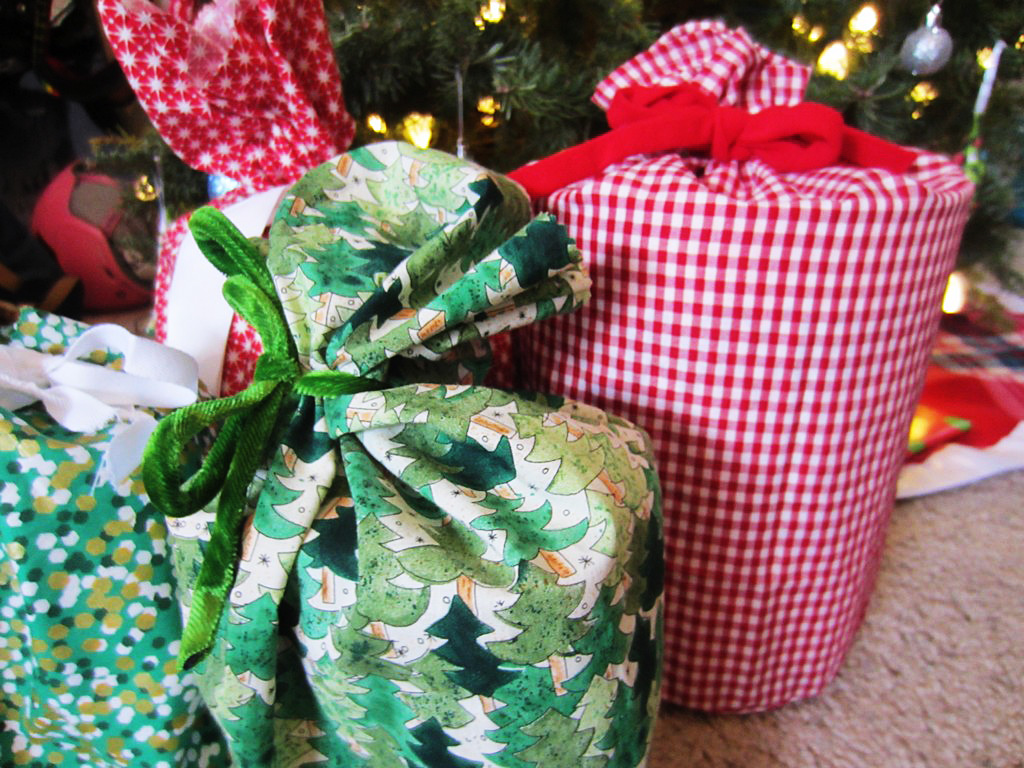
The green bag has box corners and will stand up easily once filled. The larger red bag behind it resembles a pillow case in shape and will be perfect for larger, bulkier gifts.

DIY Fabric Gift Bags instead of Wrapping Paper

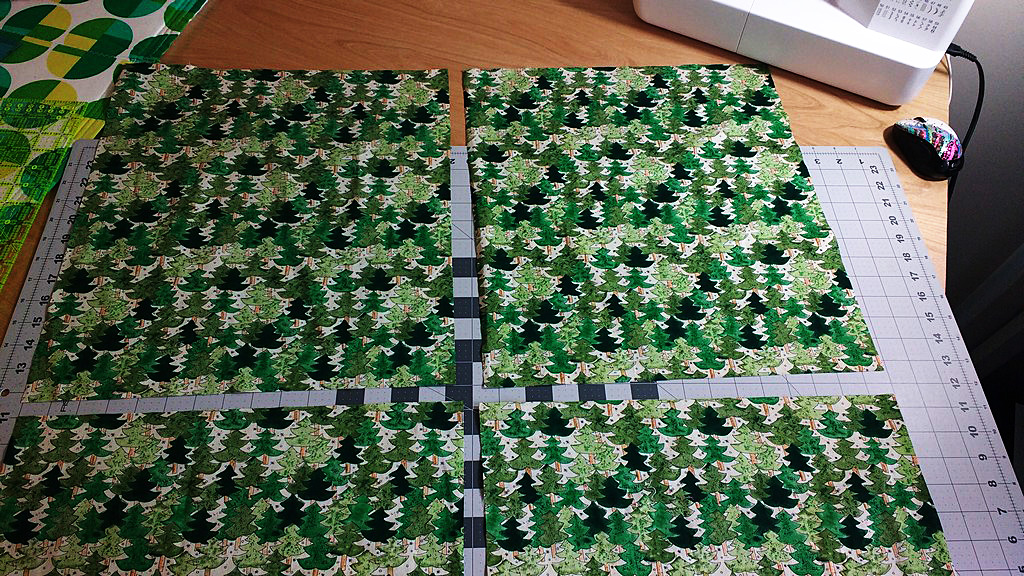
I had the most of this pine tree fabric. Because of the orientation of the trees, I couldn’t fold the double the fabric over to quickly create rectangular bags (if I did that, one side of the bags would have upside down trees). Instead, I cut four even pieces and then placed the pieces on top of each other (2 bags total), right sides together. Then I pinned, pinked and sewed them together.

DIY Fabric Gift Bags instead of Wrapping Paper

Last but not least

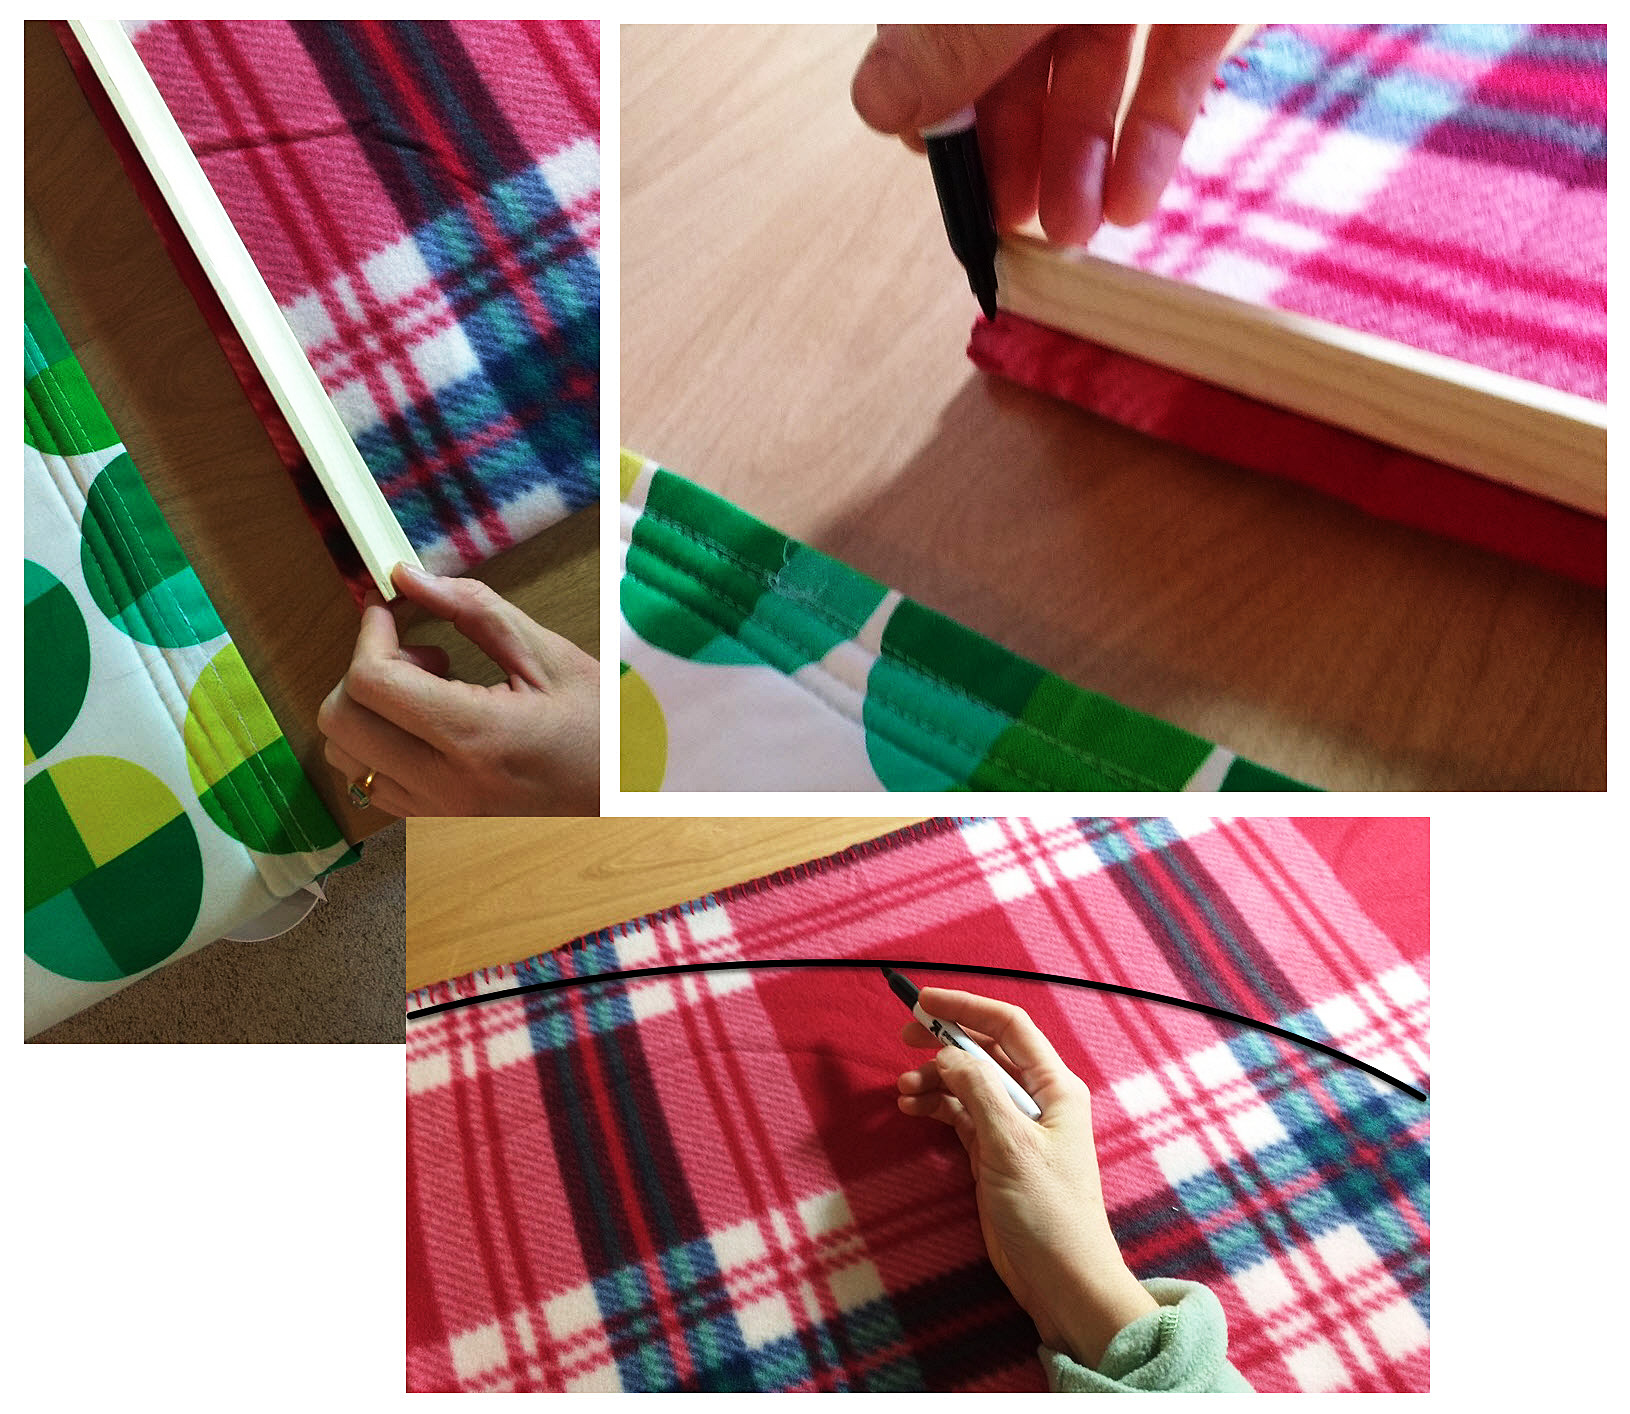
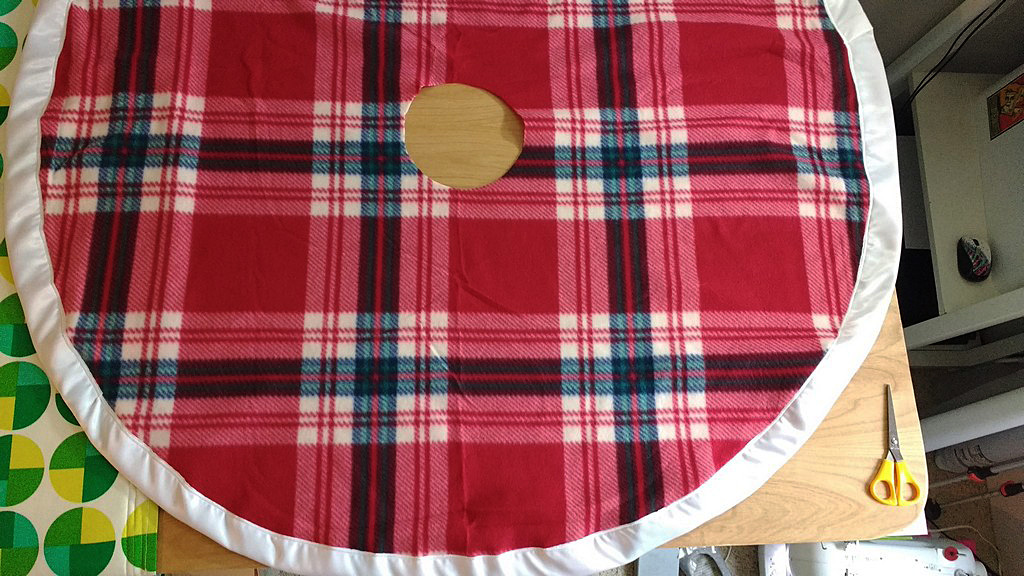
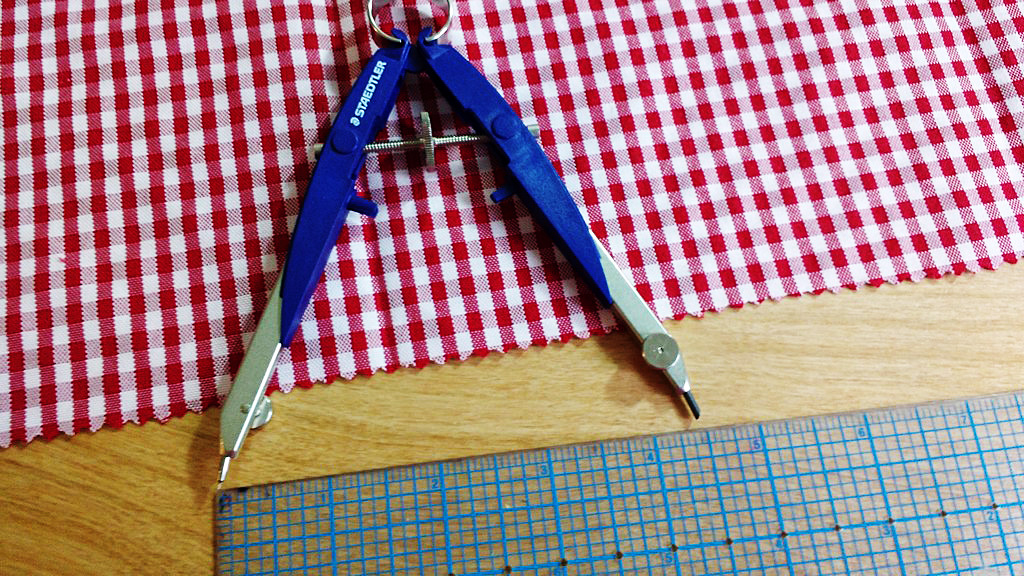
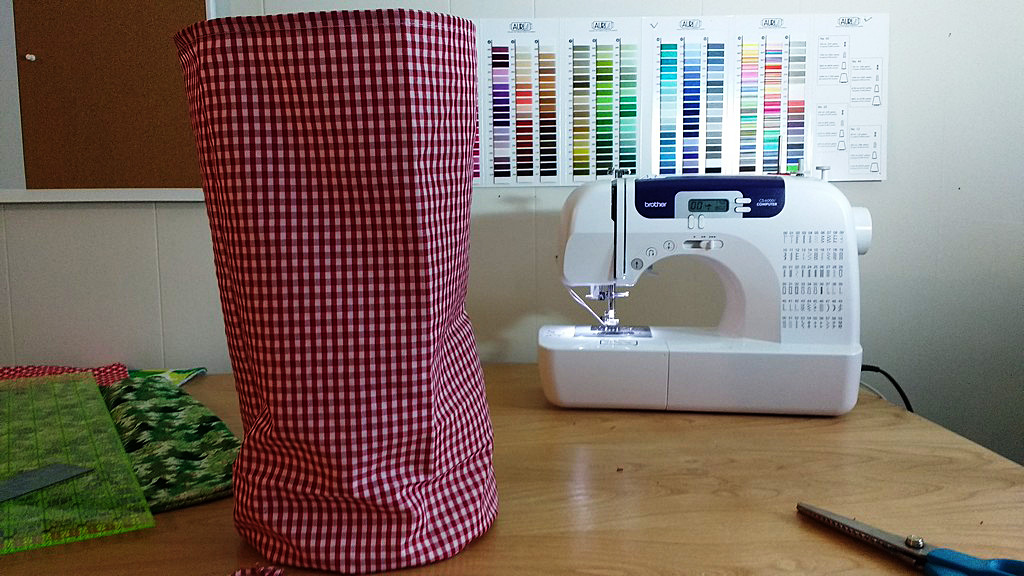
My final piece of fabric was a large, gingham napkin that I’d been holding onto. For this, I thought it’d be fun to create a barrel shape with a circular end. I dug out my compass to make the circle. I knew the circumference of the finished bag would be 25″ so I used the formula d = C/π. I then added .5″ on either side for seams and my diameter was just under 9″.

DIY Fabric Gift Bags instead of Wrapping Paper

Isn’t it darling? Now it was time to wrap some gifts (This was sooooo easy. So much easier than using traditional wrapping paper, scissors and tape).

DIY Fabric Gift Bags instead of Wrapping Paper

I used some trims I had on hand, a velvet green ribbon, a red fleece ribbon and some white satin binding to close everything up.

DIY Fabric Gift Bags instead of Wrapping Paper

I love that I can re-use these year after year and they are reminiscent of Santa’s bag of gifts too.

DIY Fabric Gift Bags instead of Wrapping Paper

Happy Holidays!

—————————–
Charlotte Kaufman is a writer and sewist in Mammoth Lakes, California. She specializes in marine and home interiors and continues to fall more and more in love with quilting. You can follow her at charlottekaufman.com.
DIY Plaid Christmas Tree Skirt with Satin Binding

DIY Plaid Christmas Tree Skirt with Satin Binding

DIY Plaid Christmas Tree Skirt with Satin Binding

I’ve always adored the classic look of plaids during the holidays. And plaid combined with satin is just lovely. We recently moved to a new house and I’ve been doing Christmas on a budget this year. I knew I wanted a plaid Christmas tree skirt but also knew I needed to be frugal. Here’s how I accomplished both.

Fabric first!

I picked up this plaid fleece throw blanket at K-Mart for $1.99. To create a perfect circle, I folded the blanket into quarters and then measured the shorter height of the rectangle it formed. On this blanket, that was 28″. I, randomly, had a stick that measured exactly 28″. You could do this with a long ruler, or just measure out the length you need on any stick or piece of wood and do the same.

DIY Plaid Christmas Tree Skirt with Satin Binding

Once you’ve marked the length on both sides of the rectangle, hold the stick at the corner of the folded blanket, and then draw an arc from point to point, moving only the top of the stick.

Making the cut

DIY Plaid Christmas Tree Skirt with Satin Binding

Now cut out that lovely quarter circle. Before you unfold the blanket, cut out the interior circle (the part that will wrap around the trunk of the tree.) To do this, determine your desired circumference, which will allow you to find the diameter, and thus the radius. If you need the formulas, they are: d = C/π and r = D/2

DIY Plaid Christmas Tree Skirt Satin Binding

Once you know your radius, do the same thing you did to mark out the larger arc but this time at the corner where the blanket is folded into quarters.

DIY Plaid Christmas Tree Skirt Satin Binding

Wash away those wrinkles

At this point I unfolded everything but the fleece was far too wrinkly. One of the great things about fleece is that it doesn’t fray, so I took the opportunity to wash a few of my daughters’ blankets and threw them, and this tree skirt, into the wash on the cold, delicate cycle. I added white vinegar as fabric softener, and then dried on low. It significantly reduced the wrinkles of the fleece.

DIY Plaid Christmas Tree Skirt Satin Binding

Binding it all together

For a tree skirt that is 56″ wide like mine, you will need two packages of satin binding. I used a satin applique stitch and worked my way around the skirt. Pre-packaged satin blanket binding is NOT cut on the bias, so you will need to pay careful attention as you go around the curve of the skirt.

DIY Plaid Christmas Tree Skirt Satin Binding

Some skirt tutorials will tell you to cut a line up to the interior circle before you add binding; I like to cut my line afterwards.

DIY Plaid Christmas Tree Skirt Satin Binding

Looking at the fabric, I followed the lines of the plaid to cut a straight line from the outside of the skirt to the inside and then used more of the satin binding to trim each edge.

DIY Plaid Christmas Tree Skirt Satin Binding

Welcome to the inner circle

When it comes time to bind the interior circle, do yourself a huge favor and switch to binding that is cut on the bias. When fabric is cut on the bias it is much easier to curve it, which makes binding circles, especially interior circles tremendously easier.

DIY Plaid Christmas Tree Skirt Satin Binding

Here I switched to prepackaged white bias binding and though pinning is not my favorite, thing, for this project I pinned everything carefully in place.

DIY Plaid Christmas Tree Skirt Satin Binding

Pro tip: think ahead before you pin and place your pins in the direction that you sew. This will it easier to pull them out as you go around the circle.

DIY Plaid Christmas Tree Skirt Satin Binding

Tie it off

Lastly, don’t forget the ties! I used four pieces of the binding tape that I used on the interior circle to create ties, two at the top of the circle, and two 12 inches down the cut edges.

DIY Plaid Christmas Tree Skirt Satin Binding

Here is my tree before the plaid tree skirt.

DIY Plaid Christmas Tree Skirt Satin Binding

And voilà, the finished product!

DIY Plaid Christmas Tree Skirt Satin Binding

The combo of fleece, plaid, and satin just warms my heart.

DIY Plaid Christmas Tree Skirt Satin Binding

What are you DIYing this holiday season? Let us know and happy sewing!

—————————–
Charlotte Kaufman is a writer and sewist in Mammoth Lakes, California. She specializes in marine and home interiors and continues to fall more and more in love with quilting. You can follow her at charlottekaufman.com.
How to Quilt a Quilt

How to Quilt a Quilt

In English, the word quilt is both a noun and a verb. You can make a quilt, and you can quilt one. When I was first learning about quilting, several times I tried the search phrase ‘how to quilt a quilt’ but I rarely got the information I was looking for. I’m hoping this post will find its way to others who were looking for the information I couldn’t find as a new quilter.

It took me awhile to discover all the methods of quilting and I’m still learning more to this day. If there is another technique you are aware of that isn’t in this article, please share in the comments!

Quilting by hand

The two methods of finishing a quilt sandwich (the term for the classic three layers of a quilt: top, batting, bottom) by hand are hand tying and hand stitching. Quilts have been around since the dawn of time but for a large portion of our recorded history they were highly functional, as opposed to decorative, or a form of art or hobby. Hand tying and hand stitching were quick and effective ways of completing a quilt sandwich.

Hand tying


Images via Quilting in the Rain, WikiHow, Selvage Blog, Craftsy.

Images via Quilting in the Rain, WikiHow, Selvage Blog, Craftsy.

Hand tying or tufting a quilt is a method of spacing out knots every 4” to 8”across a quilt’s surface. While a square knot is the most common method of tying, quilters can get as creative as they like, using a Sheath stitch, for example, or other forms of embroidery knots.

Hand stitching


Images via Jennifer Causey, Shiny Happy World, Tied With a Ribbon, and The Sewing Directory.

Images via Jennifer Causey, Shiny Happy World, Tied With a Ribbon, and The Sewing Directory.

Even after sewing machines began to be used for creating quilts, hand stitching remained the preferred method for finishing a quilt for a long time. Today even modern quilters love this method and value the hand crafted look it gives finished quilts.

Machine quilting


Machine quilting with a walking foot. Image via charlottekaufman.com.

Machine quilting with a walking foot. Image via charlottekaufman.com.

Machine quilting generally comes in three forms, quilting done with a walking foot, free motion quilting (FMQ), and long arm quilting (a variation of FMQ).

Walking foot


Images via charlottekaufman.com.

Images via charlottekaufman.com.

While a regular foot can be used to finish a quilt, walking feet are preferred because of their method of allowing all three layers of the quilt sandwich to travel evenly under the needle at the same time. The only limitation to quilting with a walking foot is that the needle always moves forward so you must move the quilt on your own and unless you have a machine with a long neck, and this can be cumbersome. I’ve been eyeing this Janome at Sewing Machines Plus because of how much neck room it gives. Oh to quilt with such a lovely machine!

Free Motion Quilting (FMQ)


Images via Charlotte Kaufman of SewSewSewYourBoat.com.

Images via Charlotte Kaufman of SewSewSewYourBoat.com.

Free motion quilting (FMQ) is a ton of fun. In this style of quilting you can move the fabric in any direction you’d like as you sew. This allows for beautiful curves and detailed designs that a walking foot just can’t give you. A special foot is connected to the presser foot and you must lower the feed dogs of your machine in order for FMQ to work. Here are some examples of my own FMQ. You would be very hard pressed to do this kind of work with a walking foot.

Long Arm Quilting


Images via Free Range Quilter and Schnigschnag Quilts and More.

Images via Free Range Quilter and Schnigschnag Quilts and More.

Long arm quilting is when a sewing machine can do FMQ on a large scale. In long arm quilting quilts are put on a frame and the quilter than moves the neck of the machine over sections of fabric at a time to create gorgeous and intricate designs. These machines can be prohibitively expensive for some but many long arm quilters find that by offering their services to other quilters they quickly pay off the cost of the machine. Sewing Machines Plus offers monthly payment plans and financing if you are thinking of getting one of these gorgeous machines. I’ve looked longingly at this King Quilter and this Juki Long Arm.

—————————–
Charlotte Kaufman is a writer and sewist in Mammoth Lakes, California. She specializes in marine and home interiors and continues to fall more and more in love with quilting. You can follow her at charlottekaufman.com.
Tips on Sewing with Kids

Tips on Sewing with Kids

Do you have a child in your life that wants to learn how to sew? If so, encourage that curiosity and allow them to learn this amazing skill. While the process of learning to sew is technically the same for children and adults, there are a few things more to consider when teaching young children how to sew.

Do you have a child in your life that wants to learn how to sew?

Do you have a child in your life that wants to learn how to sew?

What is the right age?

Can your child read? Can they follow simple instructions? Many of my friends begin teaching their children around age 7-8, however children as young as 5 or 6 can sew if they have the right maturity level and fine and gross motor skills to use a sewing machine. If they have the ability to hand sew, they can probably learn how to use a machine.

Adjust things to child size

When my 6 year old daughter sews with me, I place the foot pedal on a bathroom stool so that she can reach it while she sews.

When my 6 year old daughter sews with me, I place the foot pedal on a bathroom stool so that she can reach it while she sews.

When my 6 year old daughter sews with me, I place the foot pedal on a bathroom stool so that she can reach it while she sews. Consider what chair you have them sit in and make sure they can reach all the pertinent parts of the machine, like the presser foot lever and the wheel.

Go over the dangers

Spend some time demonstrating how fabric goes through the machine and how the needle is in constant motion when the foot pedal engaged.

Spend some time demonstrating how fabric goes through the machine and how the needle is in constant motion when the foot pedal engaged.

The biggest danger is the needle of the sewing machine. Spend some time demonstrating how fabric goes through the machine and how the needle is in constant motion when the foot pedal engaged. Describe the few inches in front of the needle as a ‘no-go zone’ and consider putting washi tape in a small rectangle forward of the needle to remind them not to get their fingers near the needle. Also explain how the foot pedal and needle work together. If they play with the foot pedal without paying attention, they could catch their fingers (or yours) if you are in the middle of demonstrating something to them.

Practice on paper!

There are many printables available online that allow children to practice “sewing” by having the children sew patterns on paper.

There are many printables available online that allow children to practice “sewing” by having the children sew patterns on paper.

An example of a paper sewing guide for children from www.welcometothemousehouse.com.

That’s right. There are many printables available online that allow children to practice “sewing” by having the children sew patterns on paper. This technique is convenient because the needle’s puncture holes are visible and the children can easily see where they are not staying in the lines. It’s also wonderful for helping them master sewing curves.

Engage your learner

If your child has expressed interest in sewing, try to let them start on a project they actually want to make. This ensures they’ll be invested in the learning process and will make them that much prouder of their final product.

Here is my then five year old daughter showing off the rag quilt she helped to sew.

Here is my then five year old daughter showing off the rag quilt she helped to sew.

Here is my then five year old daughter showing off the rag quilt she helped to sew. She made this as a gift for a teacher at her school who was expecting a baby.

Have fun!

Don’t make this something that is stressful. If you, or the child, are starting to get frustrated, take a breather. Sewing is a wonderful skill. Don’t let their first memories of it be of anger or frustration.

What tips do you have for sewing with kids? Please feel free to share in the comments.

—————————–
Charlotte Kaufman is a writer and sewist in Mammoth Lakes, California. She specializes in marine and home interiors and continues to fall more and more in love with quilting. You can follow her at charlottekaufman.com.
Bunk Bed Privacy Curtains

Bunk Bed Privacy Curtains

Privacy curtain open.

Privacy curtain open.

If you’ve ever been on a sailboat you might have seen little panels that draw closed across the sides of berths to give sailors a modicum of privacy. It was this tack I took when figuring out how to make each bunk in my daughters’ bed a small, personal space of their own.

Privacy curtain open.

Privacy curtain open.

Supplies

Here are the items you need to make your own bunk bed privacy curtains:

  1. Tension rod and curtain rod holders. We had to affix two square pieces of wood on either end of the bunk bed in order for the rod to fit.
  2. Shower curtain rings (I used clear).
    3. Fabric for the panels (mine are double-sided).
    4. Batting for structure (if using white or light-colored material).
    5. Drapery wands. These are especially useful for keeping little hands off of white fabric, plus they are a ton of fun. I got mine on Amazon in a mini-size by searching for RV Drapery Wands.
Drapery wands.

Drapery wands.

Put it all together

Each panel is 36”x29”. I sewed button holes along the top width and then used shower curtain rings to hang the panels. On my first attempt, I made the buttonhole too close to the top hem.


One of the things I love about sewing is how easy it is to remedy your mistakes. Here I simply sewed across the upper portion of the hole to align it with the others at the correct height. And unless you take a magnifying glass to the finished project, no one is so much the wiser.


The fabric is from Sarah Jane’s Magic line. I used a mix of Magic Parade Double Border in White Metallic and Lucky Stars in White Metallic.

Ta-da!

My girls adore these too, as you can see.

My girls adore these too, as you can see.

Projects that come together quickly and look awesome are my favorites. My girls adore these too, as you can see.

What types of quick projects have you done lately that really knocked it out of the park?

—————————–
Charlotte Kaufman is a writer and sewist in Mammoth Lakes, California. She specializes in marine and home interiors and continues to fall more and more in love with quilting. You can follow her at charlottekaufman.com.
These will make gorgeous DIY gifts.

DIY Pom Pom Fleece Blanket

I rarely meet someone who doesn’t like pom poms or fleece. They are two great unifiers and when you put them together, magic happens. They became my inspiration recently when perusing through Pinterest for ideas for our handmade holiday gifts for the girls’ teachers. I began my search for ideas in September, well in advance of December, so I knew that I’d have time to get them done.

This DIY tutorial was my starting template. However it is a no-sew version of what I’m about to show you. Here is how to make a DIY pom pom fleece throw blanket.

Assemble your Materials

Order a bunch of fleece. I waited until Joann’s had a 50% off coupon and I ordered 9 yards. I want to make 6 blankets and each blanket will be 1.5 yards in length. 1.5 x 6 = 9. Do the math for however many blankets you need.

This is Joann’s anti-pill fleece fabric in Ivory.

This is Joann’s anti-pill fleece fabric in Ivory.

This is Joann’s anti-pill fleece fabric in Ivory. The roll arrives with the fabric doubled on the roll. Carefully measure out 1.5 yards for each blanket and then square up the sides as needed.

Carefully measure out 1.5 yards for each blanket and then square up the sides as needed.

Carefully measure out 1.5 yards for each blanket and then square up the sides as needed.

Voila, six blankets awaiting their pom poms.

Voila, six blankets awaiting their pom poms.

Voila, six blankets awaiting their pom poms.

I wanted to do an ombre, triple row of pom poms on each end of the blankets. I did the math here again. The fabric I ordered is 58” wide, by 1.5 yards (54”). I planned to add the pom poms on the shorter side, so I’d need 3 yards (1.5 yards per end) for each blanket. 3 yards time six blankets is 18 yards of EACH color of pom poms.

I got these from IchiMyLove on Etsy. Handily, they sold pom poms in bulk by 18 yards (IT’S LIKE IT WAS MEANT TO BE!) And their color selection was fantastic. They ship from Thailand but the shipping was only a little longer than the wait for a US shipped product. Plan ahead!

Their color selection was fantastic.

Their color selection was fantastic.

Know Your Fabric

A few tips when sewing fleece:

  1. Use a longer stitch length.
  2. I saw a lot of tutorials that said to use a ball point needle but I didn’t have any. I used a quilting needle, size 14, and it worked out great.
  3. Don’t mess up. It’s really difficult to rip out stitching on fleece. To prevent mess ups, practice on a bit of scrap to make sure you have stitch length and tension set correctly.
  4. Fleece doesn’t fray when cut. Because of this, you can decide to add reinforced stitching on the longer (non-pom pom) side or not.

Fleece doesn’t fray when cut. Because of this, you can decide to add reinforced stitching on the longer (non-pom pom) side or not.

Take Your Time

Stitching on the triple rows of pom poms on each side is time consuming. Put on some music or your favorite podcast and zen out.

If you have a tag to include, plan out between which layers you want to add it.

If you have a tag to include, plan out between which layers you want to add it.

If you have a tag to include, plan out between which layers you want to add it.

Take it slowly, pushing each pom pom out of the way of the foot, or you’ll end up like this, with your needle in the middle of a pom pom and your project on hold until you get yourself out of that mess. Don’t be me like me!

Take it slowly, pushing each pom pom out of the way of the foot, or you’ll end up like this, with your needle in the middle of a pom pom and your project on hold until you get yourself out of that mess.

Take it slowly, pushing each pom pom out of the way of the foot, or you’ll end up like this, with your needle in the middle of a pom pom and your project on hold until you get yourself out of that mess.

Once completed, I washed the blankets on the gentle cycle in warm, not hot, and did not use fabric softener. Tumble dry on the gentle cycle as well. I added a Shout Color Catcher just to make sure the pom poms didn’t bleed.

Here is the finished product. These will make gorgeous DIY gifts.

Do you give handmade gifts during the holidays? What are your plans for this year?

—————————–
Charlotte Kaufman is a writer and sewist in Mammoth Lakes, California. She specializes in marine and home interiors and continues to fall more and more in love with quilting. You can follow her at charlottekaufman.com.

DIY Ironing Board Ideas

I recently decided to upgrade my ironing station from two towels placed on top of my new DIY work station to something fancier. I went from this:

I recently decided to upgrade my ironing station from two towels placed on top of my new DIY work station to something fancier.

DIY work station.

To this:

Fancy, right?

Fancy, right?

Fancy, right? Before I made my own ironing station I did a little research. Here’s what I learned.

Be Creative

Images from left to right: BH&G, Hometalk, Crazy Mary Revista, Sew We Quilt.

Images from left to right: BH&G, Hometalk, Crazy Mary Revista, Sew We Quilt.

Images from left to right: BH&G, Hometalk, Crazy Mary Revista, Sew We Quilt

The sky is really the limit when planning where you want to iron. Do you want to be able to iron a lot of fabric at a time? Go big. Do you want to save space? Go between the studs or hang from the wall. Almost anything with a flat top can be converted into an ironing board.

Thing Long Term

Images from left to right: Flaming Toes, Stitchery Dickery Dock, A Diamond in the Stuff, A Crafty Fox.

Images from left to right: Flaming Toes, Stitchery Dickery Dock, A Diamond in the Stuff, A Crafty Fox.

Images from left to right: Flaming Toes, Stitchery Dickery Dock, A Diamond in the Stuff, A Crafty Fox

Will you want your ironing board to always be on display? Consider the fabric you choose and if it coordinates or clashes with the space you’ll be ironing in.

Consider the fabric you choose and if it coordinates or clashes with the space you’ll be ironing in.

Consider the fabric you choose and if it coordinates or clashes with the space you’ll be ironing in.

I made my cover removable. It snaps firmly into place on my work station, but I can slip it off in a moment if I want the whole space.

Be Resourceful

Want to save money? You can line your ironing board cover with many things. Try using old wool blankets, receiving blankets, towels, or the innards of your former ironing board covers. Layers of batting work as well. If you want to use Insul-Bright, make sure to include a layer of batting to absorb extra moisture.

Go Vintage

Images from left to right: Simply Pallets, Recyclart.org, The Rustic Pig.

Images from left to right: Simply Pallets, Recyclart.org, The Rustic Pig.

Images from left to right: Simply Pallets, Recyclart.org, The Rustic Pig

If you are retiring a vintage ironing board for a newer one, don’t let the old board go to waste.
Use it as a wine station, to store your thread, or for holiday decorations.

Have Fun!

Have you ever made a DIY ironing station? Tell us about it!

Have you ever made a DIY ironing station? Tell us about it!

Have you ever made a DIY ironing station? Tell us about it!

—————————–
Charlotte Kaufman is a writer and sewist in Mammoth Lakes, California. She specializes in marine and home interiors and continues to fall more and more in love with quilting. You can follow her at charlottekaufman.com.
Should you Include Barter in your Sewing Business?

Should you Include Barter in your Sewing Business?

If you run a small (or sometimes large) sewing business, you may occasionally have the desire, or encounter an offer, to barter services. Bartering is an age old method of exchanging labor and/or goods and it’s one I would encourage you to not dismiss until you’ve fully considered what it could offer.

Bartering is an age old method of exchanging labor and/or goods and it’s one I would encourage you to not dismiss until you’ve fully considered what it could offer.

When considering barter, keep the following things in mind before you agree:

Make Sure you Get an Equal Exchange of Goods

Ensure your barter is for an equal exchange of goods or labor. If you are providing someone with $500 worth of labor on repairing upholstery, make sure you get the equivalent in return. If, for example, you would only receive $300 in custom built-in shelving, be very explicit that the remaining $200 will be paid in dollars. Be sure to delineate labor versus supplies/shipping/etc., and that both parties are in agreement on which exactly of those things is being bartered equally for.

Is it Worth it to You?

A lot of people have a hard time saying no. Remember, in addition to practicing your craft, you are running a business. If you prefer cash or the person offering the bartered goods or services doesn’t have something you need or desire, politely decline and ask for actual payment instead.

Exchanging my labor for spa services worked for me. Here I’m on a Mexican vacation, rocking a pedicure obtained via barter for my sewing services.

Exchanging my labor for spa services worked for me. Here I’m on a Mexican vacation, rocking a pedicure obtained via barter for my sewing services.

Recently I was approached about doing barter for a local spa. They needed large amounts of their high-end spa robes repaired and offered to barter in exchange for spa services. I’m a sucker for a good pedicure and I usually pay for this indulgence. A barter of my labor in exchange for spa service in this case was definitely worth it. I submitted invoices of the time my labor took for each batch of robes, and the monetary amount was then put 1 to 1 into my vendor account as credit at the spa.

Write it Down

Get your agreement in writing. Even if that writing is an email thread where you go back and forth until all the details are fully worked out, it’s crucial you have the agreement in writing should either party need to go back and clarify.

Also consider only doing barter for a specific time or a specific project. Just because you’ve used barter in the past does not mean you are forever stuck doing that. Be clear about for how long you’d want that specific agreement to last and don’t hesitate to ask for monetary payment in the future.

Understand whether or not to include tax on a barter invoice. In California, you do not need to charge tax for labor on repairing items that have already been made.

Understand whether or not to include tax on a barter invoice. In California, you do not need to charge tax for labor on repairing items that have already been made.

Don’t Forget Taxes

You may need to include tax on your barter invoice. Every state has its own laws in this regard, so look up where you are living to make sure you bill accordingly. I live in California. In the example above where I bartered my labor in exchange for spa services I did NOT need to charge tax but that is only because my labor was on repairs. If I had sewn new robes for them, I would have needed to charge tax on that labor. Take the time to find out how to report each transaction.

Do you barter? If so, what types of bartering situations motivate you? If you haven’t tried bartering, you may want to give it a try. Let me know how it goes.

—————————–

Charlotte Kaufman is a writer and sewist in Mammoth Lakes, California. She specializes in marine and home interiors and continues to fall more and more in love with quilting. You can follow her at charlottekaufman.com.
Fabric Trend: Crazy Cat Lady

Fabric Trend: Crazy Cat Lady

You are bound to get a cross over between fabric lovers and cat lovers.

In the United States alone, we have over 85 million house cats. Additionally a 2014 survey by Quilting in America showed that there are over 16 million active quilters in our country as well. With numbers that high, you are bound to get a cross over between fabric lovers and cat lovers, and when you do, new fabric lines like these are born:

From Porto with Love, by Sarah Watts, for Cotton + Steel

Inspired by designer Sarah Watts’ travels to Portugal, From Porto with Love features cats designed with old world charm.

Inspired by designer Sarah Watts’ travels to Portugal, From Porto with Love features cats designed with old world charm.

The line includes a pattern for cut-out cat plushies in two colorways.

The line includes a pattern for cut-out cat plushies in two colorways.

There are two cat plushies per panel and when complete they mirror each other. Just cut, stuff and sew.

There are two cat plushies per panel and when complete they mirror each other. Just cut, stuff and sew.

Cat plushies from Cotton + Steel’s Pennie print

MEOW or Never, by Erin Michael, for Moda Fabrics

Designer Erin Michael continues her paint-by-number palette with this new line, MEOW or Never, featuring a colorful assortment of feline friends.

Michael’s purrific designs stood out Quilt Market Spring 2016 and quickly inspired many projects including this cat clutch designed by Anna Graham of Noodlehead.

Michael’s purrific designs stood out Quilt Market Spring 2016 and quickly inspired many projects including this cat clutch designed by Anna Graham of Noodlehead.

The true piece de resistance of the MEOW or Never line is this giant kitty cat quilt. Truly, cat lovers everywhere are lining up to order this quilt kit, which is sure to please both humans and felines alike.

The true piece de resistance of the MEOW or Never line is this giant kitty cat quilt.

Cat Lady, by Sarah Watts, for Cotton + Steel

Sarah Watts is a co-founder and designer for Cotton + Steel. After the purrfection of her cats in From Porto with Love, she is back with the Cat Lady line of fabrics.

After the purrfection of her cats in From Porto with Love, she is back with the Cat Lady line of fabrics.

And yay, cat lovers everywhere rejoiced!

And yay, cat lovers everywhere rejoiced!

Cat Lady fabric, image via Lady Belle Fabric

Cat Lady is full of whimsy, color, and movement.

Cat Lady is full of whimsy, color, and movement.

Cotton + Steel offers this free pattern for this Cat Lady quilt on their site. I love the cats playfully flow around the quilt.

Cotton + Steel offers this free pattern for this Cat Lady quilt on their site.

This Frida Cat is one of my current faves by designer Cynetik.It’s not just fabric houses that are getting onboard the cat craze. Spoonflower has pages of fabric designed with cats galore. This Frida Cat is one of my current faves by designer Cynetik.

There are even fabric websites dedicated solely to offering cat-themed fabric. www.felinedezine.com and www.felinedrive.com are just two examples. Have you made anything that made you or a favorite pet meow? I think the Meow or Never kitty quilt by Erin Michael’s is next on my ‘to make’ list.

Charlotte Kaufman is a writer and sewist in Mammoth Lakes, California. She specializes in marine and home interiors and continues to fall more and more in love with quilting. You can follow her at charlottekaufman.com.
Types of Pillow Closures

Types of Pillow Closures

There are several methods of finishing the back, or ends of a pillow, depending on what kind of cover you are making.

There are several methods of finishing the back, or ends of a pillow, depending on what kind of cover you are making.

Sewing your own pillow covers is a quick way to bring a personal touch to your home. There are several methods of finishing the back, or ends of a pillow, depending on what kind of cover you are making. Knowing the best way to close a pillow can mean the difference between a project that looks just okay to a project that looks professionally magnificent.

Envelope closure.

Envelope closure.

1. Envelope Closure

An envelope close looks just like it sounds. Your pillow backing will have two panels of fabric that overlap, leaving an envelope style closure in which you slip your pillow form.

You can also embellish envelope closes with ties and buttons to add interest and whimsy.

You can also embellish envelope closes with ties and buttons to add interest and whimsy.

This style is excellent if you aren’t ready to take on zippers, if you know you will frequently be washing the cover, or you want to use a method that is quick and still looks beautiful. You can also embellish envelope closes with ties and buttons to add interest and whimsy.

Zipper closure.

Zipper closure.

2. Zipper Closure

With a zipper close you can either finish your cover with an invisible zipper or use an exposed zipper. I like to use zippers for pillows that are not standard sizes, like this custom Ghostbuster pillow I made for a friend’s son.


Zippers are especially well suited for large pillows like these floor cushions.

Zippers are especially well suited for large pillows like these floor cushions.

Zippers are especially well suited for large pillows like these floor cushions.

3. Drawstring Closure


Drawstring closures are common on tube pillows. There is nothing tricky about a drawstring close on a pillowcase. If you have made a pair of pajama pants or a tote bag with a drawstring close, you can create a pillowcase that closes the same.

4. Pillowcases for bedding – to add a hidden flap or not?


A pillowcase for bedding classically closes one of two ways. The first is with an open end. If you go this route, make sure to allow for enough room at the end to fully cover the inner pillow form.

A second option is to add a hidden flap on the open end.

A second option is to add a hidden flap on the open end.

A second option is to add a hidden flap on the open end. This flap allows you to tuck the pillow form inside and keep it from showing.

This flap allows you to tuck the pillow form inside and keep it from showing.

This flap allows you to tuck the pillow form inside and keep it from showing.

Do you have a favorite method for pillow case closures? I think my favorite may be drawstring but envelope comes a close second. Tell us yours!

Charlotte Kaufman is a writer and sewist in Mammoth Lakes, California. She specializes in marine and home interiors and continues to fall more and more in love with quilting. You can follow her at charlottekaufman.com.