Sewing Baby Toys

Sewing Baby Toys

I just learned that a dear friend of mine is pregnant. After the announcement and our subsequent celebratory lunch, my mind starting thinking about what I could make to welcome her child into the world. It’s too early on to know if it will be a boy or a girl, which also means I’ve got plenty of time to make something by hand and from the heart. Here’s a few of the baby toys I’m thinking about making. I’d love to hear your thoughts on them!

adorable-20374_640

Two-Sided Baby Blanket

I love this idea. I used to love my two-sided comforter because I could flip it around based on my mood (and also based on which side had less cat hair…) My friend and her man are super unique, so I know their baby’s room is going to have flair and style. A reversible baby blanket would be right up their alley. Of course, I’d want it to match the colors they choose for the nursery, so I’ll have to check about that before I start.

Super Soft Receiving Blanket

Like all babies, I’m sure my friend’s bundle of joy is going to want to be held A LOT. And I know my friend is up to the task. She’s going to be an amazing mom! The new arrival is due in the February/March timeframe, so it will still be cool where we live. It makes me think that a super soft, and warm receiving blanket will help new mom and baby snuggle and bond.

Crunchy Jellyfish

It won’t be long before that new bundle of joy is putting everything in his or her mouth. (By the way, I’m certain it will be a girl.) Between teething and the need to understand the world using all her senses, her mouth is going to be full of all sorts of stuff. I love this crunchy jellyfish pattern because it will give her something safe to mouth on and it’s so cute!

Sun Toy

Along the same lines as the crunchy jellyfish, this sun toy is super cute and great for littles ones putting everything in their mouths. It’s got loads of textures too, making it entertaining in many ways. And when baby decides it’s time to throw her toys, it’s soft and won’t hurt or damage anyone or anything.

So, if it was your friend having a baby, which of these cool baby gifts would you make?

DIY: Reversible Tote Bag Tutorial

DIY: Reversible Tote Bag Tutorial

It is easy to sew a reversible tote bag; even beginners can make this project.

It is easy to sew a reversible tote bag; even beginners can make this project.

It is easy to sew a reversible tote bag; even beginners can make this project.

You can make these in any size. My three examples are each sized slightly differently.

To make one reversible tote bag, you need 2 different bag fabrics. Depending on the sturdiness of your fabrics, you may also need medium weight interfacing or fusible fleece. You can make your bag handles from long rectangles of one or both of these fabrics, or you can use grosgrain ribbon, as I have here.

Reversible tote bag step one: cut bag pieces
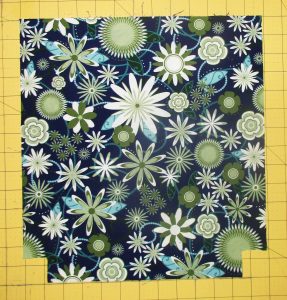
Measure & mark 1.5” from both sides of the bottom corners & cut these little squares out.

Measure & mark 1.5” from both sides of the bottom corners & cut these little squares out.

Cut two squares or rectangles of each fabric to your preferred dimensions. I made these using 13” x 14”, 14” x 15” and 13” x 17” rectangles, and I have made them both much smaller and much larger.  The 13” x 17” is big enough for my laptop. But ribbon handles aren’t a good idea for a laptop bag; follow the directions for making stronger fabric handles if you plan to carry your computer.

Then measure and mark 1.5” from both sides of the bottom corners and cut these little squares out. Do this for all four pieces of your bag fabric.

Step two, optional: interfacing

If you choose to make your reversible tote bag from home decor fabric and/or canvas, you won’t need to use interfacing.

If you are using quilter’s cottons or similar lightweight fabrics, cut fusible fleece or interfacing to fit two of the bag pieces. Follow package directions to fuse fleece or interfacing to the wrong side of both pieces of one bag fabric.

Step three, optional: pockets

You can make pockets on one or both sides of your reversible tote. The easiest way to make pockets is to start with a rectangle, fold it right sides together, and sew all around, leaving an opening for turning. First topstitch the opening closed, then pin and sew the bottom and sides of the pocket to the bag.

You can make a long rectangular pocket that stretches the full width of your bag, or make square patch pockets and sew them in the middle of one or more of the bag pieces.

Step four: sew two bag bodies

Take both pieces of one of the bag fabrics and sew along the bottom and side seams with right sides together. Press seams open. Now, miter the corners by lining up the side and bottom seams you just sewed at the middle of the new seam you will form from the square cut out. Sew these seams.

Repeat with the pieces of the second bag fabric.

Step five: handles

Use a soft measuring tape or even a string hung over your shoulder to determine how long you want your straps to be. I like long shoulder straps, so I usually cut mine about 30 inches long. If you prefer to carry your tote on your arm, cut yours shorter. You need two.

I saved time making these bags by using grosgrain ribbons to make easy straps. To do this, just cut two pieces of ribbon to your desired length.

To make fabric handles, cut two long rectangles to your desired length measurement by twice your desired strap width. Apply interfacing to the wrong side of your fabric if you like.  Fold lengthwise right sides together and press. Sew along the long open edge, then turn. Press again.  Now top-stitch along both long sides.

There is no need to finish the short ends as these will be concealed between the two sections of the bag.

Step six: assembly

They are handy for carrying books, notebooks, your computer, clothes for overnight or the gym.

They are handy for carrying books, notebooks, your computer, clothes for overnight or the gym.

Insert one bag into the other, with right sides together. If your placed pockets on one side of each bag body, insert them together so that the pockets are on opposite sides. Push down the corners to make sure both bag pieces are lined up well at the bottom. Then line up the side seams from both pieces and pin these together.

Take one strap and hold one end in each hand so that the loop hangs down. Be sure it isn’t twisted and insert it between the two bag parts on one side. Measure in from the pinned side seams on each side to be sure the straps are centered. About three inches in is a good guideline, but eyeball your bag to decide on exact strap placement. Just measure the distance between strap and side seam on both sides to be sure they are even. Pin, then repeat on the other side with the other strap.

Now sew together along the top edge.  You will have to leave an opening big enough for turning; I sew across all the straps and leave the opening on one side.  Turn everything right sides out. Both sides of the reversible tote will be pointing out.

Stick your hand into the opening and poke all the corners out from the inside. Then push one bag body into the other so that it becomes a bag with handles at the top. Return to your ironing board and press. Pay attention to the edges still open from turning; you want to press the raw edges inward and neatly align for top-stitching this opening closed.

Now stitch all the way around the top of the bag and you’re done.

Make more!

Reversible tote bags are easy to sew in a hurry & the possible variations are endless.

Reversible tote bags are easy to sew in a hurry & the possible variations are endless.

Reversible tote bags are easy to sew in a hurry and the possible variations are endless. Make them in different sizes and try different fabrics and trims. Use tie-dye, quilting, appliqué, fabric paints, or any other embellishment you like.

They are handy for carrying books, notebooks, your computer, clothes for overnight or the gym. You can use them as a shopping bag, your purse, or for handmade gift giving. Pick out some pretty fabrics and make a bunch. Happy sewing!

DIY Chicken Aprons and Hen Saddles

DIY Chicken Aprons and Hen Saddles

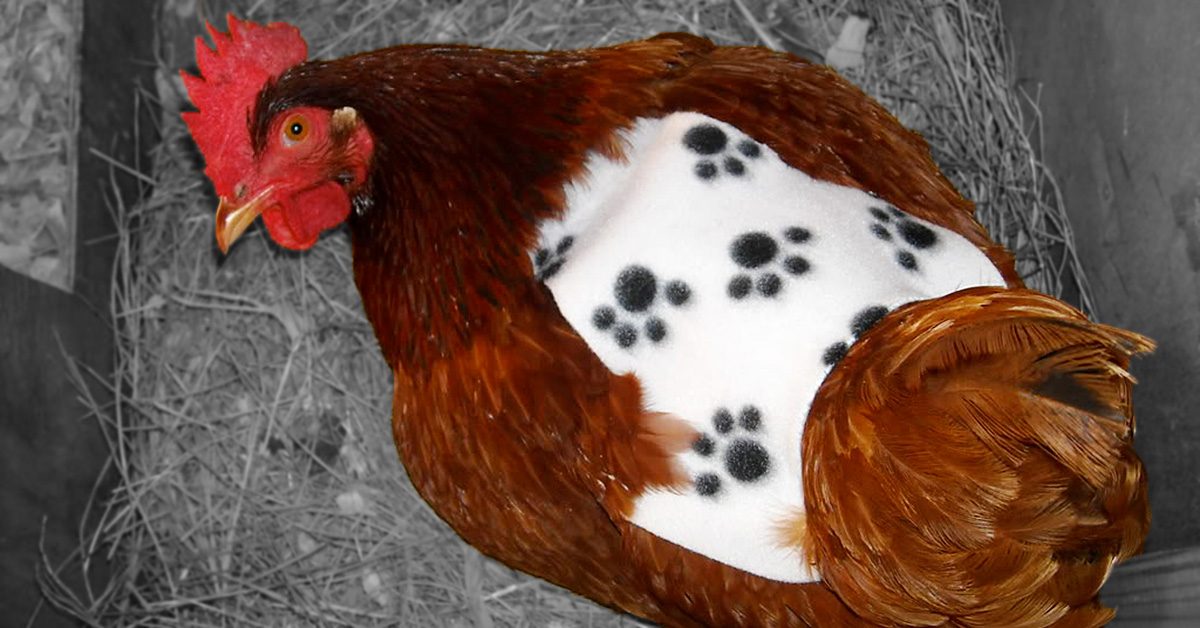
Who knew chickens wore clothes?

Who knew chickens wore clothes?

When my girlfriend, Ella, asked me if I could make her a ‘chicken apron’ I thought perhaps she meant something like a heavy duty cover for when she is out in her yard working with her chickens. I of course said yes, but she quickly corrected me and explained that the aprons in questions were actually for her chickens.

Who knew chickens wore clothes?

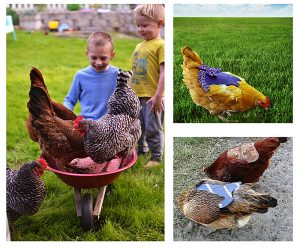
It turns out that other chickens can be mean and may pick on or peck a member of their brood (even to death). Additionally, roosters can sometimes be too aggressive with hens. Chicken aprons, also called chicken capes, or hen saddles, can protect their backs from the claws of the roosters.

While I often create my own patterns when I sew, creating something like this for Ella’s chickens was beyond me. She found me a free pattern, which you can also follow here, and I got to work.

Heads up that this project is perfect for any pre-cut layer cakes (10″ x 10″ squares) you may have on hand.

Photo credit, left to right: Ella Sherman, MyPetChicken.com & WeAllSew.com.

Photo credit, left to right: Ella Sherman, MyPetChicken.com & WeAllSew.com.

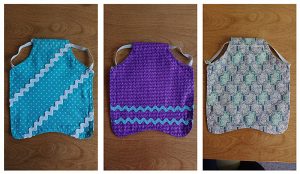
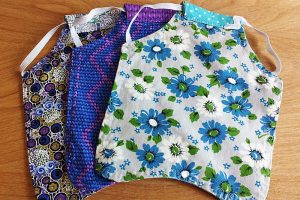
My oldest daughter helped me pick out some fabrics and we sent a picture for Ella to choose from. I planned to make her three reversible aprons.

Here’s another interesting thing we learned

Never dress your chickens in pink, or red; it brings out their cannibalistic instincts and could result in the chicken getting pecked to death. Red & pink = no no.

Beware of chicken scratch. Red & pink = no no.

Beware of chicken scratch. Red & pink = no no.

Sketch it out

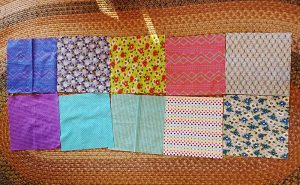
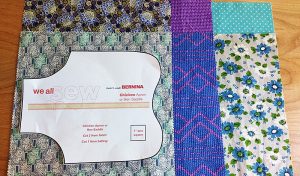
With my six fabrics decided, I drew out a pattern on each one. All of these are layer cakes squares I had in my fabric stash.

All of these are layer cakes squares I had in my fabric stash.

All of these are layer cakes squares I had in my fabric stash.

Ella lives in Southern California so she didn’t need any type of warmth or real thickness for batting. Still, I wanted them to be crisp, so I added a layer of Pellon 931TD, Fusible Midweight Interfacing to one side of each apron.

I wanted them to be crisp, so I added a layer of Pellon 931TD, Fusible Midweight Interfacing to one side of each apron.

I wanted them to be crisp, so I added a layer of Pellon 931TD, Fusible Midweight Interfacing to one side of each apron.

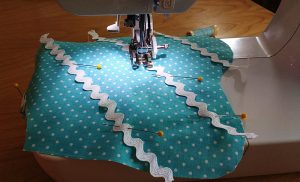
Once three of the sides had interfacing, I turned to decoration. If you plan to add rick rack or bows, do it before you sew the sides together.

Once three of the sides had interfacing, I turned to decoration.

Once three of the sides had interfacing, I turned to decoration.

Cut out a 10.5″ piece of elastic for each bib. You will pin each end where the arm (wing?) holes would be.

You will pin each end where the arm (wing?) holes would be.

You will pin each end where the arm (wing?) holes would be.

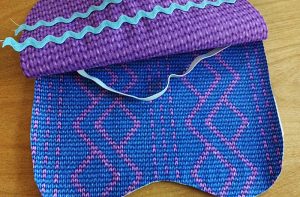
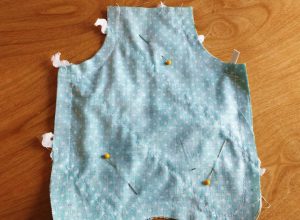
Place the layers, right sides together and pin (here you can see the elastic sandwiched between the layers).

Here you can see the elastic sandwiched between the layers.

Here you can see the elastic sandwiched between the layers.

Ok, here we go…

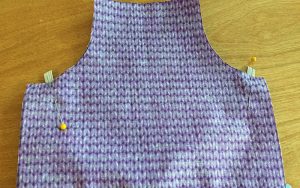
This is how it should look before you begin sewing. The pattern I used called for a ½” seam allowance, probably because it also called for thick batting. Choose your own seam allowance and sew all the way around, leaving only the neck hole completely open.

This is how it should look before you begin sewing.

This is how it should look before you begin sewing.

Here’s how mine looked after sewing all the way around. I trimmed away the excess fabric and made small snips around the inner and outer curves so they would lie flat once I turned the fabric right sides out.

Here’s how mine looked after sewing all the way around.

Here’s how mine looked after sewing all the way around.

Two important things to do once you’ve turned the fabric

  1. Take your time and run your fingers along the inside seam, popping the fabric out so it shows a great shape.
  2. Iron! I both ironed and starched mine once I had turned them.

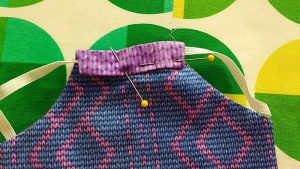
Next, turn the neck hole down first a ½ inch then another ½ inch. Tuck the piece of elastic into where you’ve turned it, creating a casing. You will sew across the bottom of the folded fabric, taking care not to catch the elastic. When you are done, you should be able to move the piece of elastic freely back and forth in the casing.

When you are done, you should be able to move the piece of elastic freely back & forth in the casing.

When you are done, you should be able to move the piece of elastic freely back & forth in the casing.

Top stitch!

Have fun with your top stitching. I used a different decorative stitch on each apron.

And there you have it

This is easily a 20 minute project if you have all your supplies at hand. It’s wonderful for layer cakes and if you have friends who own chickens, these would make great handmade gifts.

It’s wonderful for layer cakes & if you have friends who own chickens, these would make great handmade gifts.

It’s wonderful for layer cakes & if you have friends who own chickens, these would make great handmade gifts.

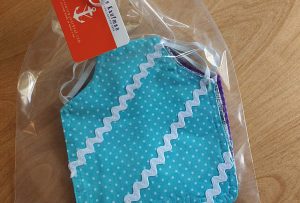
Pop your presents in some pretty wrapping and send them off to be wild with some hens!

Pop your presents in some pretty wrapping and send them off to be wild with some hens!

Pop your presents in some pretty wrapping and send them off to be wild with some hens!

Have you ever made chicken aprons or a unique piece of clothing for an animal? Tell us about it in the comments!

———————————————————————————–
Charlotte Kaufman is a writer and sewist in Mammoth Lakes, California. She specializes in marine and home interiors and continues to fall more and more in love with quilting. You can follow her at charlottekaufman.com.

DIY Reversible Circle Skirt

My littlest loves in skirts.

My littlest loves in skirts.

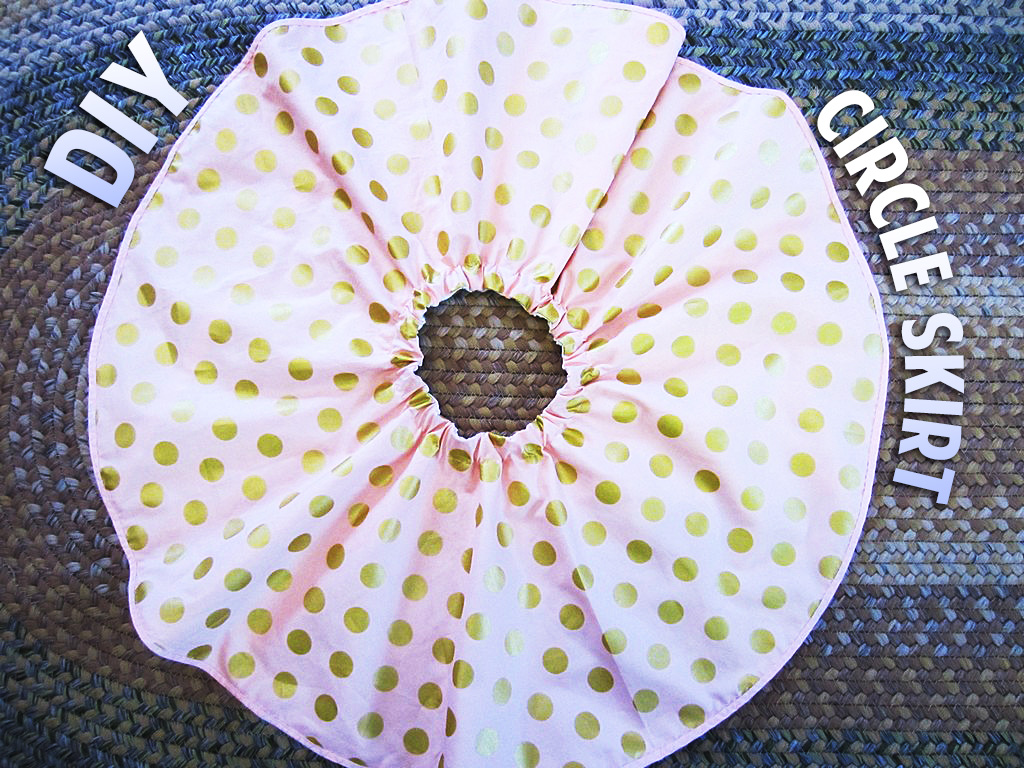
My littlest loves in skirts. In cold weather she puts them over pants and sometimes she even wears them over her pajamas. While I normally am not drawn to making clothes, I knew when her passion for skirts didn’t fade I’d want to start making some for her.

This skirt is reversible, so two skirts in one, though I think she is so in love with the top fabric that she’ll never switch it to the one underneath.

I think she is so in love with the top fabric that she’ll never switch it to the one underneath.

I think she is so in love with the top fabric that she’ll never switch it to the one underneath.

To begin making a DIY reversible circle skirt (or a non-reversible one for that matter), you’ll need to do some math. I take the width of the waist + 2. For her it was 19″ + 2 = 21″. Then I divide by 6.28 (or twice pi.) That gives me the radius of the circle for the waist, 3.34″.

Then I divide by 6.28 (or twice pi.) That gives me the radius of the circle for the waist, 3.34".

Then I divide by 6.28 (or twice pi.) That gives me the radius of the circle for the waist, 3.34″.

Next measure from the waist to the length you want. I went just above the knee, which was 10″. Cut your fabric into a square and then fold into quarters. From the bottom left corner, start drawing first your waist circle, and then the outer, skirt circle (this is the same process I showed you for the DIY tree skirt in one of my December posts).

Cut your fabric into a square and then fold into quarters.

Cut your fabric into a square and then fold into quarters.

From the bottom left corner, start drawing first your waist circle, and then the outer, skirt circle.

From the bottom left corner, start drawing first your waist circle, and then the outer, skirt circle.

If you are making this reversible (and you don’t have to, one sided is great too), do the same for the other side of fabric. In my case, I had to join two pieces together to make a square big enough for the circles.

Pin the circles right sides together and sew around the waist circle. Once sewn, make tiny cuts all around the fabric, taking care not to cut into your sewing. This will help the fabric turn smoother. Flip the skirts so they are wrong sides together and go iron the seam. Ironing is everything in sewing. Don’t skip this step.

Once you’ve ironed, sew a casing big enough to fit the width of elastic you’ll be using for the waist. My elastic was .75″ so I sewed a 1″ casing. Leave about 1.5″ for inserting the elastic.

Once you've ironed, sew a casing big enough to fit the width of elastic you'll be using for the waist.

Once you’ve ironed, sew a casing big enough to fit the width of elastic you’ll be using for the waist.

Put a safety pin through one end of the elastic and feed it through the casing (you’ll find the entrance for the casing hole between the two layers of skirts). Sew the two ends of elastic together and then sew each tail end flat so there is no bulk from the elastic’s sewn seam. Then sew the casing shut, completing the waistband of the skirt.

Sew the casing shut, completing the waistband of the skirt.

Sew the casing shut, completing the waistband of the skirt.

To finish the skirt, you could use a serger and serge the two layers together, and then press them to one side and sew a hem. I chose to add bias tape.

I chose to add bias tape.

I chose to add bias tape.

I used a decorative stitch to complete the look.

Boom! A darling, reversible circle skirt.


And a very happy three year old.


Do you sew clothing for your children or grandchildren? What are your favorite things to make them?

—————————–
Charlotte Kaufman is a writer and sewist in Mammoth Lakes, California. She specializes in marine and home interiors and continues to fall more and more in love with quilting. You can follow her at charlottekaufman.com.