
I have been away for awhile packing and moving into our new home. Unable to do any sewing with so many other things taking priority, I have missed my time with you.
The first thing I did is set up my office, so I can begin to feel productive again. Although I cannot offer an alternative method to sew a project this week, I want to create awareness of something we may take for granted. Its still about sewing, but sewing psychology!
I have gained a whole new respect for people who use their talents to produce window coverings. It is labor intensive and costly for the buyer. Naturally, today’s modern new builds will be designed differently than the earlier built homes. I always think of the difference between mid-century designs and what is popular today. Things you have to consider now are tall and narrow windows. Half arch windows above doors, double and triple wide windows in family rooms and bedrooms. I see French doors instead of sliding glass patio doors, and particularly windows to the floor versus horizontal windows high on the wall.
Times change
Times have changed and the fabric design and methods of making draperies have given us so many wonderful options. The awesome part is you can find companies that have talented people machine stitch and finish them by hand, stitching the hems and tacking the pleats, grommets, tabs, or other headers. Can you even comprehend what a huge job that is?
Shoot for the sun, the moon, and the stars, and then we will go from there.
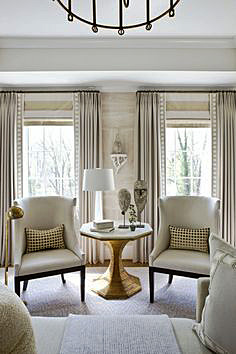
1 panel 40” wide by 108” long, cutting the fabric perfectly straight and carefully sewing the seams by machine and stitching the header and hem by hand. I understand why it takes six weeks for the completed project.
Secondly, if you have been following my blog, you already know how much I love fabric. We have only been here a week, and my sewing studio is not operative yet, but I have been basking in my product samples from a few different shade and drapery companies. I thought, new home, new life, so I will make it exquisite by professionally made drapes and roller shades. A few weeks ago, I began order sample swatches to see quality and color to design a cohesive, interesting theme.
Overload
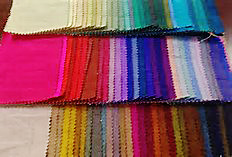
Overwhelm Overload!! I wasn’t even in the house yet and I was stressed about the overall look I wanted to achieve. I just knew I loved every color and sample I received. Does this sound like anyone else you know? I feel this same emotion when looking for fabric for sewing and quilting as well. (I imagine others do too.)
Similar to how I have described “improvisational” sewing in the past, you have to start somewhere to “dress” several windows in a newly built house. You just have jump in and play with the samples, and the colors, and find your taste. Take a break for awhile, read design magazines, think about how you live and what makes you happy. You are a designer, its your choice!
Okay, we are here, moved in and windows bare! Its decision time. Because I wanted our window treatments professionally measured and hung, I invited a design consultant who was very experienced and had exceptional reviews on her work. She only does window coverings and I had many options to consider. Even though I had a good idea what I wanted to accomplish, her comments and mostly her product knowledge opened new doors for an even greater creative experience.
She had very good advice when we started the process.

She said, “Shoot for the sun, the moon, and the stars, and then we will go from there.”
She said, “Shoot for the sun, the moon, and the stars, and then we will go from there.” Basically, she meant what is your ultimate vision of your home to suit the needs of your family? (That was an open door to all the ideas I had thought about all these months.) Of course, some ideas I knew were not obtainable, but also, the hope of a future goal was there. So, we went over the design, the samples, rods and finials. The roller shades, the Roman blinds, and the solars. But she reminded me, “Its about you not what others think you should do”.
Yes, I was almost to the moon when I saw the value of my dreams. Needless to say, with my financial advisor’s advice, (aka hubby), we came down to earth and comprised on a plan with the promise of continuing our dreams down the road. However, now, I have a vision of making panels myself for one or two of the smaller size windows. I know I can do it! My ulterior motive is to save that money for that crystal chandelier I have been admiring!
The moral of this story is not about sewing techniques, it is about the pleasure you get from coming out of your comfort zone, finding yourself and your tastes, and being courageous enough to feel confident in moving forward in your goals. Sewing is being creative!
Sewing is about making beautiful things, like silk draperies, and Roman blinds. Sewing and fabric in today’s world is earthy and organic. Sewing is also for fashion, and quilted blankets, warmth, and clothing. It is my therapy. It makes me happy!
SewingmachinesPlus.com has what you need to get started with your creations! Tell them your dream! They will help you get started.