How to Sew Faster

How to Sew Faster

My job as a tailor on a television show often requires me to complete an alteration in a seemingly impossible amount of time. Not to be overly cocky or self-congratulating but, I can be pretty fast when needed. People frequently ask me how I’m able to do something so quickly.

Don’t hesitate. Just, do.

Honestly, I don’t think so much about it anymore: its pretty much second nature at this point. But, I suppose if I were to break it down, the process would go something like this:

First, don’t panic. Whatever you do, don’t panic. If you do, you could find that suddenly you’re unable to thread a needle, or your needle breaks, or the thread tangles.

Second, don’t hesitate. Just, do.

As you’re working, think about the next step. Plan ahead.

Concentrate fully on what you’re doing. Don’t listen to the conversations going on around you. Pay no mind to whatever random chaos might be happening in another part of the room. Just focus your full attention on the one thing you are doing. That is all that is important.

Whatever you do, don’t thread mark. I know that’s what they teach in sewing school but there is no reason to have to thread mark a pant hem.

A few tips on how to sew faster:

Do as much as you can without stopping to iron.

If I’m really pressed for time, I tend to leave all the ironing until the very end (pun intended).

Learn how to eyeball measurements. Think about it, if you’ve been sewing long enough, you know what a ½” looks like. You honestly do not need to mark every single little line. If you want to measure, go ahead, put use your pins to mark the line. I often work with a metal seam gauge but rarely actually draw a new stitching line. One exception is if I’m re-mitering a suit jacket sleeve corner though I know lots of tailors that do not need to draw that line either.

Whatever you do, don’t thread mark. I know that’s what they teach in sewing school but there is no reason to have to thread mark a pant hem. I once had an additional tailor helping me on a show who insisted on thread marking the fold line on hems for cop pants. Buy some tailor’s chalk and use that to mark your hemline. It’ll disappear when ironed.

Unless you’re topstitching, you really don’t have to have your thread match exactly. Believe me. Whatever thread is in your machine is just fine. I cannot begin to tell you how many black garments I’ve altered quickly with red or yellow or whatever happened to be in the machine colored thread.

Learn how to undo a chain stitch. A lot of manufacturers use chain stitches in clothing construction. This makes it super easy to take them apart when needed. You can only unravel a chain stitch in one direction, the direction it was sewn in. Most of the time, all you need to do is insert a seam ripper and pull in that direction and all the stitching will come undone. The center back seam of men’s pants, often will have two rows of stitching so you’ll need to pull each row separately.

A couple other seam deconstruction tips:

To take apart a serged seam, use a nice sharp seam ripper and run it through the threads that wraps around the edge of a seam. After you do this, the rest of the threads will usually come apart rather quickly. Some serged seams are on a chain as well and you can undo them by pulling the thread on the straight stitch.

One of the fastest ways of taking apart a seam is to, again, use an extremely sharp seam ripper and insert it into the seam from the right side and just pull upwards through the seam. This technique takes a bit of practice (and bravery) though as the potential to accidentally slice through the fabric is ever present. There’s a knack to getting the angle of the seam ripper just right though and once you figure that out, you’re golden.

In the end, the one sure way of becoming a faster tailor is by practice. The more often you repeat the same task, the more efficient at it you become.

As you do an alteration, try to think of ways you could save time: do you really need to flip everything back right side out then inside out then right side out again? Probably not. If you sew this first, will it make it easier to sew this? Or visa versa? Experiment and try things multiple ways until you’ve figured out the quickest sequence of steps for yourself.

I love discovering a new, faster way of doing something I’ve done a million times. Sewing is kind of cool like that: there’s always something more to learn and fresh tactics to uncover.

Learning Re-Learning

Learning & Re-Learning

Generally speaking, I can be more of a hand-sewer than a machine-sewer. Getting frustrated with a machine, to me, isn’t the most difficult task, so stepping back from one can be a fairly easy decision. What I’ve found in stepping away is that I actually like hand-sewing. Sure, the process might take longer, but there’s something relaxing about going one stitch at a time with my own hands.

And, believe it or not, I might actually be more likely to sew a straight-ish line by hand than I am with a machine! Weird? Maybe!

But stepping away from the machine has led to me trying to re-acquaint myself with my sewing machine, and what I found is that the time away caused me to potentially forget things—maybe keep me from fully learning all things—about my machine. Had I had (or kept) those things in mind, I suspect my sewing-machine-experiences might’ve gone a bit better—and a bit quicker.

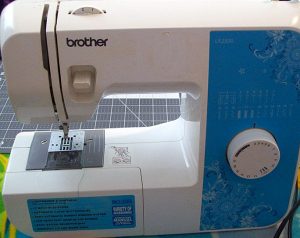
Brother LX2500

Brother LX2500

Now, don’t get me wrong! I’ve completed projects on my sewing machine. But I was potentially setting myself up for frustration by not really understanding or memorizing the details of this machine (Brother LX2500):

Imagine how far I could be with machine-sewing if I would’ve taken the time to learn more details and commit them to memory! So, for today, I’m going to give you that bit of information: Get to know your sewing machine! Even something as simple as realizing the thread-holder lifts higher could prevent grief, since you might not have as much issue with the thread falling off while you’re sewing or threading your bobbin. And, yes! That happened to me!

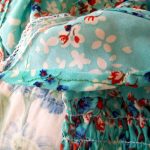
For me, figuring out the need-to-know details and letting the rest go might’ve been tempting. Do yourself a favor, and don’t keep that thought process. There might be aspects of your machine that make for easier sewing, or that advance your capabilities in a way that a basic “Hey! I can thread the needle and bobbin!” don’t quite cover. Possible examples: Apparently, I have a reverse button on my machine I maybe never knew about, and a way to alter the tension. Who knew?! And if you don’t get to know your machine, by the way, don’t be surprised if you come out with stitches that look like these:

If you buy your sewing machine brand new, check out any instruction manual that comes with it. The reading might seem tedious, but that tedious task could be worth it when you don’t hate your sewing machine, like, twelve times per use (Am I exaggerating??? You decide!). If you buy yours used, don’t have a manual, or lose the manual, try looking online. I think I threw mine away (don’t do that!), but luckily there are videos available on Youtube that show the basics of running my model. I can’t encourage you enough to look into such information to learn what you can about your sewing machine! Doing so could extend your possibilities and preserve your nerves!

Your sewing machine is only as good as your ability to use it, so don’t hold yourself back by not learning about it properly.

And even if you did know all there is to know about your machine, forgetting details after a limited amount of use isn’t out of the realm of possibility. Think about all the math classes you had over the years. Even though you might’ve had formulas in your head for a time—like, for an exam—how many do you still remember? After a while, your sewing machine’s details might be so burrowed into your thought process that you can be away for a time and remember them, but don’t be too embarrassed to rediscover those details if you can’t bring them to mind. Something like which way your bobbin’s thread goes could be so small that you don’t remember it, but not knowing could complicate your sewing.

So that’s lesson number two, one I had to learn when I came back to my sewing machine after time away: Don’t be afraid to admit you don’t remember, or be too proud to look into how to do these things again. Your sewing machine is only as good as your ability to use it, so don’t hold yourself back by not learning about it properly—even if it isn’t the first time you’re learning about it! Don’t stop until you know what every button, knob, or contraption does!

Paper N’ Plastic

Paper N’ Plastic

I don’t know about you, but I love to save time and room, especially when it comes to my sewing space. One of the best ways to save time when you are preparing or working on a sewing project is organization. I find it so much easier to move from one step to next when everything is not scattered all over the place. With that being said, I have a helpful organization tip about storing your pattern pieces.

I prefer the slider bags, but the snap bags work just as well.

I prefer the slider bags, but the snap bags work just as well.

Have you ever opened your sewing pattern and taken out the beautiful folded paper pattern inside of it? Doesn’t look it look neat and tidy?! Well, have you tried to refold the paper pattern once it has been unfolded and put it back into that same pattern pack? Or even worse, have you tried to refold it once you have cut out the pattern pieces you need for project? Those of you who have successfully refolded your paper pattern and neatly placed it back into its package…well done!!! I think you are amazing magicians with wonderful refolding powers.

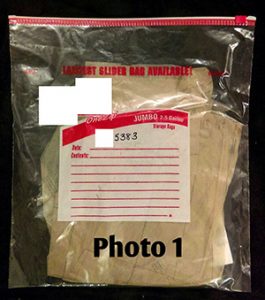
Sadly, for the rest of us (me included), it is a painful and tedious task (say that three times fast) to get the paper back into the pack. However, I have a found a solution that works great. All you need are permanent markers and plastic storage or freezer bags. I prefer the slider bags (see photo 1), but the snap bags work just as well. For one of my patterns, I used a 2.5-gallon jumbo slider bag because the pattern pieces were very large. You can adjust the size of your storage or freezer bag based on the size of your pattern pieces.

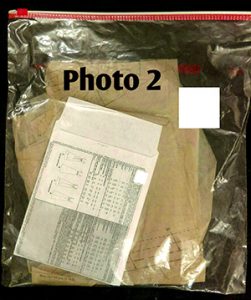
Place the pattern package in the bag with the paper pattern pieces (photo 2) in order to keep them all together.

Place the pattern package in the bag with the paper pattern pieces (photo 2) in order to keep them all together.

There are two ways that you can store your pattern pieces. The first way is to only cut out the pieces from the paper pattern that you will use for your sewing project. Then with remaining pattern paper, you can simply fold it to make it smaller and put it into the storage or freezer bag without having to make the shape precise in order to fit into the bag. The second way is to cut out all of the pieces found on the paper pattern and store them in the slider or snap plastic bag. The second way will also save you cutting time later should you decide to use the additional pattern pieces from the same sewing pattern for a future project. I also like to place the pattern package in the bag with the paper pattern pieces (photo 2) in order to keep them all together, especially because the pattern package contains fabric measurements and finished garment measurements that you may need to refer to in order to prepare for your sewing project.

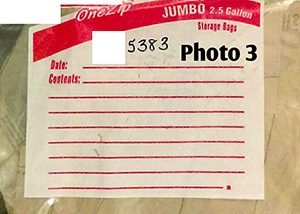
Once you have your paper pattern and package in the bag, I would suggest using a permanent marker to label the bag with the corresponding pattern number (photo 3).

Use a permanent marker to label the bag with the corresponding pattern number.

Use a permanent marker to label the bag with the corresponding pattern number.

Side note: If the paper pattern pieces do not have the pattern number printed on it, mark the number on the pieces themselves so you will know to which pattern package and bag they belong. Write the number in a place on the pattern pieces that does not interfere with the pattern markings.

The bonus of using the storage or freezer bag is that it also provides you with space to make notes right on the bag. If you have, for example, a fabric idea or found an easier way to put the pattern together why you were sewing, you can simply put a note or reminder on the bag without having to mark all over the pattern or the pattern package. So there you have it…a simple and inexpensive way to organize your paper pieces without all that refolding hassle. Sewing is fun so do not let refolding and refitting take the joy away from you.

“Pin”ny Time Savers

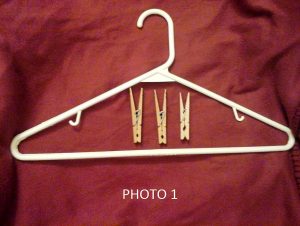
All you need are clothes hangers, clothespins, and a marker or pen (not pictured).

All you need are clothes hangers, clothespins, and a marker or pen (not pictured).

Whether you are new to sewing and quilting or just love to follow commercial patterns, you quickly find out that once you cut out your pattern pieces, they are EVERYWHERE. Along your pattern cutting journey, you may get a little lost, especially trying to keep track of “which piece goes where” and “what label is this piece?” After all your cutting is done and it is time to reach for your cut pattern pieces to begin sewing or quilting, you find you find yourself spending even more time figuring out which one is “A, B, C” or “1, 2, 3”. Here is a handy solution to help you organize your fabric pattern pieces with items you probably already have at home.

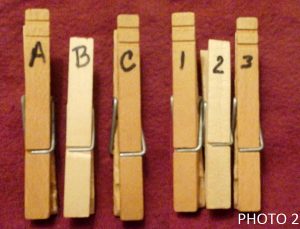
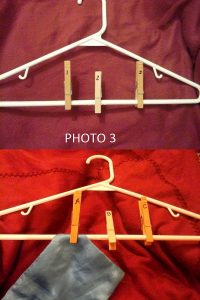
First, use a marker or pen to label the clothespins based on the labels found on the pattern pieces or the pattern guide.

First, use a marker or pen to label the clothespins based on the labels found on the pattern pieces or the pattern guide.

All you need are clothes hangers, clothespins, and a marker or pen (not pictured). First, use a marker or pen to label the clothespins based on the labels found on the pattern pieces or the pattern guide. Using a permanent marker may make it easier to write on the clothespin, especially if it is made out of plastic. When choosing the marker and pen, make sure that you choose an ink that will be very easy and quick to see on the clothespin. (The goal is to make find your pattern pieces easier.)

Second, once you have labeled the clothespins, clip them on the hanger. To make finding the pins easier, place the labeled clothespin in alphabetical and numerical order. Continue clipping the pins onto the hanger until you have all your pins in a row. If you run out of space, use additional hangers until you have all of our labeled clothespins on a hanger.

Once you have labeled the clothespins, clip them on the hanger. Finally, attach the cut fabric pieces to their corresponding labeled clothespin by clipping the fabric to the hanger.

Once you have labeled the clothespins, clip them on the hanger. Finally, attach the cut fabric pieces to their corresponding labeled clothespin by clipping the fabric to the hanger.

Finally, attach the cut fabric pieces to their corresponding labeled clothespin by clipping the fabric to the hanger. For quilting patterns, there may be many pieces that same labels (for example, a repeating quilting pattern). In those cases, clip several pieces with the same label on the same pin. If there are a large amount of pieces with the same label and the clothespin get too bulky, create several clothespins with the same label. Organize the clothespins with identical labels next to each other for convenient and quick access.

Now you can hang the hanger on a door handle, a rod, or a rack. Place your fabric pattern hanger in a location this close to your project a quick reach to start your sewing and quilting. This idea not only helps to organize your pattern pieces, but it also helps to organize your sewing process. It can be such a distraction to have pattern pieces scattered all over your sewing and quilting workspace. A great sewing and quilting project takes focus and time. Organization around you in the workshop help you focus on project and saves you the time of having to search for your pattern pieces and figure out which piece it is.

The beauty of sewing and quilting is its creativity, attention to detail, and precision. Let this handy solution give you the freedom to put all of your time and energy into those things. So check out your closets or laundry rooms for the clothespins and hangers that will save you sewing and quilting time. But, just in case you want to go a purchase new one just for your sewing and quilting space, have fun with colors, prints, textiles, and more. From hardware stores to houseware stores, the possibilities are endless. Spruce up your creative environment with fashionable hangers and fancy clothespins to create a simple gadget that will help to make your sewing and quilting experience less frustrating and more exciting.