Grain Line? What Grain Line?

Grain Line? What Grain Line?

Last week, I spent a couple days making six silk dresses for a freelance client. I did the work at home, in my fifth floor walkup apartment in New York City. I only mention this because the dresses were made from silk charmeuse and I don’t, interestingly enough, have a proper cutting table at home. This really isn’t so much interesting as it is unfortunate and slightly annoying. Because, as anyone who has ever cut silk charmeuse knows, it’s a slippery sliding thing.

I cut the first dress out on the floor. Not ideal but it does work, as long as you use enough weights to keep it from shifting around. I usually cut things on the double with the fabric folded, selvedge edge to selvedge edge, which is how most consumer patterns instruct you to cut. Silk charmeuse can be a bit woodgy (yes, that’s a technical term) but the weave tends to be tight enough that you can confidently cut on the fold.

Some fabrics with an especially loose weave where it’s hard to keep the lengthwise grain line (and cross grain) straight are best cut in a single layer.

Shall we

Grain Line? What Grain Line?

To begin cutting, I tear a straight cross grain so I have a right angle to work from. Almost all fabric can be torn in this way. The cross grain of a fabric is made from the yarns woven over and under the lengthwise fabric grain at a 90 degree angle. The over under weaving provides less tension so crosswise grains have a tiny bit more stretch than the lengthwise grain. They normally run around a person’s body.

The lengthwise grain is the one that runs parallel to the selvedge edge and is the grain marked by the arrow on every pattern piece.

After tearing the the cross grain so I have a straight line, I fold my fabric in half right sides together, selvedge to selvedge. Once I have the fabric relatively flat and smooth on my cutting surface, I place a long metal ruler about an inch or two from my torn crosswise edge. I use a metal ruler because they’re heavy enough to act like a weight.

I line up the edge of the ruler perpendicular to the selvedge edge and across the full width of both layers of fabric. Then I make sure that the edge of the fabric that extends past the ruler is even. I do this to ensure that my cross grain is lined up correctly and not sloping down or up in relation to the selvedge.

I cut the next five dresses out on my old wood dining room table. It has leaves that fold up to make it almost six feet wide. At about 39” high, my cutting tables at work are higher than a standard dining room table. This height means I don’t have to bend so far over a table when cutting and, ultimately saves my back from hurting. If you don’t spend entire days cutting out garments, a dining room table usually works just as well.

You can also buy one of the cool folding style cutting tables available.

Grain line

So, what about grain line? Do you need to always pay attention to it?

That depends. At Boardwalk Empire, we would sometimes jest (when we didn’t have enough fabric and had to get creative with our cutting layouts), “Grain lines are for suckers.”

What we really meant, though, was “As long as you know what you’re doing, you can manipulate and vary the placement of your pattern pieces.”

If you happen to have a striped fabric, playing with the grain line can be fun. Thomas Pink, who makes high end men’s dress shirts will sometimes cut one side of the front on the lengthwise grain and the other on the cross for a quirky asymmetrical look.

Striped fabrics will also naturally chevron at the side seams if you match them up correctly when cutting and sewing.

You can also turn collars, cuff pieces, and/or pockets of striped fabrics on a different grain to add an interesting design effect.

All of these things are most easily done with a fabric that doesn’t have a lot of give, like a tightly woven cotton.

Measure up

If you’re interested in getting a little creative with your next project, you may want to invest in a quilter’s ruler. These rulers have 45 and 30-degree angles marked which is helpful when adjusting grain lines.

If you’re matching stripes or other patterns, you’ll find it much easier to cut in a single layer so you see everything clearly.

This may seem obvious, but if you’re experimenting, it’s always good practice to test things out first. If you have plenty of fabric, you can use some of it to do a little practice run. If not, you can use muslin or something similar to try out your idea. If you’re using a striped fabric, you can mark lines on your muslin before cutting to show you how everything will line up.

Bias

Bias is the diagonal angle across your fabric. The bias grain has quite a bit of stretch. A dress that clings to the body closely without having multiple seams is very likely cut on the bias. When you’re making a bias garment, especially a dress or slip, you’ll want to let the bias hang out for a while if possible as it will stretch out. You’ll notice that the bottom edge of your pieces will end up uneven if you do this, which is exactly what you want. You’ll need to remark your hemline after you’ve put together the garment.

I usually stay stitch my arm and neck holes, then pin my cut pieces on a form and, if time permits, let them hang over night. It’s also beneficial to then pin the seams together while they are hanging on a form to help alleviate any puckering.

Once you have a good understanding of grain lines, there’s no reason why you can’t try different things. Get creative (just remember that bias does stretch a lot more than something on the straight so you may need to stabilize with a lightweight fusible interfacing).

Sew Fine Dress Making

Sew Fine

Need the perfect dress for an upcoming special event? Instead of perusing rack after rack of unimaginative, pricey finery consider making it yourself. Not only will you get exactly what you’re looking for, it’s a sure thing that no one else will be wearing the same dress as you.

Points for Originality

Even if you’re not a someone who designs her own patterns, making and wearing your own dress will definitely get you noticed. You’ll look stunning and you’ll be wearing something completely unique. In this day and age when everyone wants to be recognized for their personality and individual contributions, you’ll certainly earn points for wearing something stunning that you made yourself.

Your Choice

Rather than trying to find something that shows off your style, fits your budget and looks great on you from the limited selections in department store – making a dress yourself means you’ll be able to choose the style, fit and fabric that’s best for you. Show off your natural beauty with a dress that accents your coloring and body type.

Works for Formal Functions Too

Formal events like galas or weddings may not seem like that best opportunity to make your own dress, but it’s actually a great time to do so. Making a more formal dress may take a bit longer, but the results will amaze everyone. If you’ve never taken on something like this, trust me, it’s not as hard as you think!

There are some extra steps like creating the tulle under layer(s), feeding the whale bone (plastic) bodice pieces and/or adding lace or other details. Although these seem intimidating, anyone with basic sewing skills can do them – you just have to be willing to try.

Show It Off

Show It OffAfter all the hard work you put in to making your amazing dress, show it off at the big event. Get up, dance, strut your stuff to and from the buffet table, and when people start complimenting you on your attire, don’t be afraid to say you made it. Although you don’t want to overshadow the guest of honor (unless it’s you, of course) there’s nothing wrong with showing off your finery.

If you can, add some handmade accessories to complete the look. Items like hand made, one-of-a-kind jewelry, scarves or shawls will give your dress the final splash and pizazz it needs. If you don’t make any of these items yourself, maybe you’ve got some crafty friends who do and would like to contribute to your amazing look.

Remember

A few points to remember:

  1. Hem with shoes in mind. If you’re wearing heals to the big event, make sure you have those shoes on when determining hem length so the dress will fall correctly.
  2. Event location. If the event is going to be indoors or outdoors, you may need incorporate layers or a cover up depending on the time of year and your sensitivity to cold/heat.
  3. Make a muslin first. If you’re at all unsure about the dress you’re going to make – how well it’ll fit or will look on you – take the time to make a muslin demo piece first. It does extend the length of time it takes you to arrive at the finished product, but it can also mean the difference between a project you love and one you don’t.
Quilt A String-Pieced Scrap Quilt For Baby

Quilt A String-Pieced Scrap Quilt For Baby

Here is an easy scrap quilt idea that is great fun to make.Here is an easy scrap quilt idea that is great fun to make.

You could clear out your scrap stash to make this gorgeous gift.

Blue is my favorite color, so I had heaps of blue scraps. That is what gave me the idea to make this crib sized quilt for a special new baby boy. You could choose a different color of scraps for this, or you could choose to not restrict your palette and clear out a random colorful scrap pile instead.

You will need:

  • A variety of cotton scraps
  • 48 5-inch cotton muslin squares
  • 12 2.5 inch muslin squares
  • 1 yard border fabric
  • Crib size batting
  • 1.5 yard backing fabric
  • Quilt binding or fabric to make binding

To make the patchwork squares:

Press and cut your colorful scraps into approximately 1 inch wide strips. You will trim strips to the desired length as you construct the squares.

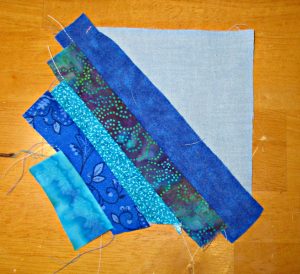
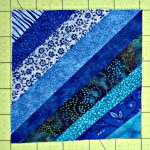
Take a muslin square and angle the first scrap strip diagonally, from the bottom left corner to the top right corner of the square. You can create a sort of uniformity in your blocks and allow for the Xs and squares effect achieved in this quilt by choosing one color scrap to use as this center piece in every square. In this case, I chose navy. All squares are made with navy as the longest, first piece in this quilt.

Next, choose another strip and place it right side down atop the first strip, then sew along one side using a quarter inch seam. Flip the second strip down to face up, then press.

Once you've added the last little strip to cover the corner, you can turn and repeat the process to fill in the other side of your square.

Once you’ve added the last little strip to cover the corner, you can turn and repeat the process to fill in the other side of your square.

Then add another strip, placing the third right side down atop the second, and sew using a quarter inch seam, then flip with right side up, and press.

Please do not skip the step of pressing each strip neatly down after sewing. Careful pressing makes the difference between neat and well made quilts and something that is more of a mess!

Repeat the process, using shorter strips and smaller scraps as you get close to the edges of the square. Once you’ve added the last little strip to cover the corner, you can turn and repeat the process to fill in the other side of your square.

Now you have your first completed square.

You have your first completed square.

Place the square right side down and trim excess strip ends from the muslin square. This is most easily accomplished using a rotary cutter, or you can trim the excess with scissors instead.

Now make 47 more.

Now make 47 more.

Now you have your first completed square.

Make 47 more.

Assembling the quilt top:

Once you have completed all your patchwork squares, sew them together into rows.

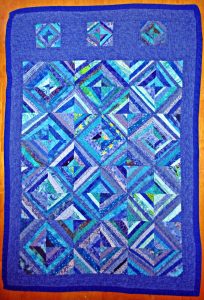
Different looks can be achieved by varying the placement of the squares. You could turn them all in the same direction or assemble them where they form the X’s and O’s pattern pictured here. This is one of the things that makes quilting so much fun, that the same simple block can be turned different ways to vary the look of the completed top.

When joining the squares, take extra care for the tiny corner triangles, as it can be easy to make a careless mistake and miss joining these “ears” properly. This is easy to avoid by being careful in joining the squares and avoiding rush.

You also have options in this design: once you have completed the joining of the strip patchwork, you could call the quilt top done. Or choose to border the patchwork with a solid fabric. You could make borders of equal widths, or you could choose to add an additional embellishment, as I have here, with smaller blocks set off with borders. I did mine this way to indicate the top of the quilt and bring the design to the right dimensions for a crib sized quilt..

To make this quilt as pictured, sew 3.5 inch border strips around all sides of the patchwork design.

Prepare the three smaller blocks in the same way as the larger ones, using 2.5 inch muslin squares for the base.

Join these into a row by alternating the small patchwork blocks with 4 4.5 inch squares of the border fabric.

Sew this strip to the top edge, and finish the top by adding one more 3.5 inch strip above this.

To make the “quilt sandwich”:

  1. Cut your backing fabric 3 inches bigger all around than the top, press well, and place it right side down on your table or workspace.
  2. Carefully smooth the batting atop the wrong side of the backing layer.
  3. Press the top and seams one more time, taking extra care, then layer it wrong side down on top of the batting layer. Smooth nicely.
  4. Then baste all three layers together, using either long running stitches or quilters safety pins.

Quilting:

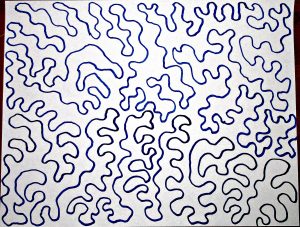
Meandering stipple stitch.

Meandering stipple stitch.

You can quilt this using the quick and easy route: the “stitch in the ditch” method of quilting over the seams that joined the individual blocks, or drop your feed dogs and use a meandering stipple stitch in one long line that (ideally) never crosses itself, guiding the quilt using your hands, working in sections until you have covered the entire quilt.  I quilted this pretty closely, like this:

Trim:

Trim the excess batting and backing, using your scissors or more quickly with your serger.

Bind:

Use prepackaged quilt binding or make your own. Sew binding strips together and then sew to quilt top, beginning along one side. Leave approximately an inch free at the beginning of this seam to join the binding ends once you have sewn it down all around. Join them, then fold over and sew the binding down on the back of the quilt using invisible whip stitches sewn by hand or using your machine if preferred.

Now you have made a beautiful heirloom gift that will be treasured forever!