The Lace-Maker by Tropinin

The Lace-Maker by Tropinin

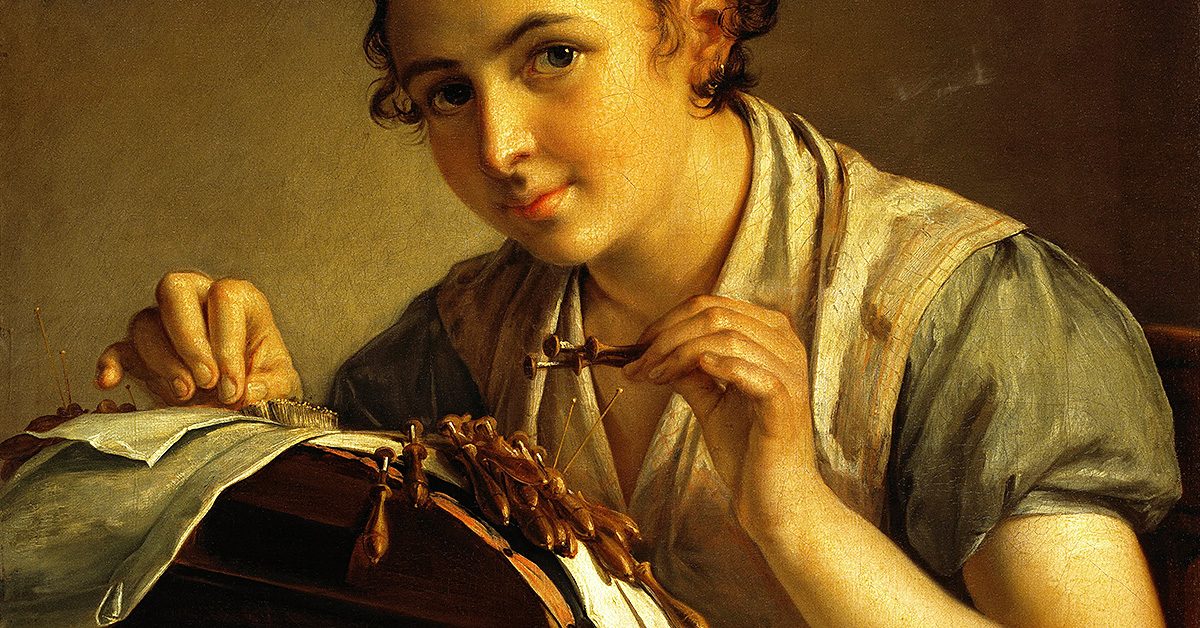
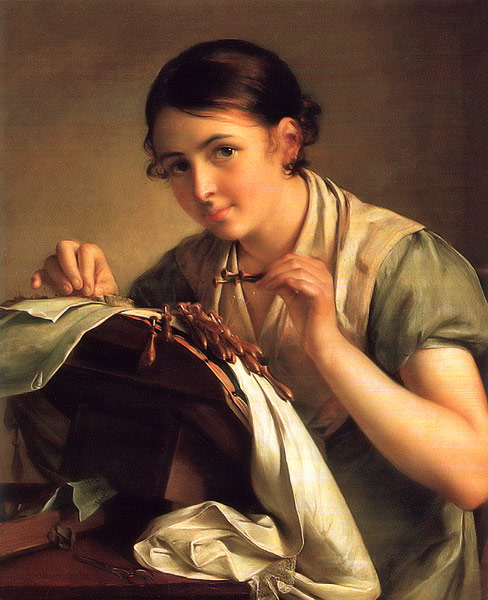
Once more, we’re turning to an artist’s rendering of a sewing topic for exploration and analysis, and this time, it’s coming with a couple of twists. Before we dive into those twists, let’s go ahead and introduce you to the painting that’s the focus of today’s post.

The Painting: The Lace-Maker

The Artist: Vasilii Andreevich Tropinin

The medium: Oil on canvas

The year: 1823

Picture 1

Masterpiece

This is an eye-catching piece, and one of the most immediate concepts that separate it from works that have already been explored on the blog can be noted in its title. The topic isn’t just sewing stitches or making repairs, but rather the very specific task of making lace, which might require different tools than general sewing. The woman in the painting isn’t using a regular needle, clearly, which provides a unique view into the world of sewing.Picture 4

In fact, this entire painting is varied from some of the ones that historically came before it since it’s showing an average woman tending to the lace’s creation rather than someone from high class (“Vasilii Andreevich Tropinin: The Lace-Maker,” n.d.). This woman looks like someone you might see working on a sewing project in the comfort of home, and that quality creates a similarity between the average viewer and the painted woman. You can relate to her because it’s so akin to your approach—sewing in your own home.

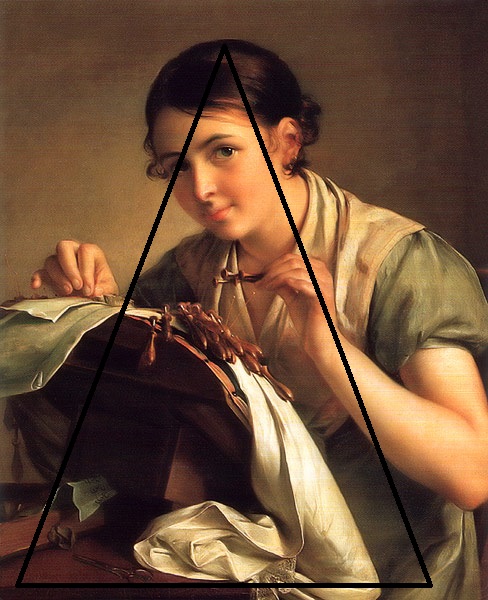
Both of these aspects are showcased specifically in the painting—the tools and the woman—through the triangular configuration that’s been noted on other artistic works. Within the triangle of focus, you have the woman and the tools she’s using, allowing your eye to primarily be drawn right to them.

Picture 6

It’s about the passion, not the project

It’s also worth noting that we don’t see much of the actual lace being made. We see the woman. We see her working. But the project is mostly facing toward her, so our view of it is limited. It can be interpreted that the lace-maker herself and the process of making the lace are, to the artist, more significant than the actual project.

By extension, you could continue this logic to assume that the woman in the work is a beginner or early lace-maker, and that the process doesn’t need to be tarnished by seeing a newer lace-maker’s mistakes and missteps. This notion can be argued as mirrored in the idea that her hands look dainty as she tends to the process, which might lead the viewer to assume that she’s treading lightly into the field. She isn’t gripping the tool firmly, and the overall result can look like the carefulness and hesitance of a beginner.Picture 4

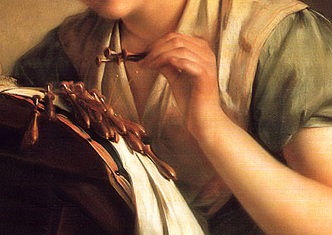
Personality and disposition

One could argue as well that the smile on her face is another detail that brings this new-lace-maker quality to life, as if the woman is happy to give this process a try and perhaps pleased with her progress. Unfortunately though, her face is the main spot where the argument could shift in favor of the woman being very secure in her craft, as if she’s done this again and again over the years. There’s no uncertain furrow in her brow or any lines of tension on her face like you might expect from someone struggling to get the hang of such an activity. Rather, she looks calm and relaxed, and that mind frame can be labeled as out of place for a new lace-maker being caught on canvas.

Picture 2

If you consider that detail—that her face is so free of lines of tension—the other elements can suddenly take a new turn as well. Maybe those hands aren’t dainty with hesitance. Maybe they’re loose from comfort with the process, like the casual grasp she has is enough to professionally finish the task. If you decide on this method of logic, the project being pointed toward the woman can mean that her comfort with the task is what’s supposed to be shown. You don’t need, from that point of view, to see the project. The woman is too at-ease with the process to be creating anything less than successful through her endeavors.

Light and shade

This notion of comfort can be seen in the lighting of the painting as well since, for the most part, everything is well-lit and in the spotlight. Other than the shady corners at the top, the space under the table, and the area underneath the platform the project is on, little is dark about this work. That sustained level of lighting speaks to an overall bright experience, and the similarity of color throughout adds to that calmness. No hue drastically sticks out, and other than the handful of dark places, nothing severely falls into the background in regard to those hues. Everything is neutral or placid enough in color to create an overall image of cohesion and balance.

With all of these elements combined, it’s sensible to interpret this as Tropinin’s attempt to showcase an average woman tending to a very specific task with so much expertise that she’s calm and tranquil throughout the experience. It’s a primarily bright experience that she feels comfort in, with little dynamism about the process due to her ease with the task while she works on a project that the viewer doesn’t need to see to know it will be a success.

References
“The Lace-Maker.” (n.d.). Russian Art Gallery. Retrieved from http://russianartgallery.org/famous/tropinin_lacemaker.htm
“Vasilii Andreevich Tropinin: The Lace Maker.” (n.d.). Rollins College. Retrieved from https://myweb.rollins.edu/aboguslawski/Ruspaint/troplace.html
Fabric for Filling Empty Wall Spaces

Fabric for Filling Empty Wall Spaces

Not so long ago, I had a series of plaques that I’d earned hanging on my wall above my bookshelf. Since then, the bookshelf was moved for the sake of rearranging my bedroom, and those same plaques were then hanging to the right side of my bed with a big space of emptiness below them. Now, because I had a concern about those plaques falling off the wall and onto the bed during the calm of a night’s sleep, I took them off of the wall altogether. And now?

Now, I have an even bigger empty space—one that exists from the ceiling to my bed.

Now, I have an even bigger empty space—one that exists from the ceiling to my bed.

Now, I have an even bigger empty space—one that exists from the ceiling to my bed.

Yawn

That’s boring. Very, very boring. It’s like my bedroom is incomplete, and I will potentially feel frustration over this until it’s covered and decorated as fully as the rest of the area is. So because I have such a distaste for the blankness of the wall, my mind has been perusing the possibilities as to what specifically could go on this space to fix the issue and therefore give me a more relaxed mentality in regard to this wall that’s so close to the right side of my bed.

My original idea for fixing my wall-is-too-empty issue was to hang a Marvel poster beside my bed, even though I know by experience that having a poster fall on you in the middle of the night can be a frightening experience. Why? Well, call me a child, but I still appreciate a good poster (and certain Marvel movies). It’s an easy fix that won’t give me a concussion if it falls at night, and it’s a cheap one if I buy the right poster. But then I got to thinking…

You see, I recently cleared out some clothes from the dresser, and if you’ve learned one thing about me through reading my posts on this blog, it could be that I’m cheap and like to make use of what I already have for fabric. So since I did that dresser-clearing, I have material right in my bedroom that can be used to create something to go on this too-empty wall to my right.

So since I did that dresser-clearing, I have material right in my bedroom that can be used to create something

So since I did that dresser-clearing, I have material right in my bedroom that can be used to create something

But what would that something be? That became the question, and through internet browsing, I’ve come up with two options I’d like to share with you.

Let’s brainstorm

The first of these possibilities is to create a wall quilt to hang there, one that’s a combination of the pieces of fabric that were banished from the dresser. Since I adore patchwork quilts, this option could be accomplished by the simple process of using similarly sized pieces of fabric for each block to compose something that’s bright and vivid—and an interesting touch to my wall décor. As I’ve covered patchwork quilts a number of times already on the blog, I won’t go into too much detail about how to make one. Just know that it’s a prospect, and time and effort could lead to a one-of-kind wall hanging to fix my problem through this method.

Beyond that though, I noticed a particular quilt idea that sparked an idea that moves away from the actual quilt theme. It was from a quilt that depicted a flower garden, and it occurred to me that the overall scene could be applied away from the quilt setting. How? You’d just need to assemble the pieces of the quilt project in separate formations and hang them on your wall instead of sewing them to the quilt. For instance, you could take a marker (use a fabric-friendly writing utensil!) and trace the patterns of flowers, butterflies, clouds, the sun, a house… Whatever you feel is appropriate for the scene you’re trying to showcase. Simple rectangles could be used to create a fence, or a combination of fabric types could come together to create something as intricate as a rosebush. Just imagine a hole fabric-created garden scene placed right on your wall!

Take a marker (use a fabric-friendly writing utensil!) & trace the patterns of flowers, butterflies, clouds, the sun, a house…

Take a marker (use a fabric-friendly writing utensil!) & trace the patterns of flowers, butterflies, clouds, the sun, a house…

In fact, this idea could be embraced for more than just using your fabric to cover up an empty space on your wall. You could use your old fabric to create holiday scenes, for example, for a sentimental touch to your decorations. If you only have red and white, you could make candy canes. Only blue? How about snowflakes?! A series of fabrics? Get to work on a gingerbread house! These individual pieces could be tiny projects that of themselves are beautiful and worth showing off, but when you bring them together, their appeal increases—a lot!

Fabric for Filling Empty Wall Spaces

Don’t overlook the prospect of constructing these tiny projects that come together for a bigger work of art! It’s like a quilt, but without the actual quilt part—which is a pretty interesting twist to me!

Beach Towels for Sewing Projects

Beach Towels for Sewing Projects

Much like the aforementioned buttons on a previous Pete the Cat related post, trends can show up for a while and eventually become memories. As they’re in the mainstream of their field though, it can be fun to jump on board and partake in them! These trends can bring brand new concepts, images, and characters to life, or they can just offer a new twist on something that’s familiar and ordinary. Those familiar and ordinary details are the case for the trend that will be explored in this post: Beach Towel Sewing Projects.

When I first saw that this was actually a thing, I was perhaps a little interested, but maybe just as uncertain. I’m not even sure what would lead to this trend beyond a creative eye that’s often looking for new possibilities. Whatever the reason for the trend’s existence, you can find a number of projects that are beach-towel based through some online browsing time or the links given in this post.

I think this beach towel concept is such a unique option for sewing projects, and I guess that’s for two reasons. One, using extra beach towels for projects could be a wonderful way to get your creative mind going while clearing out your closet space. Two, the end results to these possible products are so fluffy that they draw my attention like a child going after a stuffed animal! Maybe you share that appreciation, and maybe you don’t! Still, these are good options for how to put no-longer-used (or brand new) towels to use for your sewing hobbies!

This quirky accessory could stand out on your next beach adventure.

This quirky accessory could stand out on your next beach adventure.

First on the list, how about a beach towel tote? This quirky accessory could stand out on your next beach adventure, and it would be large enough to hold your sunscreen, your Frisbee, your sunglasses, and whatever else you could fit into this decently-sized bag! You can use something plain-colored like what’s shown in the image, or you can choose a more dynamic print on the beach towel to increase its stand-out quality! The needed supplies are few, and the unique look of it could be worth your sewing time! Why not give it a try?

While they lack the larger size of a tote, these can still be spaces to hold some of your beach bring-alongs.

While they lack the larger size of a tote, these can still be spaces to hold some of your beach bring-alongs.

But, then, maybe you’re more of a backpack person? If so, no worries! You can make one of those using a beach towel as well! While they lack the larger size of the tote, these can still be spaces to hold some of your beach bring-alongs, like sunscreen and a book to read in the sun. And, obviously, the use of these products wouldn’t need to be limited to the beach. Anywhere that you might think to bring a purse, these could be options if it’s a setting you’re comfortable using it in. Considering the site says this project can be finished in less than 24 hours, it might be worth your time to give it a shot!

If you’re looking for an option that deals a bit less with the carry-stuff-along-with-me aspect, there are possibilities to explore in other categories as well—like stuffed animals! These toys are a wonderful fit for this beach towel option because of that fluffy quality I mentioned earlier. If you’re going to make a stuffed animal toy—maybe a dog—it makes sense that the dog has fur, right? I personally like this elephant idea, but it’s very possible that I never got over the spotted elephant on Rudolph! If you prefer a different animal to make into a toy, browse through your options and find the right colored beach towel to match the standard coloring of that animal—unless you really do want a spotted elephant or something as out of the ordinary!

An intriguing option for creative towels use.

An intriguing option for creative towels use.

There’s also the option of creating something from a beach towel for the sake of gift-giving, if towels are a part of a gift you have planned for someone. One such option that stuck out to me was a bridal shower cake. True, this might require something less bulky than a beach towel and wouldn’t necessarily help to clean out your closet, but it’s still an intriguing option for using towels in general for creative endeavors. This cake is a method of giving very typical housewarming gifts, like towels and other items, in a lovely and out-of-the-box manner. It’s unique and striking, and a way to show the gift recipient that you cared enough to craft something artistic with your gift just for the sake of presentation. A towel cake, after all, is more memorable than some towels and utensils waiting in a box or a gift bag!

This cake is a unique twist on giving very typical housewarming gifts.

This cake is a unique twist on giving very typical housewarming gifts.

For a beach trip, a random toy, or a bridal shower, there are interesting projects that can make use of towels! These are just a handful of them, but maybe they’ll get the ideas rolling in your head enough to spark your interest!

Magic Makers and Dreamers of Dreams

Magic Makers and Dreamers of Dreams

As the tailor in the costume department on a major network television show, I often am asked to do minor sewing repairs/favors for people in other departments. I mostly don’t mind, especially if the person who is actually in need of the favor comes to ask me in person. It’s usually small things like sewing on a button or repairing a seam that has split open. If I’m not too busy and the repair will take five to ten minutes, I’ll often go ahead and do it while they wait.

If the favor-seeker is a woman, they inevitably say something like, “I always wanted to learn how to sew,” or “My mom tried to teach me but I was never interested,” or “I wish I knew how to sew.”

You’re never too old to learn

I always want to ask why they didn’t, or why don’t they now and then. Sometimes, if I think about it too much, I become a bit sad as, once again, I realize that sewing really kind of is a dying art. Along with shop and industrial arts classes, sewing certainly isn’t taught anymore in most school systems. Many people view ‘maker’ type skills as not as prestigious or “smart” as careers in finance or marketing. There’s quite a bit of research on the subject and, also, apparently a “Maker Movement”. It seems maybe people are starting to realize how important and necessary building and making skills are and how much the world really does still need true craftspeople.

I’m fascinated by anyone who has practiced and honed their skills to the point of being able to create something beautiful and functional with just their hands. When it comes to making things out of fabric or wood or metal or whatever, the true magic is in watching the thing emerge from beneath your fingers.

The importance of guidance

Jorge, who was the man who taught me how to drape, always used to say, “Just cut away all the parts that aren’t a 1930s dress,” (or whatever it was I was endeavoring to make). I suppose it’s true that not everyone has the ability to see a 1930s dress in a pile of fabric: that’s what makes some drapers and pattern makers artists. But if you do have that ability, or the ability to see a three-dimensional object and know what it would look like as a two-dimensional pattern than you owe to yourself to develop that gift. Because it’s a rare thing indeed. Or if you know a young person who has expressed interest in sewing and making things, teach them and encourage them.

Sewing and patternmaking are incredible skills to have and you can make a very lucrative career out of them. When I met Christy Rilling years ago, she was working out of her tiny East Village apartment. Now, she has a full studio and a roster of talented tailors working for her. And she tailors Michelle Obama’s clothing.

Use your hands and make something

I ride my bike everywhere in the city, over all sorts of potholes and debris.

I ride my bike everywhere in the city, over all sorts of potholes and debris.

I wish more young people were interested in pursuing careers in things like furniture building, masonry, tailoring, and clock & watch repair though I do think that our schools systems are partially to blame for the lack of “interest”. The world is always in need of beautiful & unique things and the individuals who can make them. By beauty, I mean anything that is lovingly & expertly crafted – from a simple wood chair to an intricate mechanical pocket watch, to a bias cut dress that hugs the body it was made for just right to a hand built bicycle wheel.

Have you ever watched someone build a bicycle wheel? It’s kind of amazing. I recently had one built for my bike. When the wheel was done and on my bike, I was struck suddenly by the immense importance of that wheel to be well built. I mean, I ride my bike everywhere in the city, over all sorts of potholes and debris and I trust, completely without thinking, that that wheel will do its intended job and not suddenly crumple under the pressure. That’s a big trust when you really think about it.

I will say here that I do have a locally owned bike shop https://www.bicycleroots.com I always go to and my friend, who owns the shop, is the only one I’d trust to build me a wheel. Which brings me to my next point.

The most valuable commodity: People

Relationships and trust are key when it comes to building a business around your skill, sewing or otherwise. When it comes to sewing and patternmaking, your goal is most always to make a person look their very best. If you do that, they will come to realize the value in having something made or altered just for them and they’ll come back and they’ll also send their friends.

So encourage some aspiring maker today if you can and tell them it’s an extremely wonderful thing if they think they might want to do this making thing for a living someday. Because there’s always room for more magic makers in this world.

Sewing Myths and Sewing Myth Myths

Sewing Myths and Sewing Myth Myths

This week, I decided I’d write a bit about popular sewing myths. I have my own list but thought I’d do a quick Google search to see what others had written about the subject. This brought me to a few sewing myth lists that I found rather odd, and not at all myth-like – meaning I thought the myths were myths. Do you follow me?

I’m going to start with some things I do believe are myths, and then get the myth myths part.

Myth 1: quilting direction

It’s ok to quilt some rows up and some rows down when quilting a garment.

Not true. There will be less possibility of bubbling or puffing if you quilt all the rows in the same direction. Overall, the whole garment will look better.

Myth 2: smaller underlining

The underlining should be smaller than the fashion fabric, especially on a jacket.

Not always true. It really depends on the fabrics being used. Hair canvas should be slightly smaller to prevent buckling but it will also restrict the give or stretch of a fabric it is joined with. Many tailors cut their canvas on the bias to prevent this.

Myth 3: cutting selvage edge

Always cut off the selvage edge.

Not true. If you think the selvage will shrink, clip the edges so it will lie flat. Otherwise, there is no need to cut it off.

Myth 4: basting stitches

Stitch next to basting stitches when sewing a basted seam lines.

Not true. If you do have the need to baste seams together, always sew right on top of the basted lines for accuracy.

Myth 5: necklines

Machine stay stitch necklines to prevent stretching.

Another, more accurate way to prevent any stretching in your necklines (and arms eyes) is to leave a whole bunch of seam allowance until you’ve done your stay stitching.

Another, more accurate way to prevent any stretching in your necklines (and arms eyes) is to leave a whole bunch of seam allowance until you’ve done your stay stitching.

Not always true. You can also hand baste your seam line, also called thread tracing. If you do machine stitch your necklines, take special care not to stretch the fabric as you sew. Another, more accurate way to prevent any stretching in your necklines (and arms eyes) is to leave a whole bunch of seam allowance until you’ve done your stay stitching. When it comes to necklines, I usually cut a straight line from shoulder seam to shoulder, leaving all the extra fabric there. If I’m bias binding the neck edge, I attach my bias without trimming anything away too. This prevents any possibility of the neckline stretching.

Myth 6: top = waistline

The top of your pants or skirt is your waistline.

Very often not true. Your waistline is where your body is the smallest, most times an inch or so above your navel. This is why, often, when you measure a pair of pants that is sized as a 27, the waistband of the pants measures more than 27.

And now, for a few sewing myth myths.

Myth myth 1: $ewing cost too much

Sewing is too expensive.

This really depends on how you look at. Sewing is not necessarily expensive but it isn’t cheap either. Especially, most especially, if you are taking into account your time. I earn my living by sewing. And my years of experience and knowledge aren’t cheap. Sewing is a skill. I always ask people what they pay their car mechanic or plumber an hour. Often, it’s somewhere in the 60 to 100 dollar and hour range. If you don’t want to pay that amount of money, you figure out how to do it yourself. The same goes for sewing.

If you’re making something for yourself or as a gift out of love then it could possibly be cheaper than buying the same thing. But remember, nice high-end fabric and supplies are not cheap, nor should they be. If you want cheap, buy clothing made in Malaysia or Bangladesh sold at Old Navy or someplace like that.

Myth myth 2: sewing is the hardest

Sewing is too hard.

Well isn’t not exactly easy, either. To sew really well takes practice. I find it incredibly annoying when someone says something like, “It’s just an easy alteration, it won’t take long.” If you don’t sew, how do you know? And if you do sew, you should know that sometimes you open a thing up to do what should be an easy alteration and find you’ve just taken the lid off a proverbial can of worms.

Myth myth 3: sewing super powers

Sewers have special creative talents.

I believe everyone, if they put their mind to it, can learn how to sew. But saying that sewers (I actually hate that word) do not have special creative talent is ridiculous. I think I’ve said this before, but really good tailors and pattern makers know the language of fabric. I don’t know how else to put it. And that, is indeed, a special talent.

How to Store Your Fabric Scraps

How to Store Your Fabric Scraps

It only took me six months, but I finally organized my fabric scraps after our move.

It only took me six months, but I finally organized my fabric scraps after our move.

It only took me six months, but I finally organized my fabric scraps after our move to this new town and new house. When we made the move, I dumped my two huge bins of scraps into a few shopping bags and tucked them away until this glorious moment when they would not only be sorted, but have a place to reside.

Bits and pieces

Why should one keep & organize fabric scraps?

Why should one keep & organize fabric scraps?

Why should one keep and organize fabric scraps? Here are some reasons to consider.

  1. Fabric is expensive. Long sized strips, and smaller pieces can be reused for a vast amount of projects. The internet is a trove of fabric scrap project ideas.
  2. Out of sight, out of mind. The reverse of this is true as well. When you have your scraps visible, you are much more likely to use them and be aware of what you have available.
  3. Have a favorite color? It probably shows in the types of fabric you buy. Take a look at your pile of scraps and try to use up more of that color before you buy a few more yards.
  4. Many people cut their scraps to standard sizes. If you have a size of fabric you constantly seem to go to, make your life easier by making your own pre-cuts out of scraps.

Scrap bags

I ultimately made 9 bags of folded scraps.

I ultimately made 9 bags of folded scraps.

I ultimately made 9 bags of folded scraps. They included the following (from left to right):

  1. All of my precut Layer Cakes (10” x 10” squares)
  2. All of my other-sized precuts
  3. Pinks
  4. Whites
  5. Yellows, tans and oranges
  6. Greens, teals and aquas
  7. Blues and purples
  8. Heavy duty fabric scraps (canvas, Sunbrella, etc)
  9. Utility fabric scraps (batting, white out fabric, mesh, etc.)

One of these things is not like the others…

Bag #10 holds all of my selvage edges & very thin strips of fabric.

Bag #10 holds all of my selvage edges & very thin strips of fabric.

There is also a 10th bag (but it didn’t fit well in the group photo above). This holds all of my selvage edges and very thin strips of fabric. I have a huge wish list of projects to make from selvage edges. Perhaps I’ll write a post soon showing you the world of possibility with saving those thin strips!

A place of and for my own making

Welcome to my fabric corner.

Welcome to my fabric corner.

This is my fabric corner. The upper shelves hold my larger stash of fabrics, so pieces that are a fat quarter size or larger. The lower shelves hold my iron on top, and my fabric scraps in the bins below.

Dirty little secret: I just tuck larger pieces in wherever I find room.

Dirty little secret: I just tuck larger pieces in wherever I find room.

I’d love to tell you that I have my larger pieces organized in some kind of fancy way, but I really don’t. I just tuck them in wherever I find room.

Behold! A place for everything & everything in its place.

Behold! A place for everything & everything in its place.

Can you see how lovely the organization of these scraps is? The easy access and keeping them visible by my work space means I’m often including them in my daydreaming when it comes to new sewing projects.

Do you store your fabric scraps? If so, tell us where or how you do!

———————————————————————————–
Charlotte Kaufman is a writer and sewist in Mammoth Lakes, California. She specializes in marine and home interiors and continues to fall more and more in love with quilting. You can follow her at charlottekaufman.com.

DIY Ironing Board Ideas

I recently decided to upgrade my ironing station from two towels placed on top of my new DIY work station to something fancier. I went from this:

I recently decided to upgrade my ironing station from two towels placed on top of my new DIY work station to something fancier.

DIY work station.

To this:

Fancy, right?

Fancy, right?

Fancy, right? Before I made my own ironing station I did a little research. Here’s what I learned.

Be Creative

Images from left to right: BH&G, Hometalk, Crazy Mary Revista, Sew We Quilt.

Images from left to right: BH&G, Hometalk, Crazy Mary Revista, Sew We Quilt.

Images from left to right: BH&G, Hometalk, Crazy Mary Revista, Sew We Quilt

The sky is really the limit when planning where you want to iron. Do you want to be able to iron a lot of fabric at a time? Go big. Do you want to save space? Go between the studs or hang from the wall. Almost anything with a flat top can be converted into an ironing board.

Thing Long Term

Images from left to right: Flaming Toes, Stitchery Dickery Dock, A Diamond in the Stuff, A Crafty Fox.

Images from left to right: Flaming Toes, Stitchery Dickery Dock, A Diamond in the Stuff, A Crafty Fox.

Images from left to right: Flaming Toes, Stitchery Dickery Dock, A Diamond in the Stuff, A Crafty Fox

Will you want your ironing board to always be on display? Consider the fabric you choose and if it coordinates or clashes with the space you’ll be ironing in.

Consider the fabric you choose and if it coordinates or clashes with the space you’ll be ironing in.

Consider the fabric you choose and if it coordinates or clashes with the space you’ll be ironing in.

I made my cover removable. It snaps firmly into place on my work station, but I can slip it off in a moment if I want the whole space.

Be Resourceful

Want to save money? You can line your ironing board cover with many things. Try using old wool blankets, receiving blankets, towels, or the innards of your former ironing board covers. Layers of batting work as well. If you want to use Insul-Bright, make sure to include a layer of batting to absorb extra moisture.

Go Vintage

Images from left to right: Simply Pallets, Recyclart.org, The Rustic Pig.

Images from left to right: Simply Pallets, Recyclart.org, The Rustic Pig.

Images from left to right: Simply Pallets, Recyclart.org, The Rustic Pig

If you are retiring a vintage ironing board for a newer one, don’t let the old board go to waste.
Use it as a wine station, to store your thread, or for holiday decorations.

Have Fun!

Have you ever made a DIY ironing station? Tell us about it!

Have you ever made a DIY ironing station? Tell us about it!

Have you ever made a DIY ironing station? Tell us about it!

—————————–
Charlotte Kaufman is a writer and sewist in Mammoth Lakes, California. She specializes in marine and home interiors and continues to fall more and more in love with quilting. You can follow her at charlottekaufman.com.
Sew Fine Dress Making

Sew Fine

Need the perfect dress for an upcoming special event? Instead of perusing rack after rack of unimaginative, pricey finery consider making it yourself. Not only will you get exactly what you’re looking for, it’s a sure thing that no one else will be wearing the same dress as you.

Points for Originality

Even if you’re not a someone who designs her own patterns, making and wearing your own dress will definitely get you noticed. You’ll look stunning and you’ll be wearing something completely unique. In this day and age when everyone wants to be recognized for their personality and individual contributions, you’ll certainly earn points for wearing something stunning that you made yourself.

Your Choice

Rather than trying to find something that shows off your style, fits your budget and looks great on you from the limited selections in department store – making a dress yourself means you’ll be able to choose the style, fit and fabric that’s best for you. Show off your natural beauty with a dress that accents your coloring and body type.

Works for Formal Functions Too

Formal events like galas or weddings may not seem like that best opportunity to make your own dress, but it’s actually a great time to do so. Making a more formal dress may take a bit longer, but the results will amaze everyone. If you’ve never taken on something like this, trust me, it’s not as hard as you think!

There are some extra steps like creating the tulle under layer(s), feeding the whale bone (plastic) bodice pieces and/or adding lace or other details. Although these seem intimidating, anyone with basic sewing skills can do them – you just have to be willing to try.

Show It Off

Show It OffAfter all the hard work you put in to making your amazing dress, show it off at the big event. Get up, dance, strut your stuff to and from the buffet table, and when people start complimenting you on your attire, don’t be afraid to say you made it. Although you don’t want to overshadow the guest of honor (unless it’s you, of course) there’s nothing wrong with showing off your finery.

If you can, add some handmade accessories to complete the look. Items like hand made, one-of-a-kind jewelry, scarves or shawls will give your dress the final splash and pizazz it needs. If you don’t make any of these items yourself, maybe you’ve got some crafty friends who do and would like to contribute to your amazing look.

Remember

A few points to remember:

  1. Hem with shoes in mind. If you’re wearing heals to the big event, make sure you have those shoes on when determining hem length so the dress will fall correctly.
  2. Event location. If the event is going to be indoors or outdoors, you may need incorporate layers or a cover up depending on the time of year and your sensitivity to cold/heat.
  3. Make a muslin first. If you’re at all unsure about the dress you’re going to make – how well it’ll fit or will look on you – take the time to make a muslin demo piece first. It does extend the length of time it takes you to arrive at the finished product, but it can also mean the difference between a project you love and one you don’t.

Blending Interests with Hobbies

Last time, I wrote about the art bug biting, and I’d like to continue with that theme this week. Why? Because when he does bite, it’s relevant to uncover what form of the virus you were infected with, and any particular interest you can bring into that hobby or artistic area.

Everyone isn’t involved with every artistic pursuit just because he or she was bitten by said art bug. Whereas one person might be a wonderful painter, another might excel at photography. One person who is awesome at sketching might be terrible at music, while a musician might not be able to draw a believable landscape. For this post, I’ll refer to this as the Artistic Division of Labor, or ADOL. Sound good? Okay!

ADOL can be driven by skill, in that someone might simply have a talent for a specific division. Maybe someone has been good at sculpting since his or her Play-Doh years, and that skill has grown in the years that followed. If such is the case, it wouldn’t be too surprising to find that said person was well-known among family and friends for that ability.

In other situations, eventual interest might lead to artistic pursuits, and that interest might be something a person has to explore to define. If that doesn’t make sense, hang on! I’m about to give you a real-world example—from my own life!

The inspirational snowball bush. So many flowers!

The inspirational snowball bush. So many flowers!

I remember picking flowers when I was younger, though they were admittedly mostly (if not completely) wildflowers. As far as actual gardening goes, one or two of the adults close to me at the time had some kind of flowers planted in a more deliberate fashion than renegade weeds springing up. Even now, my mom has this snowball bush in her front yard, which is flower-ish enough to make this post, and pretty enough when it’s in-bloom to catch my interest. Either way—whether wild or chosen—flowers were a part of my childhood, and I decided I was going to try my hand at flower gardening not too long ago. I got flowers from a store, planted them, watered them, and let them grow. And they were doing okay!

But I eventually realized I wasn’t interested enough in the gardening prospect to tend to it as much as a garden should ideally be cared for. Honestly, I don’t know that I watered the flowers at all after that initial amount, and there was little to no chance I was going to trim weeds away from them. At some point, I was told the weeds around them were moving—something that could be bad when you live in territory that has copperheads and rattlesnakes—so goodbye, flowers.

So far, what this situation amounts to is that I had a childhood interest that became an artsy pursuit I actually had the ability to see through, but didn’t have the focus to continue. The result of this predicament might seem simple: I could just give up on my flower-interest and try other ideas for artistic endeavors. The trouble though is that I still like flowers, even if I don’t have the desire to keep a garden healthy and catered to.

A possible solution then would be more along the lines of what I said earlier in this post. I could explore the topic to see if there was any flower-related ADOL that could hold my interest.

As I said in last week’s post, I tried my hand at floral arranging, and that was a fairly decent win for me. Overall, it was an ADOL I was kind of okay at, and one that could hold my interest enough to keep me involved with it. The idea has led into constructing floral arrangements for display outside of the house, as well as around-the-house projects that catch my eye. For instance, a broken down lamp could potentially use a little prettying up!

Is that a busted lamp? Or a new vase...

Is that a busted lamp? Or a new vase…

But that’s a pretty specific category, and if flowers are a particular interest of mine, that idea could surface in an ADOL that isn’t specifically built around floral arrangements and gardening. And they have! In fact, flowers have become a part of two of my primary ADOL pursuits: writing, and sewing/quilting. With writing, more than one set of lyrics I’ve written has incorporated flower and/or garden themes, including a song that a character of mine sings to his girl in Emblazed.

More than one set of lyrics I’ve written has incorporated flower and/or garden themes.

More than one set of lyrics I’ve written has incorporated flower and/or garden themes.

More importantly for this blog, floral options are available in sewing/quilting patterns, and of course there’s a number of fabrics that a person can buy with floral designs—which is okay with me! In fact, my current quilting project has had a floral arrangement design to it, in that every piece that’s been sewn on it so far has been a pattern that has some form of floral quality to it. The overall design, when all is said and done, will be floral-related from top to bottom (minus a potential border and back-overlap).

My current quilting project has had a floral arrangement design to it.

My current quilting project has had a floral arrangement design to it.

All in all, I may not have had the focus or interest to keep a flower garden going, but the world of art is so vast that there are plenty of ADOLs out there to try, and enough room to explore within each to come up with ways to utilize interests that maybe weren’t committed enough to make into their own hobbies.

Bottom line: If you’ve been bitten by the art bug, explore to find your ADOLs, and you can find ways to bring your interests into those ADOLs — even if they seem more fitting for another. For the flower-admirer who doesn’t garden, paint pictures! Make floral quilts! Do floral arrangements! Sculpt a flower! There are options to blend your interests into your art, if you look for them!